
 pin it
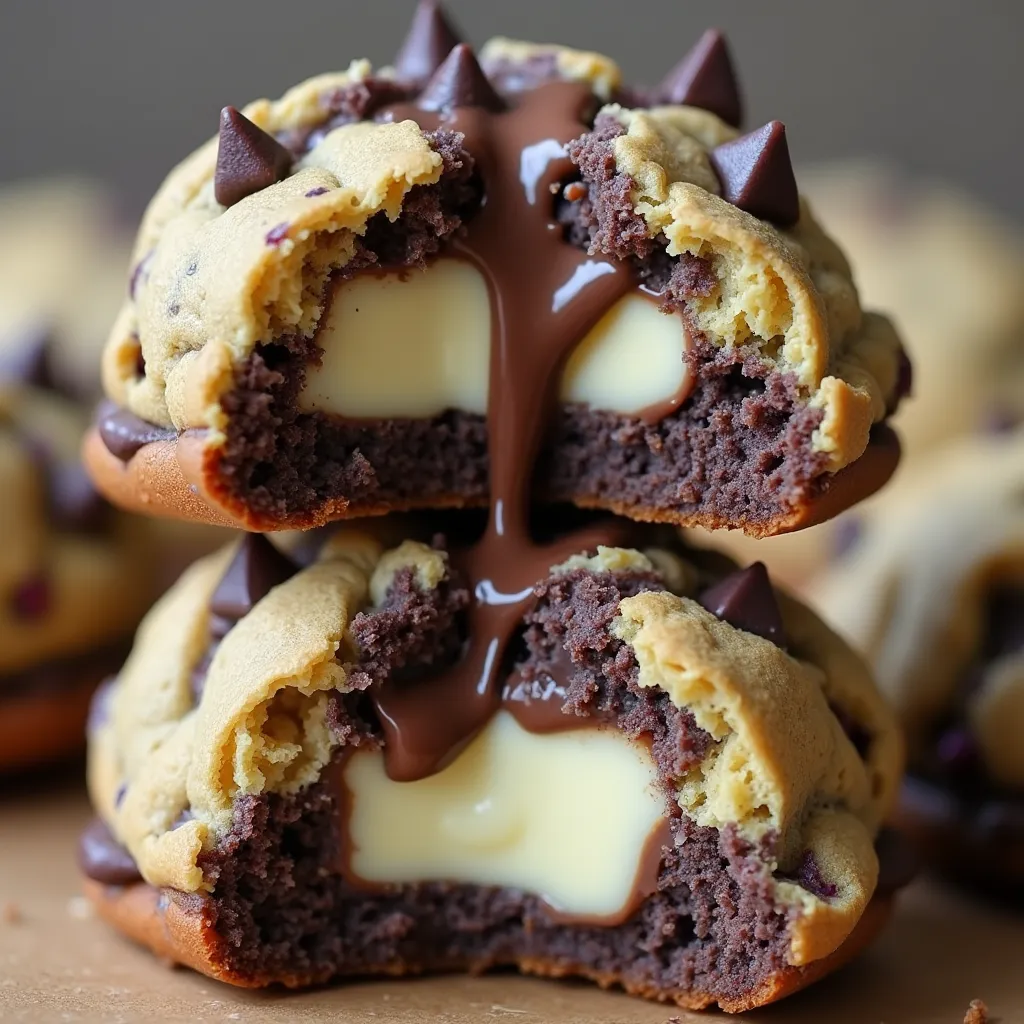
I first encountered these magnificent brownie stuffed cookies at a friend's baking competition where they won first place, and for good reason! The moment I bit into one, I was hooked by the perfect contrast between the fudgy brownie base and the soft cookie exterior. The genius addition of a creamy white chocolate center takes them to another level entirely. After begging for the recipe, I started making them for special occasions, though they quickly became a regular weekend treat in our home. I love watching people's faces when they first break one open and see all those perfect layers. There's something magical about how the textures complement each other – the slight chew of the brownie, the melt-in-your-mouth filling, and the classic cookie exterior studded with chocolate chips.
Why I love this recipe
I absolutely adore this recipe because it combines three of my favorite desserts into one incredible cookie! The brownie base provides that rich chocolate foundation that's impossible to resist, while the cream filling adds a surprising luxurious element that makes these cookies special. The chocolate chip cookie dough wrapper brings that familiar comfort that everyone loves. What I appreciate most is the versatility – you can make components ahead of time, customize the fillings, or even make mini versions for parties. They're perfect for gifting because they maintain their texture for days and always impress. The recipe might seem complex at first glance, but it breaks down into simple components that come together beautifully. Every time I make these, I feel like a pastry chef creating something truly spectacular without needing professional training. They're the perfect example of how home baking can be elevated with just a few clever techniques and quality ingredients.
What You Need From Your Kitchen
- Brownie mix: Creates the fudgy chocolate base layer
- White chocolate: Forms the creamy filling center when mixed with heavy cream
- All-purpose flour: Provides structure for the cookie dough exterior
- Unsalted butter: Adds richness and helps create the perfect cookie texture
- Brown sugar: Gives cookies a deeper flavor and chewy texture
- Chocolate chips: Add texture and extra chocolate flavor throughout the cookie
- Heavy cream: Creates a ganache-like consistency when mixed with white chocolate
Let's Make These Together
- Prepare the components
- Start by baking the brownie layer according to package directions, being careful not to overbake. While that's cooling, make your white chocolate filling by heating heavy cream and pouring it over chopped white chocolate, then refrigerate until it reaches a spreadable consistency. Finally, prepare your cookie dough by creaming butter and sugars, adding egg and vanilla, then mixing in dry ingredients and chocolate chips.
- Assembly time
- Once all components are ready, flatten a portion of cookie dough, place a brownie square on top, add white chocolate filling, then cover with another piece of cookie dough. Seal the edges carefully and add extra chocolate chips on top for decoration. Chill the assembled cookies before baking to help them maintain their shape.
- Bake to perfection
- Bake in a preheated oven until the cookie exterior is golden around the edges but still soft in the middle. This ensures your brownie layer stays fudgy and the white chocolate center remains creamy. Let them cool for a few minutes on the baking sheet before transferring to a wire rack.
- Add the finishing touch
- After the cookies have cooled completely, drizzle them with melted chocolate for that professional bakery look. This final touch adds another layer of chocolate flavor and makes them absolutely irresistible. Let the drizzle set before serving or storing.
 pin it
Switch Things Up
The first time I made these cookies, I was trying to use up leftover brownies from a family gathering. I had this crazy idea to stuff them inside cookie dough, and on a whim, I added some white chocolate ganache between the layers. What started as a kitchen experiment quickly became my most requested dessert! I've since refined the recipe, finding that slightly underbaking the brownies keeps them fudgy when assembled. Sometimes I'll switch up the filling with peanut butter ganache or add crushed nuts to the cookie dough for extra texture.
Perfect Pairings
These Brownie Stuffed Cookies pair wonderfully with a cold glass of milk or a scoop of vanilla ice cream for an over-the-top dessert experience. For a cozy evening treat, serve them slightly warmed alongside a cup of hot coffee or rich hot chocolate. The slight bitterness of coffee beautifully complements the sweetness of these decadent cookies. For an elegant dessert plating, serve with a small drizzle of raspberry coulis on the side to cut through the richness with a touch of fruity acidity.
 pin it
Frequently Asked Questions
- → Can I make these cookies ahead of time?
Yes! You can prepare the components separately up to 2 days in advance. Store the baked brownies in the refrigerator, the white chocolate filling in an airtight container, and the cookie dough wrapped in plastic. Assemble and bake when ready to serve. You can also freeze the assembled unbaked cookies for up to 1 month - just add 2-3 minutes to the baking time.
- → Why is my white chocolate filling too runny?
This usually happens if the cream was too hot when added to the white chocolate or if the mixture wasn't chilled long enough. Make sure to let the filling chill in the refrigerator until it reaches a spreadable consistency, usually 30-45 minutes. If it's still too runny, you can add a little more melted white chocolate to thicken it.
- → Can I use box mix for the cookie dough too?
While you could use a premade cookie dough, homemade dough is recommended for these cookies as it's easier to work with for assembly and will give the best texture. If you do use premade dough, let it come to room temperature before trying to flatten and shape it.
- → How do I prevent the filling from leaking out during baking?
Make sure to properly seal the edges of the cookie dough around the filling, pressing firmly to create a complete seal. Additionally, chilling the assembled cookies for 15-20 minutes before baking helps maintain their structure and prevents leakage.
- → Can I use dark chocolate instead of white chocolate for the filling?
Absolutely! You can substitute any type of chocolate for the filling. Dark chocolate will create a more intense chocolate experience, while milk chocolate will offer a sweeter, creamier center. The process remains the same - just heat cream and pour over your chosen chocolate.
Conclusion
These Brownie Stuffed Cookies are the ultimate indulgence for any chocolate lover. The combination of fudgy brownie, creamy white chocolate filling, and classic cookie dough creates an explosion of flavors and textures in every bite. The chocolate drizzle adds that perfect finishing touch that makes these treats absolutely irresistible. Whether for a special occasion or just to satisfy your sweet tooth, these cookies are guaranteed to impress.