
 pin it
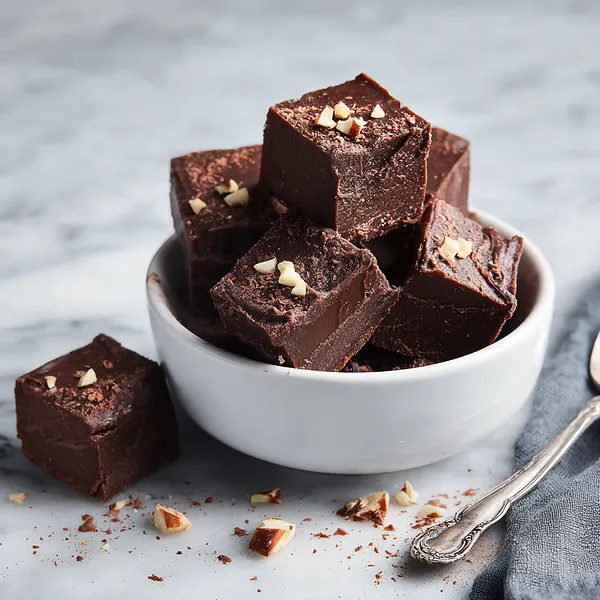
I remember the first time I decided to make this fudge myself, armed with Mrs. Henderson's blessing and Paula Deen's recipe card. I was skeptical that anything this simple could taste so incredible. I gathered my ingredients on a lazy Saturday afternoon, lined my pan with parchment paper, and got to work. The moment I melted the chocolate chips with the sweetened condensed milk and butter, watching them transform into this glossy, luxurious mixture, I knew I was onto something special. Adding the vanilla sent the most incredible aroma through my kitchen – that pure, sweet scent of real chocolate mixed with butter and cream. When I stirred in the walnuts, hearing them crackle against the smooth chocolate, I felt like a real confectioner. The hardest part was waiting for it to set in the refrigerator, checking on it every 30 minutes like an impatient child. When I finally cut into it and saw those perfect, clean edges and the beautiful contrast of chocolate and nuts, I felt such pride. That first bite confirmed what I'd hoped – it was exactly like Mrs. Henderson's, maybe even better because I'd made it myself. The texture was incredibly smooth, almost like ganache, but with that perfect fudge firmness that lets it hold its shape. Now, years later, I've made this recipe hundreds of times, and it never fails to impress. It's my go-to recipe when I need something quick but want to look like I spent hours in the kitchen. The beauty is in its simplicity – no complicated candy-making techniques, no precise temperature monitoring, just pure, delicious chocolate magic that happens in minutes.
Why I love this recipe
What I love most about this recipe is how it democratizes the art of candy-making. You don't need to be a pastry chef or have fancy equipment to create something that looks and tastes utterly professional. It's empowering to know that in just five minutes of active work, I can create something that brings so much joy to people. I love how versatile it is – I've made it with dark chocolate for a more sophisticated flavor, added sea salt for a trendy salted chocolate version, thrown in dried cranberries for a festive twist, and even swirled in some peanut butter for my husband who's obsessed with that combination. I love that it's a recipe I can make with my nieces and nephews, teaching them that homemade treats don't have to be complicated. Watching their faces light up when they realize they actually made real fudge is priceless. I love the reliability of this recipe – it works every single time, no matter the weather, humidity, or phase of the moon. There's something deeply satisfying about cutting into a pan of perfectly set fudge, seeing those clean lines and knowing that each piece will taste exactly right. I love that it's become part of my family's traditions – Christmas isn't Christmas without my fudge boxes, and summer barbecues always end with this chocolate treat. Most of all, I love how this simple recipe connects me to that sweet lady at the church bake sale, to Paula Deen's Southern cooking legacy, and to everyone who's ever enjoyed a piece of my fudge and asked for the recipe.
What You Need From Your Kitchen
- Semi-sweet chocolate chips: The foundation of the fudge, providing rich chocolate flavor and smooth texture when melted
- Sweetened condensed milk: Creates the creamy, sweet base that gives fudge its signature texture and helps it set properly
- Unsalted butter: Adds richness and helps create that glossy, professional finish on the fudge surface
- Pure vanilla extract: Enhances the chocolate flavor and adds depth and warmth to the overall taste
- Chopped walnuts: Provide a delightful crunchy texture contrast to the smooth, creamy chocolate fudge
Let's Make These Together
- Prepare Your Workspace
- Start by gathering all your ingredients and equipment before you begin. Line your 8x8 inch baking pan with parchment paper, making sure to leave enough overhang on two sides so you can easily lift the fudge out later. Give the parchment a light coating of butter or cooking spray. Having everything ready means you can work quickly once the chocolate starts melting, ensuring the smoothest possible texture in your finished fudge.
- Create the Chocolate Base
- Place your saucepan on the stove over low heat and add the chocolate chips, sweetened condensed milk, butter, and a pinch of salt. The key here is patience and constant stirring. Watch as the chocolate chips slowly soften and melt into the milk, creating this beautiful, glossy river of chocolate. Keep stirring gently but continuously, making sure nothing sticks to the bottom of the pan. The mixture will gradually become completely smooth and homogeneous, with a luxurious sheen that tells you it's ready. This process takes about 3-4 minutes, and you'll know it's done when you can't see any lumps of chocolate remaining.
- Add the Final Touches
- Once your chocolate mixture is perfectly smooth, remove it from the heat immediately. This is important because you don't want to overcook it. Quickly stir in your vanilla extract – you'll notice an immediate boost in aroma as the vanilla mingles with the warm chocolate. Then fold in your chopped walnuts, making sure they're distributed evenly throughout the mixture. Work relatively quickly at this stage because the fudge will start to set as it cools.
- Set and Finish
- Pour the fudge mixture into your prepared pan, using your rubber spatula to guide it into all the corners and smooth the top surface. Take a moment to make it as even as possible – this will give you those beautiful, professional-looking squares later. Give the pan a few gentle taps on the counter to release any trapped air bubbles. Then into the refrigerator it goes for at least 2 hours, though I prefer to leave it overnight for the firmest texture. When you're ready to cut it, lift the whole block out using the parchment paper, place it on a cutting board, and use a sharp knife to cut into squares. Wipe the knife between cuts for the cleanest edges. Now you have perfect, gift-worthy fudge squares that look like they came from a fancy chocolate shop!
 pin it
Switch Things Up
I'll never forget the first time I tasted this fudge at a church bake sale in Georgia. An elderly lady named Mrs. Henderson was selling squares wrapped in wax paper, and I bought three pieces on a whim. That first bite completely changed my understanding of what fudge could be – so smooth it practically dissolved on my tongue, with just enough crunch from the walnuts to keep things interesting. I tracked her down the next week and practically begged for the recipe. She smiled knowingly and told me it was Paula Deen's famous recipe that she'd been making for decades. Now I make it every Christmas, and I've added my own twist by sometimes using pecans instead of walnuts, or adding a swirl of peanut butter for variety. The beauty of this recipe is its versatility – you can add dried cherries, use dark chocolate chips, or even throw in some crushed peppermint during the holidays. Last Thanksgiving, I made four batches in different flavors and packaged them in little gift boxes for neighbors. The response was so overwhelming that I ended up making two more batches! It's become my signature contribution to every potluck and gathering.
Perfect Pairings
This rich, creamy fudge pairs beautifully with a variety of beverages and accompaniments. Serve it alongside a robust cup of freshly brewed coffee or espresso to cut through the sweetness and enhance the chocolate notes. For an evening treat, pair it with a glass of port wine or a rich red wine like Cabernet Sauvignon – the tannins complement the chocolate perfectly. If you're hosting a dessert board, arrange the fudge pieces alongside fresh raspberries, strawberries, and orange segments for a lovely contrast of flavors. The fudge also goes wonderfully with vanilla ice cream for an indulgent sundae, or crumbled over warm brownies for a double chocolate experience. During the holidays, serve it with spiced apple cider or hot chocolate for a cozy winter treat. For a sophisticated presentation, pair with aged cheese like sharp cheddar or blue cheese – the savory-sweet combination is surprisingly delightful.
 pin it
Frequently Asked Questions
- → Can I make this fudge without nuts?
Absolutely! Simply omit the walnuts from the recipe. The fudge will still set perfectly and taste incredibly creamy and delicious. Some people prefer nut-free fudge, and it works beautifully. You can also substitute the walnuts with other add-ins like mini marshmallows, dried fruit, or crushed cookies if you want to add texture without using nuts.
- → Why didn't my fudge set properly?
If your fudge is too soft, it's usually because the mixture wasn't heated enough to properly combine, or it needs more chilling time. Make sure you melt the chocolate mixture over low heat until it's completely smooth and well combined. Also, give it adequate time in the refrigerator – at least 2-3 hours, preferably longer. If it's still soft after extended chilling, you can try placing it in the freezer for 30 minutes to help it firm up.
- → Can I use milk chocolate instead of semi-sweet chocolate chips?
Yes, you can use milk chocolate chips if you prefer a sweeter, milder chocolate flavor. Keep in mind that the fudge will be considerably sweeter since milk chocolate has more sugar than semi-sweet. You can also do a combination of half milk chocolate and half semi-sweet for a balanced flavor. Dark chocolate chips work wonderfully too if you prefer a more intense, less sweet chocolate experience.
- → How should I store the fudge and how long will it last?
Store your fudge in an airtight container with parchment paper between layers to prevent sticking. At room temperature, it will keep for up to 1 week. In the refrigerator, it stays fresh for up to 2 weeks. For longer storage, you can freeze the fudge for up to 3 months – just wrap individual pieces in wax paper, place them in a freezer bag, and thaw at room temperature when you're ready to enjoy. The texture remains excellent after freezing.
- → Can I double this recipe?
Yes! This recipe doubles beautifully. Just use a 9x13 inch pan instead of an 8x8 inch pan, and follow the same instructions. You may need to stir for an extra minute or two when melting the larger quantity of chocolate. The setting time will remain about the same. Doubling the recipe is perfect for holidays, parties, or when you need to make gifts for multiple people.
- → What can I do if my fudge turned out grainy?
Grainy fudge usually results from overheating or cooking the mixture at too high a temperature. The key is to use low heat and stir constantly. If your fudge does turn grainy, you can try remelting it gently with a tablespoon or two of cream, stirring until smooth, then rechilling. For future batches, keep the heat low and be patient during the melting process. Using fresh, quality chocolate chips also helps ensure a smooth texture.
Conclusion
This 5-Minute Fudge is truly a game-changer for anyone who loves homemade treats but doesn't have hours to spend in the kitchen. The combination of rich chocolate, creamy sweetened condensed milk, and crunchy walnuts creates a confection that rivals any fancy chocolate shop creation. What makes this recipe so special is its foolproof nature – even if you've never made candy before, you'll achieve perfect results every time. The fudge sets beautifully, cuts cleanly, and has that professional appearance that makes it perfect for gifting during holidays or special occasions. Store it in an airtight container and it'll stay fresh for up to two weeks, though I doubt it'll last that long once people taste it!