
 pin it
I discovered this artisan pizza dough recipe during a trip to Naples, where I watched a pizzaiolo work his magic. The way he handled the dough with such confidence inspired me to recreate that experience at home. This recipe captures everything I love about authentic Italian pizza – the dough is soft and pliable when you're working with it, but transforms into something spectacular in the oven. The key is patience; letting the dough rise slowly develops those complex flavors you just can't rush. I remember my first attempt was a bit rough around the edges, but even that imperfect pizza tasted better than anything I'd ordered. Over time, I've perfected my technique, learning exactly how thin to stretch the dough and when it's perfectly risen. The satisfaction of creating something this delicious from such simple ingredients – flour, water, yeast, salt – never gets old. Each time I make it, I'm transported back to those narrow Naples streets where pizza-making is an art form. This isn't just a recipe; it's a connection to centuries of Italian culinary tradition, now happening right in my own kitchen.
Why I love this recipe
There's something deeply satisfying about making pizza dough from scratch that pre-made versions just can't match. I love how versatile this recipe is – you can customize it with different toppings, adjust the thickness, or even stuff the crust with cheese. The aroma of fresh dough rising is one of my favorite kitchen smells; it makes my whole house feel warm and inviting. What really wins me over is how this recipe brings people together. Friends and family gather in the kitchen, everyone gets involved stretching dough and choosing toppings, and suddenly you're not just making dinner, you're creating memories. The dough is forgiving too – even if you're a beginner, you'll get great results. I appreciate that it uses simple, everyday ingredients that I always have on hand. The texture is absolutely perfect: crispy edges, slightly chewy center, and those beautiful air bubbles in the crust that mark authentic artisan pizza. Plus, making pizza at home is so much more economical than ordering out, and honestly, it tastes better. Every time I bite into a slice and taste that fresh-baked, slightly yeasty flavor with melted cheese and bright basil, I feel like a professional chef.
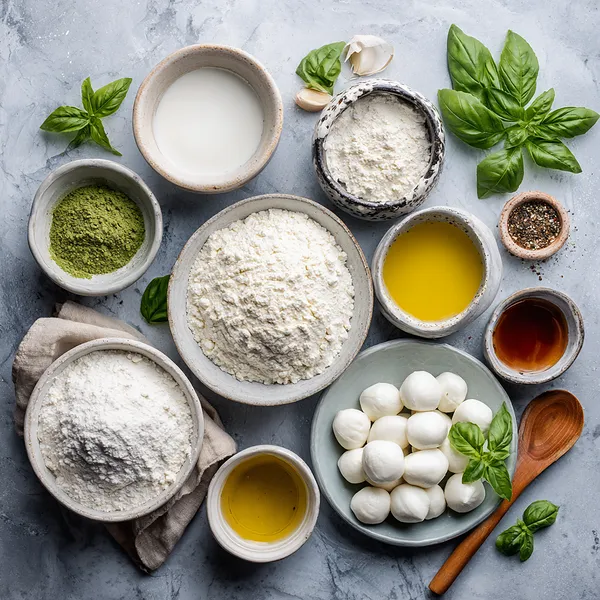
What You Need From Your Kitchen
- All-purpose flour: Forms the base of the dough; sift before using for lighter texture
- Active dry yeast: Check expiration date and activate in warm water to ensure it's working properly
- Fresh mozzarella: Tear into pieces and pat dry with paper towels to avoid excess moisture on pizza
- Pizza sauce: Use store-bought or make your own with crushed tomatoes, garlic, and Italian herbs
- Fresh basil: Wash and dry leaves thoroughly; add after baking for bright, fresh flavor
- Olive oil: Use extra virgin for best flavor in both dough and finishing drizzle
- Parmesan cheese: Freshly grate for optimal flavor and texture
Let's Make These Together
- Activate the yeast properly
- Begin by warming your water to the right temperature – it should feel like a warm bath, not hot. Combine it with sugar and yeast in a small bowl, then wait patiently for those telltale bubbles that signal your yeast is alive and ready. This step is crucial because active yeast is what gives your dough that beautiful rise and complex flavor.
- Mix and knead with care
- When combining your ingredients, start with a wooden spoon and don't worry if the dough looks rough at first. Once you start kneading, you'll feel the dough transform under your hands – it goes from shaggy to smooth and elastic. This kneading process develops the gluten strands that give pizza dough its characteristic chew. Take your time with this step; it's therapeutic and essential for great results.
- Allow proper rising time
- Patience is truly a virtue when it comes to pizza dough. Find a warm, draft-free spot in your kitchen and let that dough double in size. You can place it near a sunny window or even inside your oven with just the light on. This rising period is when the yeast works its magic, creating air pockets and developing those complex, slightly tangy flavors that make homemade pizza special.
- Shape with confidence
- When it's time to shape your dough, resist the urge to use a rolling pin – your hands are the best tool. Start from the center and gently press and stretch outward, rotating as you go. Don't worry about making a perfect circle; rustic shapes have their own charm. Leave those edges a bit thicker – they'll puff up beautifully in the oven, creating that classic pizza crust we all love.
- Top thoughtfully and bake hot
- Less is definitely more when it comes to pizza toppings. Start with a thin layer of sauce, add your cheese strategically, and remember that a crowded pizza won't cook properly. Your oven should be screaming hot – this high heat is what creates those beautiful charred spots on the crust and makes the cheese bubble and brown perfectly. When you pull that golden, aromatic pizza from the oven and add those final fresh basil leaves, you'll know all your effort was worth it.
 pin it
Switch Things Up
I'll never forget the first time I decided to make pizza dough from scratch instead of buying the pre-made stuff. It was a rainy Saturday afternoon, and I was craving that authentic pizzeria taste. I mixed the dough, let it rise while I caught up on my favorite show, and when I finally stretched it out and saw how beautifully it held together, I was hooked. The smell of fresh yeast and olive oil filling my kitchen was incredible. When I pulled that first pizza out of the oven – golden, bubbling, perfect – I literally did a happy dance. My partner walked in, took one bite, and said we were never ordering delivery again. Now it's become our Saturday ritual: I make the dough in the morning, we prep toppings together, and by evening we're enjoying the best pizza we've ever had. Sometimes I'll make extra dough and freeze it for busy weeknights. Pro tip: if you have a pizza stone, use it! It makes such a difference in getting that crispy bottom crust.
Perfect Pairings
This artisan pizza pairs beautifully with a crisp Caesar salad dressed with tangy lemon and parmesan. For drinks, try a light Italian red wine like Chianti or Pinot Grigio for white wine lovers. If you're serving a crowd, start with bruschetta or caprese skewers as appetizers. Garlic knots made from extra dough are always a hit. For dessert, keep it simple with tiramisu or gelato to maintain that Italian theme. On casual nights, pair it with a cold craft beer or homemade lemonade for the kids.
 pin it
Frequently Asked Questions
- → Can I make the dough ahead of time?
Absolutely! Pizza dough actually improves with time. You can make it up to 3 days in advance and store it in the refrigerator in an oiled, covered bowl. The slow fermentation in the fridge develops even more flavor. Just remember to bring it to room temperature (about 30-60 minutes) before shaping. You can also freeze the dough for up to 3 months – just thaw it overnight in the refrigerator before using.
- → Why is my pizza dough not rising?
The most common culprit is inactive yeast. Check your yeast's expiration date and make sure your water temperature is correct – too hot (over 120°F) will kill the yeast, while too cold won't activate it. The water should feel warm but not hot to the touch. Also ensure your rising location is warm enough; cold kitchens can slow down or prevent rising. If your kitchen is cool, try placing the dough in the oven with just the light on.
- → How do I get a crispy crust?
Several factors contribute to a crispy crust: First, preheat your oven to the highest temperature (usually 475-500°F) and if you have a pizza stone, heat it for at least 30 minutes. Don't overload your pizza with sauce and toppings, as excess moisture makes the crust soggy. You can also brush the edges with olive oil before baking, and consider par-baking the crust for 3-4 minutes before adding toppings. Finally, make sure your dough is stretched thin enough – thick dough won't crisp up properly.
- → Can I make this dough without a stand mixer?
Yes, definitely! This recipe is designed to be made by hand. Mixing and kneading by hand actually gives you better control and helps you develop a feel for the dough's texture. It takes about 8-10 minutes of kneading, which is great exercise and quite therapeutic. The dough is ready when it's smooth, elastic, and springs back when poked. Making pizza dough by hand is traditional and very satisfying.
- → What can I do if my dough is too sticky?
Sticky dough is common and easily fixable. Add flour one tablespoon at a time while kneading, giving the dough a chance to absorb it before adding more. However, be careful not to add too much flour, as this can make your dough tough. A slightly tacky dough is actually ideal – it should feel soft and supple, not completely dry. You can also lightly oil your hands while kneading to prevent sticking without adding extra flour.
- → Can I use this dough for other recipes?
Absolutely! This versatile dough works wonderfully for calzones, breadsticks, garlic knots, and focaccia. You can also use it to make stromboli or pizza rolls. For breadsticks, roll the dough into strips, brush with garlic butter, and bake until golden. For calzones, fill half of a dough circle with your favorite pizza toppings, fold over, seal the edges, and bake. The possibilities are endless!
Conclusion
This artisan pizza dough recipe brings the authentic taste of Italian pizzeria right to your home kitchen. The secret lies in the slow fermentation process that develops complex flavors and creates that perfect airy texture. Whether you're hosting a casual dinner party or treating your family to a special homemade meal, this pizza never disappoints. The combination of crispy crust, melted mozzarella, and fresh basil creates a symphony of flavors that will have everyone asking for seconds. Once you master this dough, you'll find yourself experimenting with different toppings and creating your own signature pizzas.