
 pin it
I'll never forget my first encounter with truly crispy baked zucchini chips at a farm-to-table restaurant in California. I was amazed that something so simple could be so incredibly satisfying and flavorful. The chef explained that the secret was in the double coating technique and high-heat baking, which creates that golden, crunchy exterior while keeping the zucchini tender inside. When I returned home, I became obsessed with recreating that experience in my own kitchen. After countless experiments with different breadcrumb ratios, temperatures, and coating methods, I finally achieved that perfect balance of crispy exterior and tender interior. This recipe represents all those lessons learned. The parmesan adds a savory, umami depth that elevates these from simple veggie chips to something truly special. Every time I make them, I'm transported back to that sunny California afternoon, but now I can enjoy them whenever the craving strikes.
Why I love this recipe
What I love most about this recipe is how it transforms a humble vegetable into something that feels truly indulgent without any guilt. Zucchini is so mild and versatile, and this preparation lets it shine while adding incredible texture and flavor. The fact that these are baked rather than fried means I can enjoy them regularly without feeling like I'm derailing my health goals. I also love how this recipe has become a gateway for getting my family to eat more vegetables – even the pickiest eaters can't resist that golden, crispy coating. The prep work is minimal, and while they do take some time in the oven, it's completely hands-off time that I can use to prepare other dishes or just relax. They're perfect for meal prep too; I often make a double batch and keep them in the fridge for quick snacking throughout the week.
What You Need From Your Kitchen
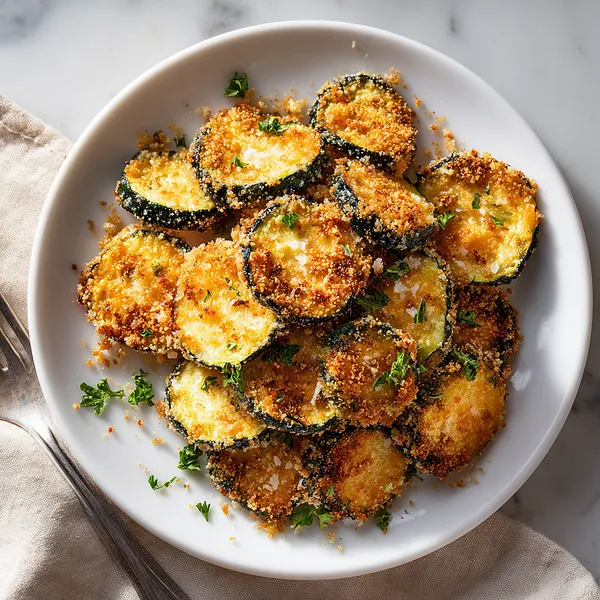
- Zucchini: Choose firm, medium-sized zucchini without soft spots. Slice evenly for consistent cooking.
- Eggs: Beat thoroughly to create a smooth coating that helps the breadcrumbs adhere properly.
- Panko breadcrumbs: Use Japanese-style panko for the crispiest texture, much better than regular breadcrumbs.
- Parmesan cheese: Freshly grated parmesan provides the best flavor and helps create that golden, savory crust.
- Garlic powder: Adds aromatic depth without the moisture of fresh garlic which could prevent crisping.
- Paprika: Provides subtle color and a hint of smokiness to the coating.
- Sour cream: Forms the creamy base for the dipping sauce, can substitute with Greek yogurt.
Let's Make These Together
- Prepare Your Workspace
- Start by gathering all your ingredients and equipment. Preheat your oven to 425°F and line your baking sheets with parchment paper. Wash and thoroughly dry your zucchini, then slice them into uniform 1/4-inch rounds. The key to success is having everything ready before you start the coating process, making the workflow smooth and efficient.
- Create the Coating Station
- Set up three shallow bowls in an assembly line. Beat your eggs in the first bowl until smooth and uniform. In the second bowl, combine the panko breadcrumbs with freshly grated parmesan, garlic powder, paprika, salt, and pepper, mixing thoroughly to distribute the flavors evenly. This organized setup makes the breading process quick and tidy.
- Coat Each Zucchini Round
- Now comes the fun part! Take each zucchini slice and dip it first into the beaten eggs, letting any excess drip back into the bowl. Then press both sides firmly into the breadcrumb mixture, ensuring complete coverage. The key is to press firmly so the coating adheres well and creates that perfect crust. Arrange each coated round on your prepared baking sheets, leaving space between them for proper air circulation.
- Bake to Golden Perfection
- Slide your baking sheets into the preheated oven and bake for 20-25 minutes. Set a timer for the halfway point so you remember to flip each chip for even browning. You'll know they're ready when both sides are beautifully golden and the edges look crispy. If you want extra crunch, give them a quick minute under the broiler at the end, watching carefully to avoid burning.
- Finish and Serve
- While your chips are achieving golden perfection, whip up the simple dipping sauce by mixing sour cream with fresh chopped parsley, a squeeze of lemon, and seasoning to taste. When the chips come out of the oven, resist the urge to eat them immediately – let them rest on the baking sheet for 2-3 minutes to firm up and reach peak crispiness. Then serve warm with your dipping sauce and watch them disappear!
 pin it
Switch Things Up
I first made these zucchini chips on a Sunday afternoon when I was desperately trying to use up the abundance of zucchini from my garden. I was skeptical that anything baked could truly be "crispy," but I decided to give it a shot anyway. The moment I pulled that first batch from the oven and heard that satisfying crunch, I knew I'd stumbled onto something special. My kids came running into the kitchen asking what smelled so good, and before I knew it, the entire batch had disappeared. Now, every summer when zucchini season hits, I make these at least twice a week. I've experimented with different coatings and spice combinations, but this parmesan-panko version remains the family favorite. The key is slicing them evenly and not overcrowding the baking sheet – give each chip space to breathe and crisp up properly.
Perfect Pairings
These crispy zucchini chips pair wonderfully with a variety of dipping sauces beyond the classic sour cream base. Try them with marinara sauce for an Italian twist, or ranch dressing for a more traditional approach. They make an excellent accompaniment to grilled burgers or sandwiches, serving as a healthier alternative to regular fries. For a complete appetizer spread, serve them alongside other baked veggie chips like sweet potato or beet chips. They also work beautifully as a side dish for grilled chicken or fish, and they're perfect for game day platters when you want to offer something a bit healthier alongside the usual fare.
 pin it
Frequently Asked Questions
- → Can I make these zucchini chips ahead of time?
While these chips are absolutely best enjoyed fresh from the oven when they're at peak crispiness, you can prepare them a few hours in advance. Store them in an airtight container and reheat in a 400°F oven for 5-7 minutes before serving to restore their crunch. Avoid microwaving as this will make them soggy.
- → Why aren't my zucchini chips crispy?
The most common reason is excess moisture. Make sure to thoroughly pat your zucchini slices dry before coating them. Also ensure you're not overcrowding the baking sheet – the chips need space for air to circulate. Finally, make sure your oven is fully preheated to 425°F before baking.
- → Can I use regular breadcrumbs instead of panko?
You can, but panko breadcrumbs create a much crispier, lighter texture because of their larger, flakier structure. If you only have regular breadcrumbs, the chips will still taste great but won't be quite as crispy. For best results, stick with panko.
- → How do I store leftover zucchini chips?
Store any leftovers in an airtight container in the refrigerator for up to 2 days. To reheat, place them on a baking sheet and warm in a 400°F oven for 5-7 minutes until they're crispy again. Don't use the microwave as it will make them soft and soggy.
- → Can I freeze these zucchini chips?
I don't recommend freezing the finished chips as they tend to become soggy when thawed. However, you can freeze the breaded but unbaked chips on a baking sheet, then transfer to a freezer bag. Bake directly from frozen, adding a few extra minutes to the cooking time.
- → What other vegetables work with this coating method?
This coating technique works wonderfully with yellow squash, eggplant rounds, sliced mushrooms, or even green tomatoes. Just adjust the baking time slightly depending on the moisture content of the vegetable you're using. Drier vegetables will crisp up faster.
Conclusion
These crispy baked zucchini chips have become my go-to solution for healthy snacking without sacrificing flavor or satisfaction. The golden parmesan crust delivers that addictive crunch we all crave, while the tender zucchini inside provides a perfect contrast. They're so much lighter than fried alternatives, yet nobody ever guesses they're baked. Whether you're looking for a guilt-free appetizer, a side dish that even kids will love, or just a better option for movie night munching, these chips deliver every single time.