
 pin it
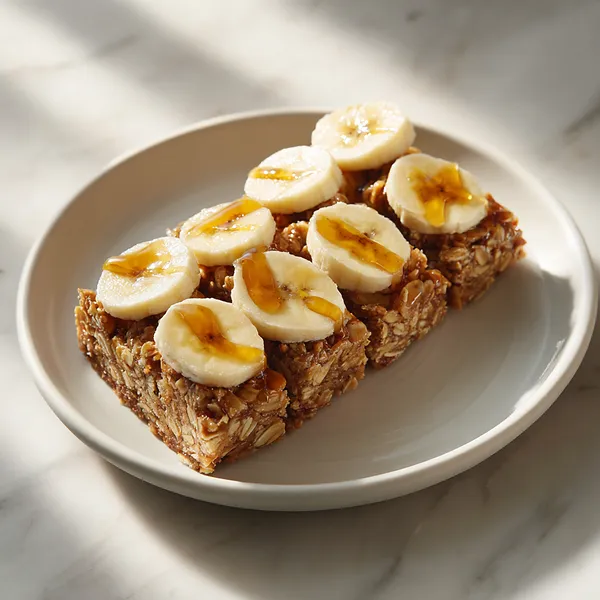
I remember the first time I encountered banana oatmeal bars at a local farmers market. A vendor was selling homemade baked goods, and these unassuming golden squares caught my eye. She described them as her grandmother's recipe, made with only natural ingredients and no refined sugar. I was skeptical at first – how good could healthy bars really be? But one bite changed everything. The natural sweetness from ripe bananas, the hearty texture from oats, and the subtle crunch from nuts created this perfect harmony. I went home determined to recreate them, and after a few attempts, I nailed the recipe. What I love most about these bars is their simplicity. There's no complicated technique, no fancy equipment needed, just good ingredients mixed together and baked until golden. The bananas provide both sweetness and moisture, eliminating the need for excessive oil or sugar. Every time I make them, I'm transported back to that farmers market stand, and I feel connected to that tradition of wholesome, from-scratch baking that's become so rare these days.
Why I love this recipe
This recipe holds a special place in my heart because it represents everything I believe about good food – it's simple, wholesome, and absolutely delicious. I love that I can pronounce every ingredient and feel good about what I'm putting into my body. These bars have saved me countless times when I'm running late and need to grab something nutritious on my way out. They've become my signature recipe that I bring to potlucks, give as gifts to neighbors, and make for friends who are going through tough times. There's something incredibly satisfying about baking a batch on Sunday and knowing I have healthy snacks ready for the entire week. I also appreciate how forgiving this recipe is – if my bananas are extra ripe, the bars turn out sweeter; if I'm out of walnuts, pecans work just as well. The recipe adapts to what I have on hand, which makes it practical and stress-free. Most importantly, these bars remind me that eating healthy doesn't mean sacrificing flavor or enjoyment. Every bite delivers genuine satisfaction, and that's what keeps me coming back to this recipe time and time again.
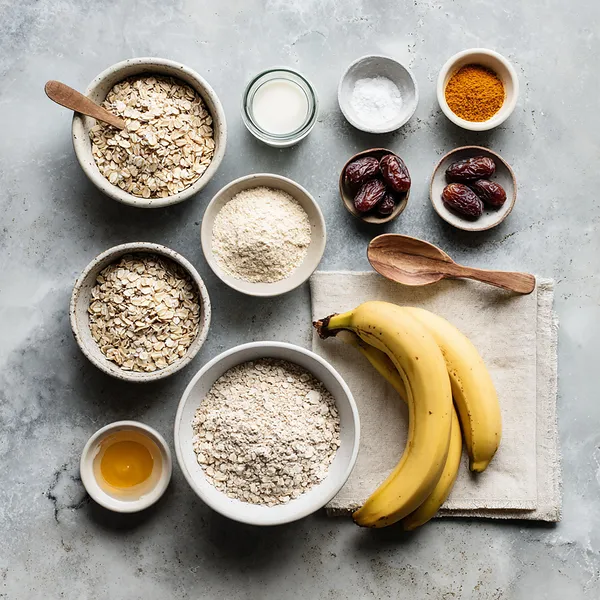
What You Need From Your Kitchen
- Ripe Bananas: Mash well until mostly smooth, leaving a few small chunks for texture and natural sweetness.
- Rolled Oats: Use old-fashioned rolled oats for the best texture; quick oats will make the bars too soft.
- Honey or Maple Syrup: Provides additional sweetness and helps bind the ingredients together.
- Coconut Oil: Melted and used to add moisture and help everything stick together.
- Walnuts: Roughly chop for added crunch and healthy fats throughout the bars.
- Raisins or Dried Cranberries: Fold in gently for bursts of natural sweetness in every bite.
- Vanilla Extract: Enhances the overall flavor and complements the banana beautifully.
Let's Make These Together
- Prepare Your Workspace
- Start by preheating your oven and preparing your baking pan with parchment paper. This simple step ensures easy removal and cleanup later. Having everything ready before you start mixing makes the process smooth and enjoyable.
- Create the Base Mixture
- Mash your overripe bananas until they're mostly smooth, then combine them with the melted coconut oil, sweetener, and vanilla. This wet mixture forms the foundation of your bars and provides all the moisture and natural sweetness needed.
- Add Texture and Flavor
- Stir in your rolled oats along with cinnamon and salt, making sure every oat gets coated with that delicious banana mixture. Then fold in your nuts and dried fruit, distributing them evenly throughout for perfect bites every time.
- Press and Bake
- Transfer your mixture to the prepared pan and press it down firmly using a spatula. This step is crucial for bars that hold together beautifully. Pop it in the oven and let the magic happen as your kitchen fills with an incredible aroma.
- Cool and Enjoy
- Once baked to golden perfection, resist the urge to cut immediately. Let the bars cool completely so they set properly. Once cooled, lift them out using the parchment paper, cut into squares, and enjoy your homemade healthy treat.
 pin it
Switch Things Up
I first made these bars on a Sunday afternoon when I realized my pantry was looking pretty bare but I had overripe bananas begging to be used. I wasn't planning on creating anything special, just wanted something quick to have for breakfast during the week. The house filled with the most incredible aroma of banana bread mixed with toasted oats, and I couldn't wait for them to cool down. When I finally took that first bite, I was blown away by how something so simple could taste so good. The texture was perfect – chewy but not dense, sweet but not overwhelming. My roommate came home and devoured three bars immediately, declaring them better than any store-bought granola bar. Since then, I've made these countless times, experimenting with different mix-ins like chocolate chips, different nuts, and various dried fruits. They've become my go-to recipe for meal prep, and I love how I can grab one on my way out the door knowing I'm starting my day with something nutritious.
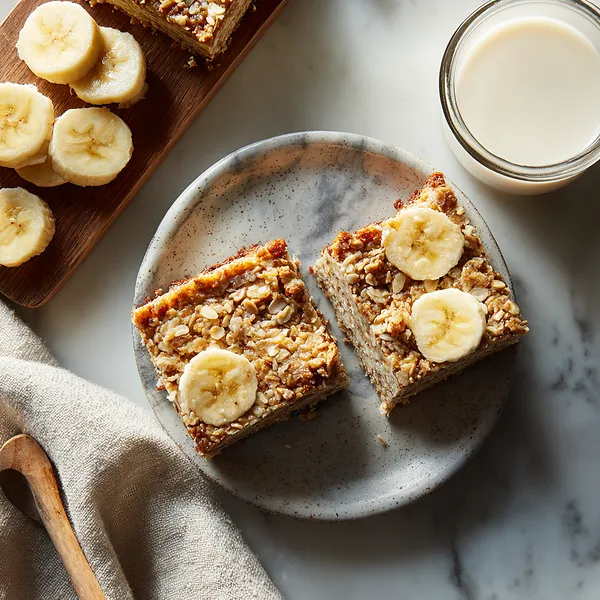
Perfect Pairings
These Banana Oatmeal Bars pair wonderfully with a variety of beverages and foods to create a complete snack or breakfast. Enjoy them with a cold glass of almond milk, oat milk, or regular milk for a classic combination. They're also delicious alongside a hot cup of coffee or tea, especially chai or cinnamon spice tea. For a more substantial breakfast, serve them with Greek yogurt and fresh berries on the side. You can also crumble them over yogurt parfaits or smoothie bowls for added texture. If you're looking for a heartier option, pair them with scrambled eggs and fresh fruit for a balanced meal. The bars also work great as a pre or post-workout snack when paired with a protein shake or a handful of almonds for extra protein.
 pin it
Frequently Asked Questions
- → Can I make these bars gluten-free?
Yes! Simply use certified gluten-free oats. Most oats are naturally gluten-free but can be contaminated during processing, so look for brands specifically labeled gluten-free if you have celiac disease or gluten sensitivity.
- → How do I store these banana oatmeal bars?
Store the bars in an airtight container at room temperature for up to 5 days. For longer storage, wrap individual bars in plastic wrap and freeze them in a freezer-safe container for up to 3 months. Thaw at room temperature or microwave for 15-20 seconds.
- → Can I substitute the coconut oil with something else?
Absolutely! You can use melted butter, vegetable oil, or even applesauce for a lower-fat option. Keep in mind that different oils will slightly alter the flavor and texture, but all work well in this recipe.
- → My bars turned out crumbly. What went wrong?
Crumbly bars usually result from not pressing the mixture firmly enough into the pan or cutting them before they've completely cooled. Make sure to pack the mixture tightly and allow at least 30 minutes of cooling time before cutting.
- → Can I add protein powder to make these more filling?
Yes! You can add 1/4 to 1/3 cup of your favorite protein powder. You may need to add a tablespoon or two of milk or water to compensate for the extra dry ingredient and maintain the right consistency.
- → What other mix-ins work well in these bars?
The possibilities are endless! Try chocolate chips, shredded coconut, chia seeds, hemp seeds, different nuts like pecans or almonds, or dried fruits like apricots or dates. Just keep the total amount of mix-ins around 1 cup for best results.
Conclusion
These Banana Oatmeal Bars are proof that healthy snacking doesn't have to be boring or complicated. With just a handful of wholesome ingredients and minimal prep time, you can create a batch of delicious bars that everyone will love. They're naturally sweetened, packed with fiber, and so versatile that you can customize them with your favorite add-ins. Whether you're looking for a quick breakfast option, an after-school snack for the kids, or a pre-workout energy boost, these bars have you covered. Make a double batch and freeze half for those busy mornings when you need something nutritious and ready to go.