
 pin it
I remember scrolling through pet forums late one night, worried about the ingredient lists on commercial dog treats. That's when I stumbled upon the idea of making homemade chew sticks, and this banana peanut butter version immediately caught my attention. The concept seemed almost too simple – could something so easy really work? But the first time I pulled these golden sticks out of the oven, I knew I'd discovered something special. The aroma of banana and peanut butter filled my kitchen, and my own dog was doing circles of excitement. What I love most is how the oat flour creates that satisfying chewy texture that dogs crave, while the banana adds natural sweetness and moisture. The peanut butter binds everything together and provides healthy fats and protein. These aren't just treats; they're little cylinders of joy that I can make in bulk and feel confident about. Every batch reminds me that the best things we can give our pets are made with our own hands and filled with love.
Why I love this recipe
This recipe has become my go-to for so many reasons, but mainly because it perfectly balances simplicity with quality. I love that I can whip up a batch in under 20 minutes of active time, and then the oven does all the work while I go about my day. There's something deeply satisfying about creating treats that I know are 100% safe and healthy for dogs – no preservatives, no mystery ingredients, just pure wholesome goodness. The fact that these chew sticks actually keep for weeks in an airtight container means I'm always prepared with rewards for training or just because. I also appreciate how customizable they are; I can make them thicker for aggressive chewers or thinner for smaller dogs. But honestly, what I love most is seeing the pure joy on dogs' faces when they get one of these treats. It's that tail-wagging, happy-dancing excitement that makes every minute of preparation worthwhile. This recipe has turned me into the favorite aunt for all my friends' dogs!
What You Need From Your Kitchen
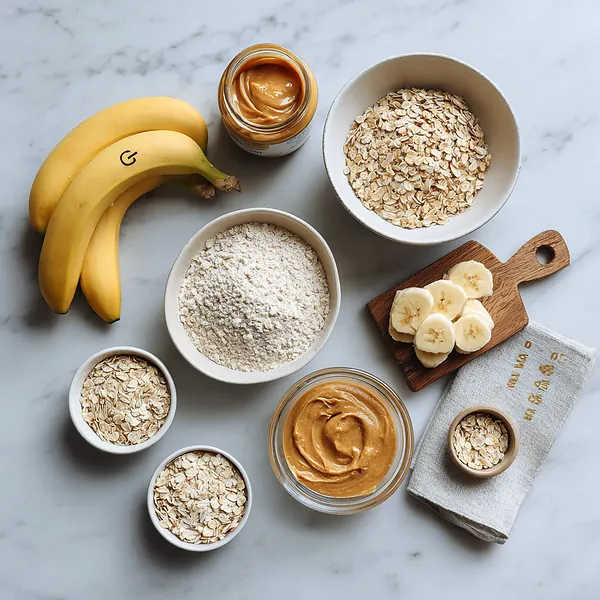
- Ripe Bananas: Mash thoroughly until smooth to serve as the natural sweetener and binder for the dough
- Natural Peanut Butter: Ensure it's xylitol-free and mix with bananas for protein and flavor
- Oat Flour: Gradually incorporate to create the dough structure and chewy texture
- Rolled Oats: Add for extra texture and fiber benefits for your dog's digestion
- Coconut Oil: Melt and mix in to add healthy fats and help bind ingredients together
- Water: Add only if needed, one tablespoon at a time, to achieve proper dough consistency
Let's Make These Together
- Prepare the Banana Base
- Start by preheating your oven to a low temperature of 300°F, which is key for creating that perfect chewy texture. Mash your ripe bananas in a large bowl until they're nice and smooth – the riper the banana, the sweeter and more flavorful your treats will be. Mix in your xylitol-free peanut butter and melted coconut oil until everything is creamy and well combined. This forms the flavorful base that dogs absolutely love.
- Create the Dough
- Gradually add your oat flour and rolled oats to the banana mixture, stirring constantly as you go. You want the dough to come together into a firm, workable consistency that's not too sticky. If it feels dry and crumbly, add water a tablespoon at a time until you achieve that perfect pliable texture. The dough should hold together when you squeeze it but not stick to your hands.
- Shape Your Chew Sticks
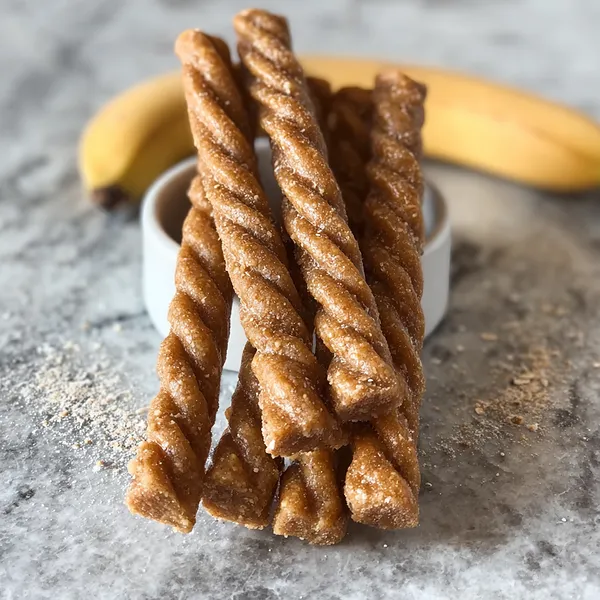
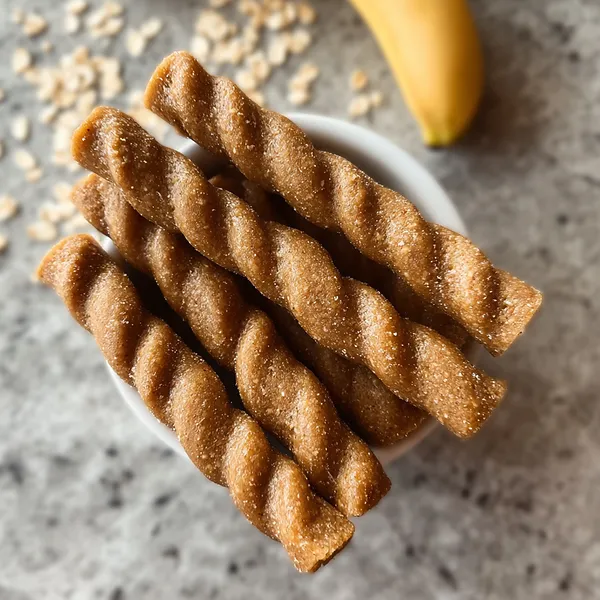
- Now comes the fun part – rolling out your chew sticks! Take about 2 tablespoons of dough at a time and roll it between your palms to create stick shapes. Aim for 4-5 inches long and about half an inch thick, though you can adjust based on your dog's size. Larger dogs can handle thicker sticks, while smaller pups need thinner ones. Place them on your parchment-lined baking sheet with a bit of space between each one.
- Slow Bake to Perfection
- Slide your baking sheet into the preheated oven and let the magic happen. These treats bake low and slow for 2.5 to 3 hours, which dehydrates them gradually and creates that ideal chewy texture. Flip them halfway through to ensure even baking on all sides. You'll know they're done when they're firm to the touch and have developed a nice golden color.
- Cool and Store Properly
- Once your chew sticks are done baking, resist the temptation to give them to your pup right away! Let them cool completely on the baking sheet for at least 30 minutes. They'll continue to harden as they cool down. Transfer the completely cooled treats to an airtight container where they'll keep fresh for up to 2 weeks at room temperature, or pop them in the fridge for up to 4 weeks of freshness.
 pin it
Switch Things Up
I'll never forget the first time I made these for my neighbor's golden retriever, Bailey. She was recovering from surgery and needed some special treats that were gentle but exciting. I whipped up a batch of these chew sticks, and honestly, I was a bit nervous about whether she'd like them. The moment I handed one to her, her tail started wagging so hard I thought she might take flight! She carried it around like a trophy before finally settling down to enjoy it. Now, every time I visit, Bailey sits by the kitchen counter with those big puppy eyes, hoping I've brought more. It's become our little tradition, and seeing her excitement makes the simple process of mixing bananas and peanut butter feel like I'm creating something truly magical. These treats have turned me into Bailey's favorite human, and I'm completely okay with that!
Perfect Pairings
These chew sticks pair wonderfully with your dog's regular meal routine as a special reward or training treat. Consider giving them alongside fresh water after a long walk or play session. They also work beautifully with other homemade dog treats like sweet potato chips or frozen yogurt bites for variety. If you're hosting a dog birthday party or playdate, these chew sticks make an excellent addition to a treat platter alongside carrot sticks and apple slices. They're substantial enough to keep your pup occupied during quiet time, making them perfect companions for puzzle toys or kong fillers.
 pin it
Frequently Asked Questions
- → How long do these dog chew sticks last?
These homemade banana peanut butter chew sticks will stay fresh for up to 2 weeks when stored in an airtight container at room temperature. For extended storage, refrigerate them for up to 4 weeks or freeze for up to 3 months. Always check for signs of mold or spoilage before giving treats to your dog.
- → Can I make these treats if my dog has peanut allergies?
Absolutely! If your dog is allergic to peanuts, you can substitute the peanut butter with sunflower seed butter or almond butter. Just make sure whatever nut or seed butter you choose is xylitol-free, as xylitol is extremely toxic to dogs. The texture and flavor will be slightly different but still delicious for your pup.
- → Why do these treats need to bake for so long?
The long, low-temperature baking time is crucial for creating the perfect chewy texture that dogs love. This method dehydrates the treats slowly rather than baking them quickly, which removes moisture and helps them stay fresh longer. It also prevents the outside from burning while the inside stays soft. The result is a satisfying chew that's firm but not rock-hard.
- → Can I adjust the thickness of the chew sticks?
Yes, definitely! The thickness should be tailored to your dog's size and chewing habits. Make thicker sticks (about 3/4 inch) for larger, aggressive chewers, and thinner sticks (about 1/4 to 1/2 inch) for smaller dogs or puppies. Just remember that thinner treats will bake faster, so you may need to reduce the baking time by 30 minutes to an hour.
- → Are these treats suitable for puppies?
Yes, these treats are safe for puppies over 3 months old, but you should make them thinner and softer for young dogs. You can also reduce the baking time slightly to create a softer chew that's easier on developing teeth. Always supervise puppies when giving them any treats, and make sure the portion size is appropriate for their small size to prevent choking.
- → What's the best way to tell if my peanut butter contains xylitol?
Always check the ingredient list on your peanut butter jar. Xylitol may be listed under several names including "birch sugar" or "wood sugar." Natural peanut butters with just peanuts and salt are usually safe, but many reduced-fat or sugar-free varieties contain xylitol. When in doubt, choose organic natural peanut butter with only one or two ingredients listed.
Conclusion
These Banana Peanut Butter Dog Chew Sticks are the perfect way to show your furry companion some love while keeping their snacks healthy and wholesome. Made with simple, natural ingredients that you can pronounce and trust, these treats offer a satisfying chew that dogs absolutely adore. They're easy to customize based on your dog's size and preferences, and they store beautifully for weeks. Your pup will come running every time they hear the treat jar open, and you'll feel great knowing exactly what they're eating. Treat-making has never been more rewarding!