
 pin it
I first encountered real French crepes during a college trip to Paris, and I was blown away by how different they were from thick American pancakes. These paper-thin delicacies, both elegant and simple, became something I dreamed about recreating at home. For years, I struggled with traditional methods until I discovered the blender technique that changed everything. This recipe creates crepes that are incredibly thin and delicate, with those beautiful lacy edges that make them look professionally made. The batter comes together in literally one minute – you just throw everything in the blender and pulse until smooth. The secret is letting it rest so the flour can fully hydrate, which prevents tough, rubbery crepes. When you pour the batter into a hot, buttered pan and swirl it around, watching it spread into a perfect circle is so satisfying. The edges start to brown and crisp up slightly while the center stays tender. What I love most is how versatile they are – the same base recipe works for both sweet and savory preparations. The texture is what really sets them apart: delicate enough to fold beautifully, yet sturdy enough to hold generous amounts of filling without tearing.
Why I love this recipe
I absolutely love this recipe because it takes all the intimidation out of making crepes. Traditional crepe recipes require technique and practice, but this blender method is genuinely foolproof. I can have impressive, restaurant-quality crepes ready in less time than it takes to make regular pancakes. The cleanup is minimal – just the blender, a pan, and you're done. What really makes me reach for this recipe time and again is its incredible versatility. I've used it for romantic breakfast-in-bed surprises, casual weekend brunches with friends, and even fancy dinner party desserts. Every single time, people are amazed and ask for the recipe. The fact that you can make both sweet and savory versions from the same basic batter means it works for any meal or occasion. I also love that this recipe is forgiving – even if you're not great at flipping, the crepes are so thin and delicate that they're easy to work with. And there's something so satisfying about creating something that looks and tastes this elegant with such simple, everyday ingredients. It makes me feel like a skilled chef even on my laziest mornings.
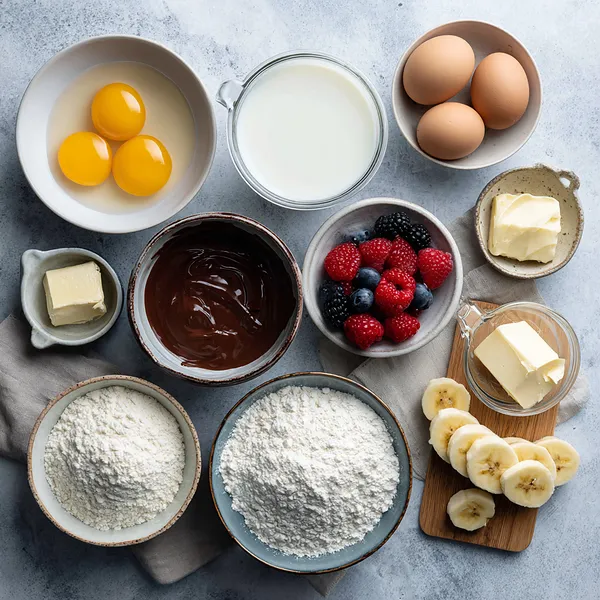
What You Need From Your Kitchen
- All-purpose flour: Creates the structure of the crepes; use a light hand when measuring for the most delicate texture
- Eggs: Provide protein and richness; make sure they're at room temperature for easier blending
- Whole milk: Adds creaminess and flavor; can substitute with 2% milk if needed
- Melted butter: Gives richness and prevents sticking; make sure it's cooled slightly before adding to prevent cooking the eggs
- Fresh strawberries: Slice just before serving to keep them fresh and vibrant
- Chocolate sauce: Use your favorite brand or make homemade for drizzling
Let's Make These Together
- Blend the Perfect Batter
- Start by adding all your dry ingredients to the blender first – flour, sugar, and salt. Then add the wet ingredients: eggs, milk, water, and that gorgeous melted butter. This order helps prevent lumps from forming. Blend everything on medium-high speed until you have a silky smooth batter that flows like heavy cream. If you see any lumps, stop and scrape down the sides, then blend again. The batter should be thin enough to coat the back of a spoon but not watery. Let it rest for 10 minutes – this step is crucial for achieving that perfect tender texture.
- Master the Pan Temperature
- Getting your pan temperature right is the secret to perfect crepes. Heat your nonstick skillet over medium heat for a few minutes. You want it hot enough that a drop of batter sizzles gently, but not so hot that it burns immediately. Brush a thin layer of butter across the surface. The butter should melt and shimmer but not brown. This is your sweet spot. If your first crepe cooks too quickly or burns, lower the heat. If it takes forever to set, increase the heat slightly.
- Pour and Swirl Like a Pro
- Here's where the magic happens! Pour about 1/4 cup of batter into the center of your hot pan. Immediately lift the pan off the heat and tilt it in a circular motion, letting the batter flow and spread across the entire surface. Work quickly but smoothly – you want a thin, even layer before the batter starts to set. If you have any gaps, you can add a tiny bit more batter and swirl again. The crepe should be paper-thin with delicate, lacy edges. Return the pan to the heat and let it cook undisturbed.
- Watch for the Perfect Flip
- Patience is key here! Let the crepe cook for about 1-2 minutes until you see the edges starting to turn golden brown and pulling away from the pan. The surface should look mostly matte with just a hint of shine in the center. Use a thin spatula to gently lift one edge – if it releases easily and looks golden underneath, it's ready to flip. You can use the spatula or, if you're feeling confident, use your fingers to grab the edge and flip it in one smooth motion. The second side only needs 30-45 seconds since it's already mostly cooked.
- Stack and Serve with Style
- Slide your finished crepe onto a plate and immediately start the next one. Stack the cooked crepes on top of each other – they won't stick and the residual steam will keep them soft and pliable. Once you've cooked all your batter, it's time for the fun part: filling and topping! Fold each crepe into quarters for an elegant presentation, or roll them up for a more casual look. Arrange them on your prettiest plates, then load them up with fresh berries, banana slices, a generous drizzle of chocolate sauce, and a final dusting of powdered sugar. Serve immediately while they're still slightly warm for the ultimate crepe experience.
 pin it
Switch Things Up
I remember the first time I made crepes the traditional way – whisking away at lumpy batter, trying to get the consistency just right, and ending up frustrated. Then a friend showed me the blender method and everything changed. Now I make these almost every weekend because they're so incredibly easy. The blender creates the silkiest batter with zero lumps, and letting it rest for just 10 minutes gives you perfect results every time. I love experimenting with different toppings – sometimes I go classic with lemon and sugar, other times I pile on Nutella and bananas. My favorite discovery was adding a tiny bit of vanilla extract to the batter for extra flavor. I've even made savory versions filled with spinach and feta for brunch parties. The key is getting your pan to the right temperature – medium heat works perfectly. Don't worry if your first crepe isn't perfect; that's the test crepe that tells you if your pan is ready. By the second or third one, you'll be flipping them like a pro.
Perfect Pairings
These delicate crepes pair beautifully with so many accompaniments. For a classic French experience, serve them with a dollop of sweetened whipped cream and fresh berries. If you're feeling indulgent, Nutella and sliced bananas are an unbeatable combination. For a more sophisticated brunch, try pairing them with champagne or mimosas. Greek yogurt and honey make a lighter, protein-rich topping that's perfect for a healthier breakfast. Don't forget about savory options – these crepes work wonderfully with scrambled eggs, smoked salmon, and cream cheese for an elegant brunch spread. A hot cup of coffee or French press café au lait completes the experience perfectly.
 pin it
Frequently Asked Questions
- → Can I make the crepe batter ahead of time?
Absolutely! You can make the batter up to 24 hours in advance and store it covered in the refrigerator. Just give it a good stir or quick blend before using, as some separation is normal. Let it come to room temperature for about 15 minutes before cooking for the best results.
- → Why are my crepes tearing or breaking?
If your crepes are tearing, the batter might be too thick. Add a tablespoon or two of water or milk to thin it out slightly. Also make sure you're letting the batter rest – this allows the gluten to relax and creates more flexible crepes. Using a good nonstick pan and adequate butter also helps prevent tearing.
- → Can I freeze leftover crepes?
Yes! Crepes freeze beautifully for up to 2 months. Stack them with parchment or wax paper between each crepe to prevent sticking, then wrap the stack tightly in plastic wrap and place in a freezer bag. Thaw in the refrigerator overnight or at room temperature for about 30 minutes before reheating.
- → What can I use instead of a crepe pan?
Any nonstick skillet will work perfectly! An 8-10 inch pan is ideal for standard-sized crepes. If you only have a larger pan, you can make bigger crepes – just use a bit more batter. The key is having a flat bottom and good nonstick surface for easy flipping.
- → How do I make savory crepes?
Simply omit the sugar from the batter and add a pinch of black pepper or dried herbs if desired. Savory crepes are amazing filled with ham, cheese, sautéed mushrooms, spinach, or eggs. You can also add a tablespoon of grated Parmesan to the batter for extra flavor.
- → Why is my first crepe always ugly?
Don't worry – the first crepe is almost always a practice crepe! It helps you gauge if your pan temperature is right and if the batter consistency is perfect. Think of it as your tester. By the second or third crepe, you'll have everything dialed in and they'll come out beautifully.
Conclusion
These blender crepes are the perfect solution for anyone who's been intimidated by traditional crepe-making. The blender does all the work, creating a perfectly smooth batter in seconds. Whether you serve them for a special breakfast, brunch with friends, or even a light dessert, they never fail to impress. The versatility is endless – go sweet with Nutella and berries, or savory with ham and cheese. Once you master this easy technique, you'll find yourself making crepes all the time. They're elegant enough for special occasions yet simple enough for a Tuesday morning treat.