
 pin it
I first discovered the magic of brownie bombs during a late-night Pinterest scrolling session when I couldn't sleep. The concept immediately grabbed my attention - who wouldn't want to combine brownies and cookie dough in one perfect bite? My first attempt was admittedly a disaster; the cookie dough was too soft and kept falling apart when I tried to wrap it in brownie mixture. But I persisted, adjusting the ratios and chilling times until I found the perfect balance. The key breakthrough came when I realized I needed to make the cookie dough much firmer and the brownie mixture more pliable. Now, every time I make these, I'm reminded of that determined late-night experimentation that led to this incredible dessert. The process of rolling each bomb by hand has become therapeutic for me - there's something so satisfying about shaping these little spheres of joy. The moment when you dip them in that smooth chocolate coating and watch it cascade down the sides is pure kitchen poetry. These bombs have become my go-to dessert for impressing guests and treating myself when I need some serious chocolate therapy.
Why I love this recipe
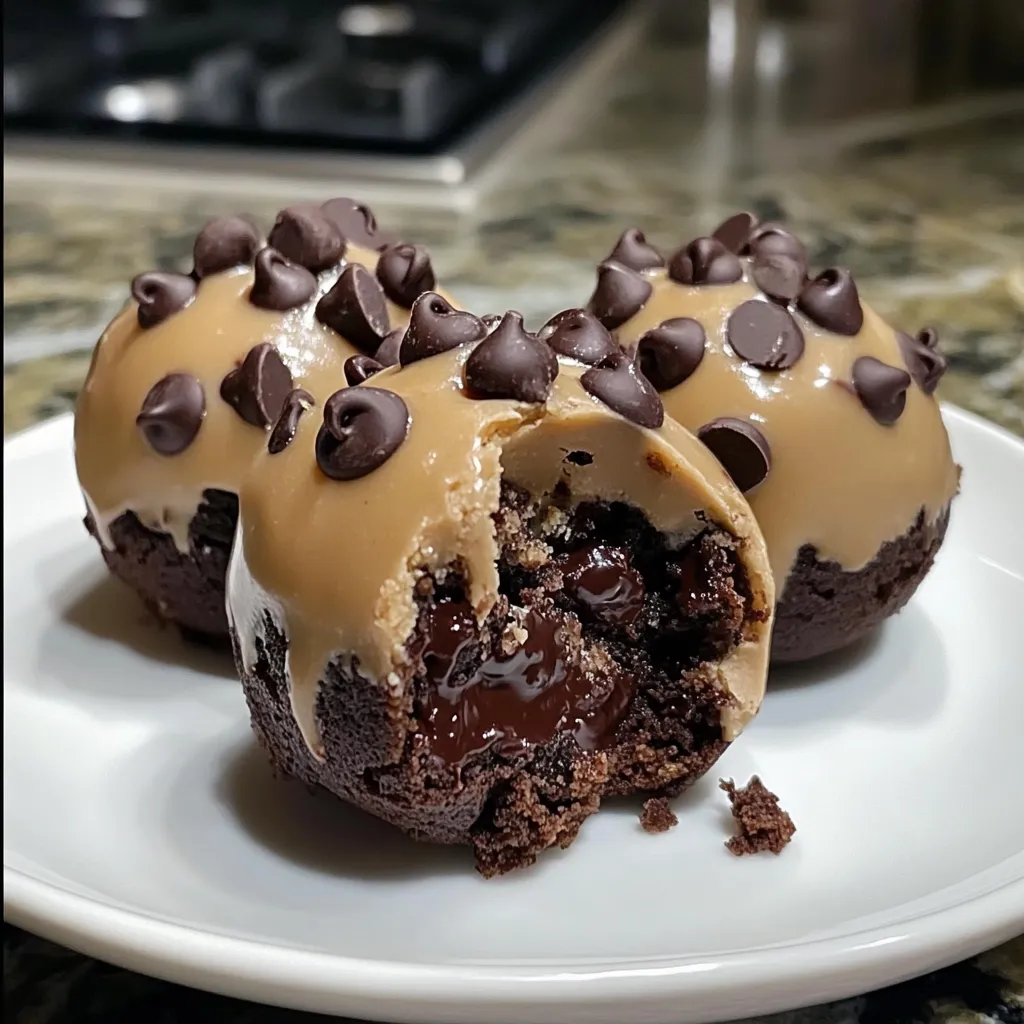
What I absolutely adore about this recipe is how it takes two classic comfort desserts and elevates them into something extraordinary. There's pure joy in that first bite when you break through the chocolate shell, hit the fudgy brownie layer, and then discover that creamy cookie dough center - it's like a treasure hunt for your taste buds. I love how versatile these are too; you can customize the cookie dough flavors, switch up the coating, or even add different mix-ins. The process itself is incredibly satisfying - there's something almost meditative about rolling each bomb and watching the chocolate coating set to that perfect glossy finish. These treats never fail to make people smile, and I've seen them turn even the most reserved dinner guests into excited children. They represent everything I love about baking: creativity, indulgence, and the power of dessert to bring pure happiness. Plus, they keep well in the fridge, so I can always have a stash ready for when I need a pick-me-up or want to surprise someone special.
What You Need From Your Kitchen
- Brownie Mix: Use your favorite brand or homemade brownies, baked and completely cooled
- All-Purpose Flour: Heat-treated flour for safe consumption in edible cookie dough
- Butter: Softened to room temperature for easy mixing with sugars
- Brown Sugar: Packed firmly to measure, provides moisture and caramel flavor
- Mini Chocolate Chips: Perfect size for cookie dough and decoration
- Chocolate Coating Wafers: Melts smoothly for professional-looking finish
Let's Make These Together
- Create the Cookie Dough Base
- Start by combining the heat-treated flour with softened butter, brown sugar, and vanilla extract. Mix until you have a cohesive dough that holds together well. Fold in those mini chocolate chips for extra texture and flavor. The key here is getting the right consistency - not too wet, not too dry. Chill this mixture for at least 30 minutes so it's firm enough to roll into perfect little balls.
- Prepare Your Brownie Coating
- Take your cooled brownies and crumble them into fine, uniform pieces. You want them small enough to mold easily but not powdery. If the mixture feels too dry to hold together, add just a tiny bit of melted butter. The goal is to create a moldable mixture that feels like wet sand when pressed together.
- Shape and Assemble
- Roll your chilled cookie dough into 12 evenly-sized balls and pop them in the freezer for 15 minutes. This extra chill time is crucial - it prevents the centers from getting mushy when you wrap them. Take portions of your brownie mixture, flatten them in your palm, and carefully wrap each frozen cookie dough ball, sealing the edges completely.
- Apply the Chocolate Coating
- After your bombs have chilled thoroughly, melt your chocolate coating wafers with a touch of coconut oil for that perfect glossy finish. Dip each bomb completely, let excess drip off, and immediately add your mini chocolate chip decoration while the coating is still wet. The contrast of textures and flavors in each bite is absolutely divine.
 pin it
Switch Things Up
I'll never forget the first time I made these brownie bombs - it was for my friend's birthday party and I wanted to create something completely over-the-top. I was experimenting in my kitchen, trying to figure out how to combine my two favorite desserts, and suddenly had this lightbulb moment about stuffing cookie dough inside brownie spheres. The rolling process was messy but so much fun, and when I dipped them in that glossy chocolate coating, I knew I had created something special. The birthday girl took one bite and literally closed her eyes in pure bliss. Now these have become my signature dessert that everyone requests. Every time I make them, I remember that magical moment of culinary discovery and how sometimes the best recipes come from just playing around with flavors you love.
Perfect Pairings
These decadent brownie bombs pair beautifully with a tall glass of cold milk or a rich cup of coffee to balance the sweetness. For an adults-only twist, serve alongside a glass of red wine or bourbon. They're also fantastic crumbled over vanilla ice cream for an ultimate sundae experience. During the holidays, pair them with hot cocoa topped with marshmallows, or serve with fresh berries to add a tart contrast to the rich chocolate flavors.
 pin it
Frequently Asked Questions
- → Can I make these ahead of time?
Absolutely! These brownie bombs actually taste better after sitting in the refrigerator overnight. The flavors meld together beautifully, and the texture becomes even more perfect. You can make them up to a week in advance and store them covered in the refrigerator.
- → What if my cookie dough is too soft to work with?
If your cookie dough feels too sticky or soft, simply add a bit more flour (1-2 tablespoons at a time) until you achieve the right consistency. You can also chill it longer - sometimes an extra 30 minutes in the refrigerator makes all the difference.
- → Can I use different types of chocolate for coating?
Yes! While chocolate coating wafers work best because they set up nicely, you can use melted chocolate chips, dark chocolate, or even white chocolate. Just add a teaspoon of coconut oil to help with consistency and shine.
- → How do I know when the brownie mixture is the right consistency?
The brownie mixture should hold together when pressed but not be wet or sticky. Think of the texture of wet sand at the beach - it should clump together when squeezed but not leave residue on your hands.
- → What's the best way to store leftover bombs?
Store them in an airtight container in the refrigerator for up to one week. For longer storage, you can freeze them for up to three months. Just let them thaw in the refrigerator for a few hours before serving.
Conclusion
These Chocolate Chip Cookie Dough Brownie Bombs are the ultimate indulgent dessert that combines two beloved treats into one spectacular creation. The contrast between the rich brownie exterior and creamy cookie dough center creates an unforgettable taste experience. Perfect for special occasions or when you want to treat yourself to something extraordinary. The chocolate coating adds an elegant finish that makes these look as amazing as they taste. Store them in the refrigerator for the best texture and enjoy within a week.