
 pin it
I first encountered refrigerator cake at my grandmother's house during summer visits, though hers was a simpler version with graham crackers. Years later, when I discovered this brownie-based variation at a friend's potluck, I knew I had to recreate it. What makes this recipe special is the way each layer plays a specific role in the overall experience. The brownie base provides that essential chocolate foundation – dense, fudgy, and slightly chewy. Then comes the sweetened cream cheese layer, which adds tanginess and richness that prevents the dessert from being one-dimensional. The chocolate mousse layer is where things get truly luxurious – silky smooth and intensely chocolatey. Finally, the whipped cream topping with its chocolate drizzle and peanut garnish adds visual drama and textural contrast. I love how the dessert needs several hours to set properly in the refrigerator, allowing the flavors to meld together while the layers firm up just enough to slice cleanly. It's a dessert that rewards patience, and the make-ahead nature means you can enjoy your gathering without last-minute kitchen stress. Every time I serve this, I'm reminded why layered desserts have such enduring appeal.
Why I love this recipe
This recipe holds a special place in my heart for so many reasons. First, it's genuinely foolproof – if you can bake brownies from a box and mix ingredients together, you can make this stunning dessert. There's something deeply satisfying about creating such an impressive result with relatively simple techniques. I love that it's make-ahead friendly, which means I can prepare it the night before any event and actually be present with my guests instead of stressed in the kitchen. The texture combination is absolutely perfect – you get that chewy brownie bite, followed by creamy richness, silky mousse, and finally that light whipped topping. It's also incredibly versatile; I've made it for birthday parties, holiday dinners, summer barbecues, and casual weekend gatherings, and it always gets rave reviews. The recipe is forgiving too – if your layers aren't perfectly smooth, the whipped cream and toppings cover any imperfections. I appreciate that it uses accessible ingredients you can find at any grocery store, yet the result looks and tastes like something from a fancy bakery. Most importantly, this dessert has become part of my family's tradition. My kids request it for their birthdays, and my husband claims it's better than any restaurant dessert he's ever had.
What You Need From Your Kitchen
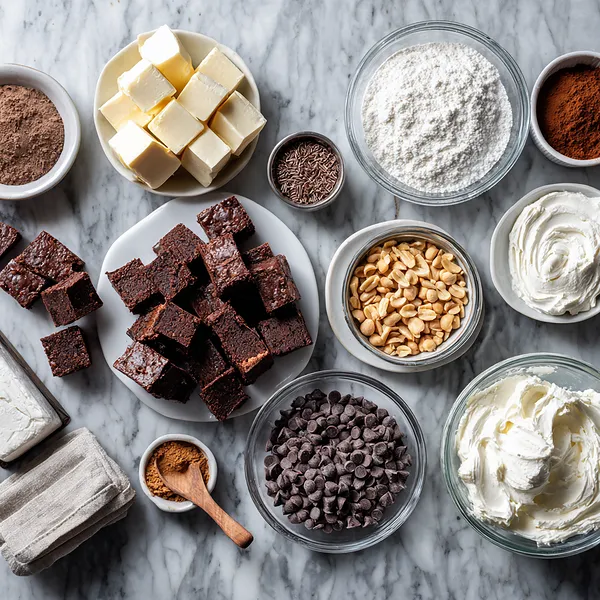
- Brownie Mix: Use your favorite brand or make from scratch if preferred; this forms the foundation layer
- Cream Cheese: Must be softened to room temperature for smooth, lump-free mixing
- Whipped Topping: Divided between layers; provides light, airy texture throughout the dessert
- Chocolate Pudding Mix: Instant variety works best; creates the silky mousse layer
- Chocolate Chips: Melted for drizzling; adds glossy finish and extra chocolate flavor
- Peanuts: Crushed for topping; provides crunchy texture contrast
Let's Make These Together
- Prepare the Brownie Foundation
- Begin by baking your brownies according to package directions in a 9x13 inch pan. This forms the sturdy base that will support all your beautiful layers. The key here is patience – let those brownies cool completely before moving forward. I like to pop mine in the fridge for a quick cool-down. While they're cooling, take a moment to admire what you're about to create!
- Whip Up the Cream Layer
- Grab your softened cream cheese and beat it until it's fluffy and smooth as silk. This step is crucial for avoiding lumps. Gradually incorporate the powdered sugar, then gently fold in half your whipped topping. The result should be cloud-like and spreadable. Spread this heavenly mixture evenly over your cooled brownies, making sure to reach every corner. Pop it back in the fridge while you work on the next layer.
- Create the Chocolate Mousse Magic
- Now for the chocolate pudding layer that makes this dessert extraordinary. Whisk your instant pudding with cold milk until it starts to thicken, then let it sit for a few minutes to fully set. Once it's ready, fold in the remaining whipped topping to create a mousse that's light yet intensely chocolatey. Spread this carefully over your cream cheese layer, taking care not to disturb what's beneath.
- Decorate Like a Pro
- This is where your cake transforms from delicious to absolutely stunning. Pipe or spread whipped cream across the top – get creative with your design! Drizzle melted chocolate in artistic patterns, letting some cascade down the sides for that wow factor. Finish with crushed peanuts and chocolate shavings. Then comes the hardest part: refrigerate for at least four hours to let everything set perfectly.
 pin it
Switch Things Up
I'll never forget the first time I made this cake for my sister's birthday party. I was nervous about the layers holding up, but when I pulled it from the fridge and saw how beautifully everything had set, I felt like a professional pastry chef. The moment of truth came when I made that first slice – the knife glided through each distinct layer, and I heard actual gasps from around the table. My nephew, who's notoriously picky about desserts, went back for thirds. Now, I make this cake whenever I need to bring something impressive to a gathering. I've experimented with different brownie bases – sometimes I add espresso powder to the mix for a mocha twist, or swirl in some peanut butter for extra richness. The best part? I always keep the ingredients on hand because you never know when you'll need an emergency show-stopper dessert. Last month, I taught my best friend how to make it for her book club, and she texted me later that night saying three people asked for the recipe before they even finished their slices.
Perfect Pairings
This rich, chocolatey dessert pairs beautifully with a variety of beverages and accompaniments. Serve it alongside freshly brewed coffee or espresso to balance the sweetness, or offer cold milk for a classic combination. For adults, a dessert wine like port or a chocolate stout beer complements the deep cocoa flavors wonderfully. Fresh berries – especially raspberries or strawberries – make an excellent garnish that adds a tart contrast to the creamy richness. If you're serving this at a party, consider offering vanilla ice cream on the side for guests who want to take their indulgence to the next level. The cake also pairs well with other coffee-flavored desserts if you're creating a dessert buffet.
 pin it
Frequently Asked Questions
- → Can I make this dessert ahead of time?
Absolutely! In fact, this dessert benefits from being made ahead. Prepare it up to 24 hours in advance and keep it refrigerated until serving time. The layers will set beautifully and the flavors will meld together perfectly. Just add any final garnishes right before serving to keep them fresh and crisp.
- → Can I use homemade brownies instead of a mix?
Yes, definitely! Use your favorite homemade brownie recipe baked in a 9x13 inch pan. Just make sure they're fully cooled before adding the layers. Homemade brownies will give you even more control over the chocolate intensity and texture of your base layer.
- → What if I don't have instant pudding mix?
You can make a chocolate mousse from scratch by whipping heavy cream with cocoa powder and sugar, then folding in melted chocolate. However, instant pudding is convenient and creates a perfect texture for this specific recipe. If using regular pudding, prepare it according to package directions and let it fully set before folding in the whipped topping.
- → How do I get clean slices when serving?
The secret to beautiful slices is a sharp knife dipped in hot water and wiped clean between each cut. The warm knife glides through the layers without dragging or mixing them. Take your time with each slice, and the results will look bakery-perfect with all the distinct layers visible.
- → Can I substitute the peanuts for another topping?
Absolutely! This recipe is very flexible with toppings. Try crushed Oreos, toffee bits, chopped pecans, sliced almonds, mini chocolate chips, or even fresh berries. You can also omit nuts entirely if you have allergies in your family. The core layers are what make this dessert special, so feel free to customize the garnish to your preference.
- → How long will leftovers keep?
Store any leftover cake covered in the refrigerator for up to 3 days. The layers actually continue to meld and set during storage, so some people prefer it on day two! Make sure it's well-covered to prevent it from absorbing other refrigerator odors. Do not freeze this dessert as the cream and mousse layers don't thaw well.
Conclusion
This Brownie Refrigerator Cake is the ultimate crowd-pleaser that combines convenience with pure indulgence. The beauty of this dessert lies in its simplicity – once you've baked the brownies, everything else comes together without any heat required. Each layer contributes its own unique texture and flavor, from the dense fudgy base to the airy whipped cream topping. The make-ahead nature makes it perfect for entertaining, and the impressive presentation will have your guests thinking you spent hours in the kitchen. Whether you're celebrating a special occasion or just treating yourself to something extraordinary, this refrigerator cake delivers maximum wow factor with minimal stress.