
 pin it
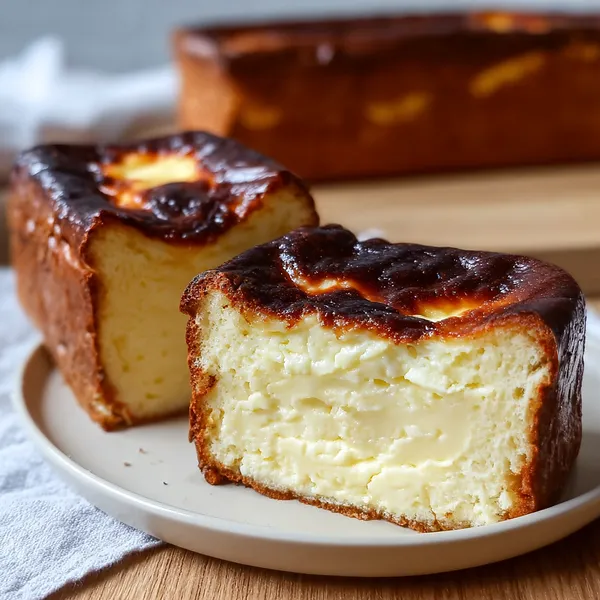
I first encountered Burnt Basque Cheesecake in a small pintxos bar in San Sebastian, and it completely changed my understanding of what cheesecake could be. This isn't your typical New York-style cheesecake with its firm, dense texture and graham cracker crust. Instead, this Spanish beauty is crustless, with a deeply caramelized, almost blackened top that tastes like the most sophisticated burnt sugar you've ever had. The interior is impossibly creamy - almost custard-like - with a slight jiggle when you shake the pan. What makes this recipe so special is that you bake it at a very high temperature, which creates that signature caramelized exterior while keeping the center luxuriously soft. I adapted the traditional round version to a loaf pan because I love how cleanly it slices and how impressive it looks when you cut into it to reveal that gorgeous contrast. The preparation is wonderfully simple - just blend everything together and pour it into a parchment-lined pan. There's no water bath, no careful temperature monitoring, just pure, unapologetic baking at high heat. When it comes out of the oven, it looks dramatic and rustic, with its deeply browned top and slightly cracked surface. After cooling, the texture transforms into something silky and dreamy that melts on your tongue.
Why I love this recipe
I love this recipe because it breaks all the traditional cheesecake rules and somehow ends up being better for it. There's something liberating about intentionally burning your dessert - it goes against everything we're taught in baking, yet it creates the most incredible depth of flavor. The contrast between the bitter-sweet caramelized top and the rich, creamy interior is absolutely addictive. What really wins me over is how forgiving this recipe is - you don't need to worry about cracks or perfect smoothness because the rustic, imperfect appearance is exactly what you're going for. It's also incredibly easy to make; unlike traditional cheesecakes that require precise techniques and water baths, this one is basically dump, blend, and bake. I appreciate how the loaf shape makes it easy to serve at gatherings - each slice looks elegant and professional. The texture is what keeps me coming back though - that almost pudding-like, jiggly center is unlike any other cheesecake. It's sophisticated enough for dinner parties but simple enough for a casual weekend treat. Plus, it actually tastes better the next day after the flavors have melded together in the fridge, which makes it perfect for make-ahead entertaining.
What You Need From Your Kitchen
- Cream Cheese: Use full-fat cream cheese at room temperature for the smoothest, creamiest texture
- Heavy Cream: Adds richness and creates the signature custard-like interior
- Eggs: Provide structure while keeping the cheesecake soft and jiggly
- Sugar: Sweetens the cheesecake and helps create the caramelized top
- Flour: A small amount gives just enough structure without making it dense
- Vanilla Extract: Enhances the overall flavor and adds warmth
Let's Make These Together
- Prepare Your Pan
- Start by preheating your oven to a high temperature of 400°F. Line your loaf pan generously with parchment paper, making sure it hangs over the edges. This will be your lifeline for removing the delicate cheesecake later, so don't skip this step.
- Create the Batter
- Beat your room temperature cream cheese with sugar until it's silky smooth. This is where the magic begins - you want zero lumps. Add your eggs one by one, giving each time to fully incorporate. Then stream in that heavy cream and vanilla, followed by a gentle fold of the flour. The batter should be smooth and pourable, like thick pancake batter.
- Bake to Perfection
- Pour your luscious batter into the prepared pan and get it into that hot oven. As it bakes, you'll watch the top transform from pale to golden to deeply caramelized. That jiggle in the center when you give the pan a gentle shake? That's exactly what you're looking for. Don't be alarmed by the dark top - embrace it!
- The Waiting Game
- This is the hardest part - letting it cool completely at room temperature before moving it to the fridge. I know it's tempting to dive in right away, but patience pays off here. After several hours of chilling, you'll be rewarded with perfect slices that hold together beautifully while maintaining that creamy, dreamy texture.
 pin it
Switch Things Up
I'll never forget the first time I intentionally burnt a cheesecake - it felt so wrong, yet so right! I had just returned from a trip to San Sebastian and was determined to recreate the famous Basque cheesecake I'd tasted there. As I watched the top darken in the oven, every instinct told me to pull it out, but I held strong. When I finally sliced into it hours later, after the agonizing wait for it to cool, I was blown away. That bitter-sweet caramelized top paired with the jiggly, creamy center was pure perfection. Now I make this in a loaf pan because it's easier to slice evenly, and honestly, it looks stunning on the table. I've made this for countless dinner parties, and it never fails to spark conversation. People are always surprised when I tell them it's supposed to look burnt!
Perfect Pairings
This Burnt Basque Cheesecake pairs beautifully with fresh berries - the tartness of raspberries or the sweetness of strawberries cuts through the richness perfectly. A dollop of lightly sweetened whipped cream adds an elegant touch without overwhelming the dessert. For a more indulgent pairing, try it with a drizzle of salted caramel or a dusting of cocoa powder. Coffee lovers will appreciate how well this pairs with a strong espresso or a creamy latte. For an adult twist, serve it alongside a glass of dessert wine like Pedro Ximénez sherry or a tawny port. Fresh figs or poached pears also make excellent companions, adding a sophisticated element to your presentation.
 pin it
Frequently Asked Questions
- → Why is the top so dark?
The deeply caramelized, almost burnt top is the signature characteristic of Basque cheesecake! It's intentional and creates a wonderful bitter-sweet flavor that contrasts beautifully with the creamy interior. This happens because the cheesecake is baked at a high temperature without a water bath.
- → Can I make this in a round pan instead?
Absolutely! You can use an 8 or 9-inch round cake pan instead of a loaf pan. The baking time may vary slightly, so watch for that deep caramelization on top and the jiggly center as your doneness indicators.
- → Why is my cheesecake so jiggly?
The jiggly, almost custard-like texture is exactly what makes Basque cheesecake special. It should wobble when you shake the pan and will firm up as it cools. If it seems too liquid, it may need a few more minutes in the oven, but err on the side of underdone rather than overdone.
- → Can I freeze this cheesecake?
Yes! Wrap it tightly in plastic wrap and then aluminum foil. It will keep frozen for up to 2 months. Thaw overnight in the refrigerator before serving. The texture remains wonderfully creamy after freezing.
- → Do I need to use a water bath?
No water bath needed! Unlike traditional cheesecakes, Basque cheesecake is baked at high heat without a water bath. This is what creates that signature caramelized top and creamy interior. It's actually much easier than traditional cheesecake methods.
Conclusion
This Burnt Basque Cheesecake is proof that sometimes the best recipes are the simplest ones. With just a handful of ingredients and minimal technique, you create something truly spectacular. The intentionally caramelized top and impossibly creamy interior make this dessert unforgettable. Whether you're serving it for a special occasion or treating yourself on a weekend, this cheesecake delivers restaurant-quality results right from your home kitchen. The loaf shape adds a modern twist to the classic round version, making it perfect for slicing and sharing.