
 pin it
I absolutely love these Candy Cane Heart Lollipops because they capture everything magical about the Christmas season in one sweet treat. I first discovered the idea of making homemade lollipops at a holiday craft fair years ago, where a vendor was selling similar treats for quite a premium price. I thought to myself, I can definitely make these at home! So I experimented with different chocolate combinations and techniques until I perfected this recipe. What makes these special is the beautiful marbled effect you get when you swirl the colored candy melts into the white chocolate – no two lollipops ever look exactly the same, which gives them that artisanal, handcrafted charm. The crushed candy canes add a delightful peppermint crunch, while the festive sprinkles make them look like tiny edible Christmas ornaments. The heart shape adds an extra touch of love and care, making them perfect for gifting. Every time I make these, I'm transported back to childhood memories of candy shops and holiday excitement.
Why I love this recipe
This recipe holds a special place in my heart for so many reasons. First, it's incredibly forgiving – even if you're not experienced with candy making, you can create beautiful results. The process is almost meditative: melting the chocolate, watching the colors swirl together, carefully placing each sprinkle. It's therapeutic and creative at the same time. I love that these lollipops are both a treat and a craft project rolled into one. They're perfect for involving kids in holiday preparations, teaching them about patience and precision while having tons of fun. The fact that they make such impressive gifts is a huge bonus – people are always amazed when I tell them I made these myself. But most of all, I love how these lollipops embody the spirit of giving. Every time I tie a ribbon around one and hand it to someone, I see their face light up with joy. That moment of happiness, that connection created over something sweet and handmade, is what the holidays are truly about. These lollipops aren't just candy; they're little edible expressions of love and holiday cheer.
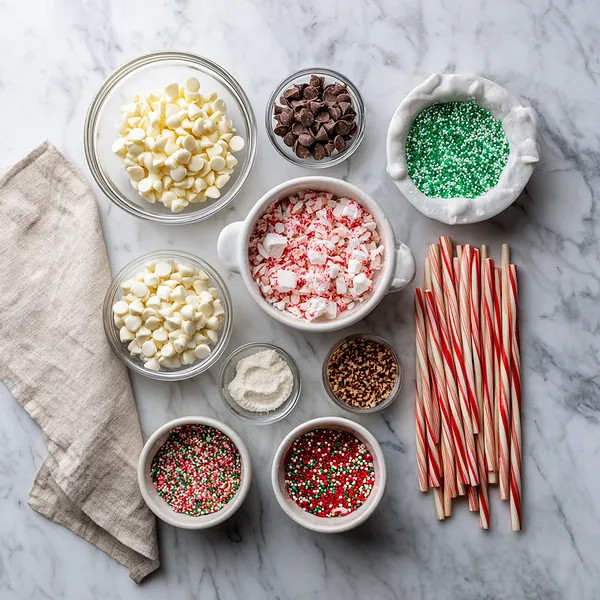
What You Need From Your Kitchen
- White chocolate chips: Melt in microwave-safe bowl in 30-second intervals until smooth and use as the base for the lollipops
- Candy canes: Crush into small pieces using a food processor or by placing in a sealed bag and crushing with a rolling pin, then sprinkle on top
- Red and green candy melts: Melt separately and drop onto white chocolate to create festive swirled patterns
- Holiday sprinkles: Sprinkle generously over the wet chocolate surface for colorful decoration
- Lollipop sticks: Insert into molds before pouring chocolate to create the lollipop structure
- Red ribbon bows: Tie around each stick after removing from molds for an elegant finishing touch
Let's Make These Together
- Prepare Your Workspace
- Start by organizing all your ingredients and tools on your counter. Line your baking sheet with parchment paper and arrange your heart-shaped silicone molds. This preparation step ensures everything flows smoothly once you start working with melted chocolate, which sets quickly. Having lollipop sticks ready and within reach will make the assembly process much easier.
- Master the Melting Process
- Melting chocolate properly is crucial for smooth, glossy lollipops. Use the microwave method with 30-second intervals, stirring thoroughly between each heating. The chocolate should be fluid but not hot – overheating can cause it to seize or become grainy. Melt your white chocolate first, then tackle the colored candy melts in separate small bowls for easy access during the swirling step.
- Create Beautiful Swirls
- This is where the magic happens! Pour your melted white chocolate into each heart mold, filling them about three-quarters full. Using a toothpick, add drops of red and green candy melts randomly across the surface. Then, gently drag your toothpick through the colors to create swirls – don't overmix or the colors will muddy together. Each lollipop will have its own unique pattern, making them extra special.
- Add Festive Toppings
- Work quickly while the chocolate is still wet to add your toppings. Sprinkle crushed candy canes first for that peppermint crunch, then add your holiday sprinkles for pops of color. Don't be shy – these lollipops should look festive and fun! A gentle press with your fingertip will help the toppings adhere without disturbing your beautiful swirls underneath.
- Chill and Complete
- Patience is key in this final step. Pop your baking sheet into the refrigerator and let the lollipops set completely for 15-20 minutes. Once firm, they'll release easily from the molds. The final touch – tying those adorable red ribbon bows around each stick – transforms them from simple candies into giftable works of art that look like they came from a boutique candy shop.
 pin it
Switch Things Up
I first made these candy cane heart lollipops three Christmases ago when I was looking for a fun activity to do with my nieces. We had leftover candy canes from decorating the tree, and I thought, why not turn them into something special? The kitchen quickly became a candy-making workshop, with chocolate melting, sprinkles flying everywhere, and lots of giggles. The girls absolutely loved watching the white chocolate swirl with the colorful candy melts, creating those beautiful marbled patterns. We tied red ribbons around each stick, and suddenly they looked like professional confections. Now it's become our annual tradition – we make these every December, and the girls have gotten so good at it that they've started gifting them to their teachers and friends. It's amazing how a simple recipe can create such lasting memories and bring so much joy to the holiday season.
Perfect Pairings
These Candy Cane Heart Lollipops pair wonderfully with a steaming cup of hot chocolate topped with whipped cream and crushed peppermint. For a complete holiday dessert spread, serve them alongside sugar cookies, gingerbread men, and peppermint bark. They also make fantastic accompaniments to a holiday cheese board, providing a sweet contrast to savory cheeses and nuts. If you're hosting a Christmas party, display them in a glass jar next to eggnog or mulled cider. For gifting, package them in clear cellophane bags tied with festive ribbons and pair with homemade fudge or chocolate truffles for an irresistible holiday gift basket.
 pin it
Frequently Asked Questions
- → Can I use regular chocolate instead of white chocolate?
Yes, you can use milk chocolate or dark chocolate as a base, though the festive red and green colors won't show up as vibrantly against darker chocolate. White chocolate provides the best canvas for the colorful swirls and allows the holiday sprinkles to really pop visually.
- → How do I prevent the chocolate from getting too thick while working?
If your chocolate starts to thicken or set while you're working, simply pop it back in the microwave for 10-15 seconds to re-melt it. Avoid overheating, as this can cause the chocolate to seize. Working in small batches and keeping your workspace warm can also help maintain the right consistency.
- → Can I make these lollipops ahead of time?
Absolutely! These lollipops can be made up to 2 weeks in advance when stored properly in an airtight container at room temperature. For longer storage, keep them refrigerated for up to a month. Just make sure to separate layers with parchment paper to prevent them from sticking together. Add the ribbon bows just before gifting or serving.
- → What if I don't have silicone heart molds?
You can use any shaped silicone candy molds you have on hand, or even spread the chocolate mixture on a parchment-lined baking sheet and cut into shapes with cookie cutters once partially set. Alternatively, use plastic chocolate molds or even ice cube trays as substitutes – the technique remains the same.
- → My chocolate seized or became grainy, what did I do wrong?
Chocolate can seize when it comes into contact with water or steam, or if it's overheated. Make sure all your bowls and utensils are completely dry before melting chocolate. Heat in short intervals and stop heating once mostly melted – the residual heat will finish the job. If it does seize, you can sometimes save it by stirring in a teaspoon of vegetable oil or shortening.
- → Are these lollipops suitable for people with dietary restrictions?
These lollipops are naturally gluten-free, making them safe for those with celiac disease or gluten sensitivity. However, they do contain dairy from the white chocolate and may contain soy. Always check ingredient labels on your specific chocolate and candy products, as formulations can vary. For vegan versions, look for dairy-free white chocolate alternatives.
Conclusion
These Candy Cane Heart Lollipops are the perfect blend of festive fun and delicious sweetness. They're incredibly easy to make, requiring just a few simple ingredients and minimal time in the kitchen. Whether you're making them for a holiday party, as gifts for loved ones, or simply to spread some Christmas cheer, these adorable treats are guaranteed to bring smiles. The best part? You can customize the colors and decorations to match any holiday theme. Make a batch today and watch them disappear faster than Santa down a chimney!