
 pin it
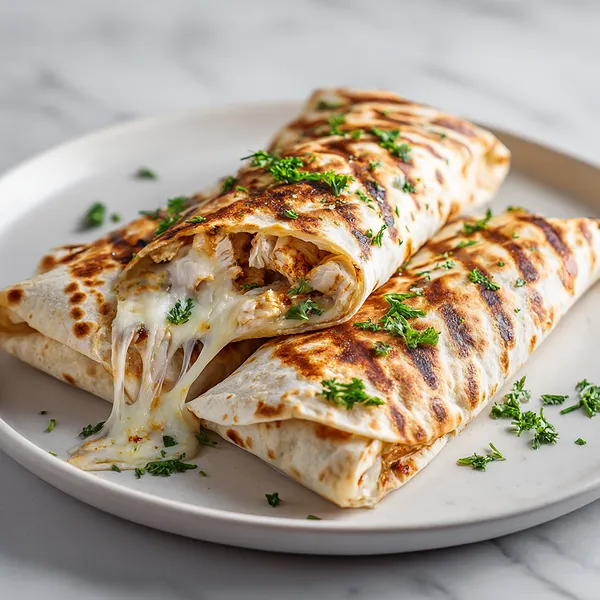
I'll never forget the first time I tried a version of these wraps at a local food truck festival. The vendor had a line around the block, and when I finally got my hands on one, I understood why. The contrast between the crispy, buttery tortilla and the creamy, garlicky chicken filling was absolute perfection. I went home that night determined to recreate it, and after a few attempts, I nailed it. My version features shredded chicken tossed in a garlic-herb mixture, layered with a generous amount of melted cheese, all wrapped up and grilled until golden. The secret is brushing the outside with garlic butter before grilling – it creates this incredible crispy shell that shatters when you bite into it. I love making these when I have leftover chicken, but honestly, I've been known to cook chicken specifically just to make these wraps. The creamy garlic sauce on the side is non-negotiable; it adds this cool, tangy element that balances the richness perfectly.
Why I love this recipe
What I love most about this recipe is how it checks all the boxes: it's quick, it's satisfying, and it uses simple ingredients that I almost always have on hand. There's something deeply comforting about the combination of melted cheese and garlic that just hits the spot every single time. I also appreciate how versatile these wraps are – they work for lunch, dinner, or even as a hearty snack. The prep is straightforward enough that I can involve my kids in making them, which has turned into a fun weeknight activity. Watching that cheese stretch as you cut into a freshly grilled wrap never gets old. Plus, these wraps are impressive enough to serve to guests but easy enough for a solo dinner when I don't feel like cooking something elaborate. They're proof that simple ingredients, when combined thoughtfully, can create something truly special.
What You Need From Your Kitchen
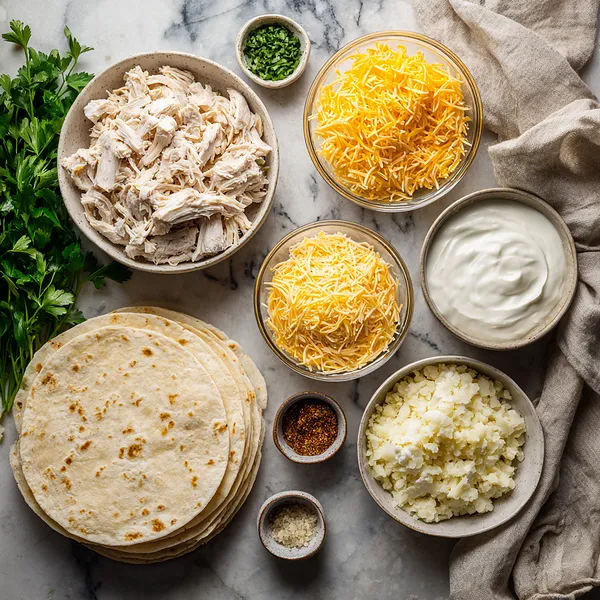
- Chicken breast: Cook and shred, or use rotisserie chicken for convenience
- Cheddar cheese: Shred freshly for best melting quality
- Mozzarella cheese: Shred freshly to ensure proper melting and stretch
- Flour tortillas: Use large burrito-size tortillas for easier wrapping
- Garlic: Mince fresh cloves for maximum flavor
- Sour cream: Use full-fat for creamiest texture
- Mayonnaise: Combine with sour cream for the signature creamy sauce
Let's Make These Together
- Prepare the Chicken Filling
- Start by combining your shredded chicken with minced garlic, garlic powder, onion powder, black pepper, and fresh parsley in a large bowl. Mix everything together thoroughly so the chicken is well-seasoned throughout. This is where all the flavor comes from, so don't rush this step. The garlic and herbs will infuse into every bite.
- Create the Creamy Sauce
- In a separate bowl, whisk together sour cream, mayonnaise, additional minced garlic, and a pinch of salt. This creates a tangy, creamy sauce that serves double duty – half goes into the chicken mixture for moisture and flavor, while the other half becomes your dipping sauce. Make sure it's smooth and well combined.
- Assemble Your Wraps
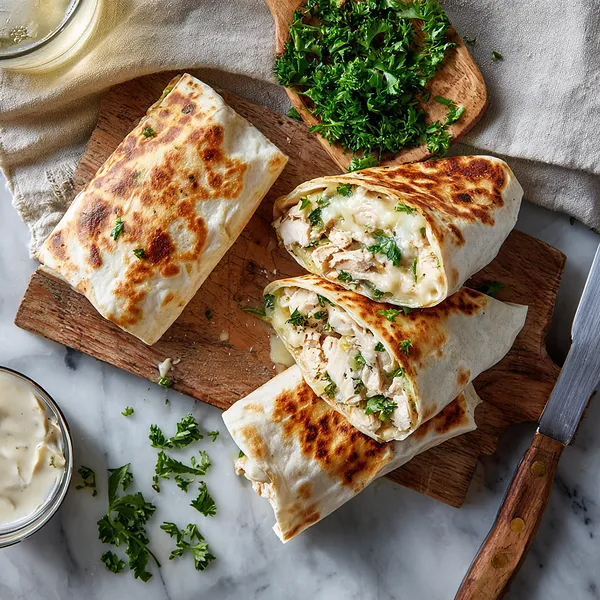
- Lay your tortillas flat and divide the chicken mixture evenly among them, keeping the filling centered. Generously sprinkle both cheddar and mozzarella cheese over the chicken. The combination of cheeses gives you the best flavor and that irresistible cheese pull. Fold the sides in first, then roll tightly from the bottom up, keeping everything tucked in securely.
- Brush and Grill
- Melt butter and mix in a touch of garlic powder, then brush this garlic butter generously over the outside of each wrap. Heat your skillet over medium heat and place the wraps seam-side down. Cook for 3-4 minutes per side, pressing gently with a spatula, until they're golden brown and crispy with beautiful grill marks and the cheese inside is completely melted.
- Rest and Serve
- Once your wraps are perfectly golden and crispy, remove them from the heat and let them rest for a minute or two. This allows the cheese to set slightly so it doesn't all ooze out when you cut them. Slice each wrap diagonally, garnish with fresh parsley, and serve hot with your reserved creamy garlic sauce on the side.
 pin it
Switch Things Up
I first made these wraps on a random Tuesday when I had leftover rotisserie chicken and a serious craving for something cheesy. I didn't have much time, so I threw together what I had in the fridge, and honestly, I was blown away. The combination of the crispy grilled tortilla and that gooey cheese center was an instant hit. My family devoured them in minutes and kept asking when I'd make them again. Now, I always keep the ingredients on hand because these wraps have become our go-to comfort food. Sometimes I add jalapeños for a kick, or swap in pepper jack cheese when I'm feeling spicy. The beauty of this recipe is how forgiving and adaptable it is – you can customize it to whatever you're craving that day.
Perfect Pairings
These wraps pair beautifully with crispy seasoned fries, sweet potato wedges, or a fresh garden salad with ranch dressing. For a lighter option, serve them alongside pickled vegetables or coleslaw to cut through the richness. A cold beer, iced tea, or lemonade makes the perfect beverage companion. If you're feeding a crowd, set up a toppings bar with salsa, guacamole, jalapeños, and extra sour cream so everyone can customize their wraps. These also go wonderfully with tortilla chips and queso dip as an appetizer before diving into the main event.
 pin it
Frequently Asked Questions
- → Can I make these wraps ahead of time?
Yes! You can assemble the wraps and store them wrapped in plastic wrap in the refrigerator for up to 24 hours before grilling. You can also grill them completely and reheat in a skillet or air fryer for 3-4 minutes until warmed through and crispy again.
- → What can I use instead of chicken?
These wraps are very versatile! You can substitute shredded turkey, ground beef, or ground turkey seasoned with taco spices. For a vegetarian version, try using black beans, seasoned tofu, or sautéed vegetables with the same cheese and sauce.
- → How do I prevent the wraps from getting soggy?
The key is not to overload the tortillas with too much filling or sauce. Also, make sure to cook them seam-side down first to seal the wrap, and cook over medium heat so the outside gets crispy while the cheese melts. If reheating, always use a skillet or air fryer, never a microwave.
- → Can I freeze these wraps?
Yes, you can freeze the assembled but uncooked wraps. Wrap each one tightly in plastic wrap and then in aluminum foil. Freeze for up to 2 months. When ready to eat, thaw in the refrigerator overnight, then brush with garlic butter and grill as directed.
- → What's the best way to get those perfect grill marks?
Make sure your skillet or griddle is properly preheated over medium heat. Don't move the wraps around too much – let them sit for 3-4 minutes on each side to develop those beautiful golden-brown grill marks. Pressing down gently with a spatula also helps create better contact with the pan.
- → Can I use different types of cheese?
Absolutely! While cheddar and mozzarella create the perfect combination of flavor and melt, you can experiment with pepper jack for spice, Monterey Jack for creaminess, or even add some cream cheese to the filling for extra richness. Just make sure to use cheeses that melt well.
- → How do I know when the chicken filling is properly seasoned?
Taste a small amount of the chicken mixture before assembling the wraps. It should be flavorful on its own since the tortilla and cheese are relatively mild. If it seems bland, add more garlic powder, salt, or herbs. Remember, you can always add more seasoning, but you can't take it away!
Conclusion
These Cheesy Garlic Chicken Wraps are the perfect combination of crispy, creamy, and utterly satisfying. They're versatile enough for a quick weeknight dinner, meal prep Sunday, or even a casual gathering with friends. The garlic-infused filling paired with that golden, crispy exterior creates a texture and flavor combination that's simply irresistible. Serve them with the creamy garlic sauce, and you've got a restaurant-quality meal made right in your own kitchen. Once you master this recipe, you'll find yourself coming back to it again and again!