
 pin it
I first had a chicken pot pie at a small diner during a road trip years ago, and I remember thinking it was the most comforting thing I had ever eaten. The crust was golden and shattered when the fork went in, and the filling was thick, creamy, and packed with vegetables and chicken. I went home and spent weeks trying to recreate that feeling. The version I landed on uses puff pastry for that extra flakiness and layers mozzarella inside for a cheese pull that makes every slice dramatic and delicious. The cream sauce is seasoned simply but deeply — butter, garlic, thyme, and a good chicken broth do all the work. What I love most is how it looks incredibly impressive but is actually very approachable to make. It has become my go-to recipe when I want to feed people something that feels like a warm hug.
Why I love this recipe
I love this recipe because it genuinely tastes like something you would pay a lot of money for at a restaurant, but it comes together in your own kitchen with simple ingredients. The puff pastry eliminates the need for making pie dough from scratch, which saves time without sacrificing any of that satisfying crunch. The filling is endlessly versatile — you can swap vegetables, change the cheese, or use leftover turkey instead of chicken. But most of all, I love the way people react when they see that first slice being lifted out of the pan. The cheese stretching, the steam rising, the vegetables peeking through — it is a moment every time. This is one of those recipes that makes cooking feel rewarding and joyful.
What You Need From Your Kitchen
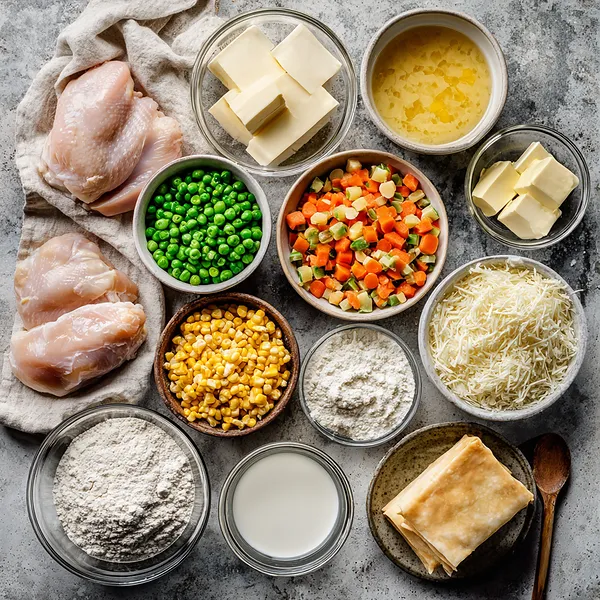
- Chicken Breast: Cook and shred into bite-sized pieces for the hearty filling base
- Puff Pastry: Thaw completely and lay over the top as the golden flaky crust
- Mozzarella Cheese: Sprinkle generously over the filling before adding the pastry for incredible cheese pulls
- Carrots: Dice into small even pieces so they cook through in the sauce evenly
- Heavy Cream: Pour into the roux slowly while stirring to create a thick, velvety cream sauce
- Chicken Broth: Use as the liquid base for the sauce to build deep savory flavor
- Frozen Peas: Stir in directly from frozen — they will thaw perfectly in the hot filling
Let's Make These Together
- Sauté the aromatics in butter
- Start by melting butter in your cast iron skillet over medium heat. Add the diced onion and cook until it turns soft and translucent, about 3-4 minutes. Then add the minced garlic and stir for about 60 seconds until the kitchen starts to smell absolutely incredible.
- Build a thick cream sauce
- Sprinkle flour over the cooked aromatics and stir for a minute or two to cook off the raw flour taste. Slowly stream in the chicken broth while stirring constantly, then add the heavy cream. Keep stirring as the sauce thickens into something gorgeous and velvety. Season it well with salt, pepper, and thyme.
- Fold in the chicken and vegetables
- Add the shredded chicken, peas, diced carrots, and corn into your cream sauce and stir everything together until well combined. Let the filling simmer gently for a few minutes, then take the pan off the heat and scatter the shredded mozzarella on top.
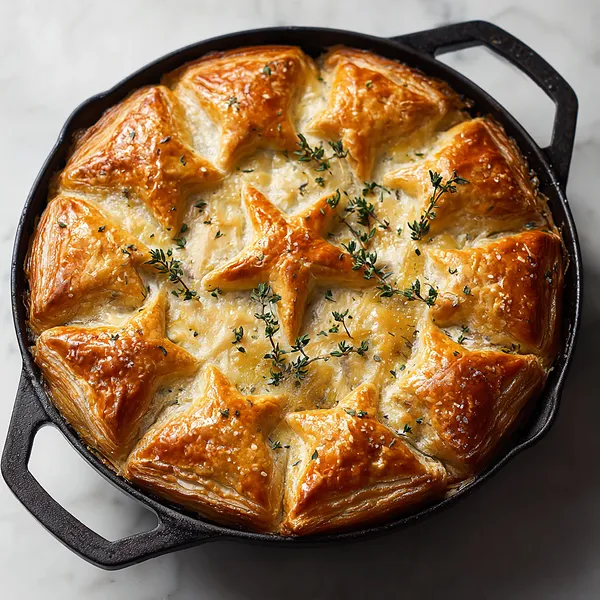
- Top with puff pastry and egg wash
- Drape the thawed puff pastry sheet over the skillet and press the edges in gently. Use any pastry scraps to cut stars and press them on top for a beautiful finish. Brush the whole surface with beaten egg so it bakes up deeply golden and glossy.
- Bake until flaky and golden brown
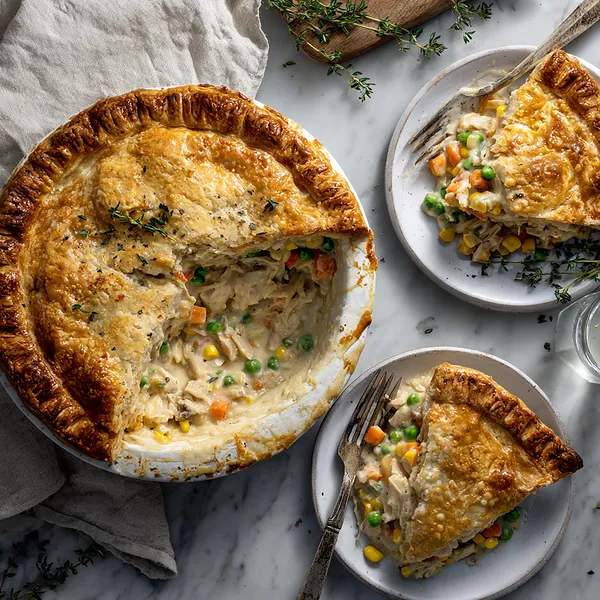
- Cut a few small steam vents in the pastry with a knife, then slide the skillet into your preheated 400°F oven. Bake for 25-30 minutes until the crust is puffed, golden, and flaky. Let it rest a few minutes before slicing so that incredible filling stays inside the slice.
 pin it
Switch Things Up
I remember the first time I made this on a cold Sunday afternoon — I had leftover rotisserie chicken from the night before and a sheet of puff pastry sitting in the freezer. I figured I would try something new. I tossed in extra mozzarella on a whim and that cheese pull when I served the first slice absolutely floored me. Now I always add a generous layer of mozzarella right over the filling before laying the pastry down. Sometimes I throw in mushrooms or swap the mozzarella for gruyere when I want something a little fancier. Either way, this pie hits every single time.
Perfect Pairings
This Chicken Pot Pie pairs beautifully with a simple green salad dressed in lemon vinaigrette to cut through the richness. A bowl of roasted tomato soup on the side makes it a truly cozy dinner. For drinks, a cold glass of sparkling water with lemon or a light white wine like Chardonnay complements the creamy flavors perfectly.
 pin it
Frequently Asked Questions
- → Can I use store-bought rotisserie chicken for this recipe?
Absolutely — rotisserie chicken is actually one of the best shortcuts for this recipe. It is already cooked, well-seasoned, and shreds perfectly into the creamy filling. Just remove the skin and shred the meat before adding it to your sauce.
- → Can I make this chicken pot pie ahead of time?
Yes! You can fully assemble the pie, cover it tightly with plastic wrap, and refrigerate it unbaked for up to 24 hours. When ready to bake, remove it from the fridge while the oven preheats and add about 5 extra minutes to the baking time.
- → What can I use instead of puff pastry?
You can use a traditional homemade pie crust, crescent roll dough, or even biscuit dough as an alternative. Each will give you a slightly different texture — biscuit topping is especially popular for a more rustic version.
- → How do I store and reheat leftovers?
Store leftover pot pie covered in the refrigerator for up to 3 days. To reheat, place slices in an oven at 350°F for about 15 minutes to keep the pastry crispy. Avoid microwaving if possible as it makes the pastry soggy.
- → Can I freeze chicken pot pie?
Yes, you can freeze the assembled unbaked pie for up to 2 months. Wrap it tightly in plastic wrap and then foil. Bake from frozen at 375°F for 50-60 minutes, covering the edges if they start to brown too quickly.
- → Why is my filling too runny?
This usually happens if the roux was not cooked long enough before adding the liquids, or if the sauce was not given enough time to thicken. Make sure you stir the flour and butter for at least 1-2 minutes before adding the broth, and let the sauce simmer until it coats the back of a spoon.
Conclusion
This Homemade Chicken Pot Pie is the ultimate comfort food that never fails to impress. The combination of a buttery flaky crust with a creamy, hearty filling makes it the kind of meal that brings everyone to the table. Make it once and it will become a permanent staple in your kitchen rotation.