
 pin it
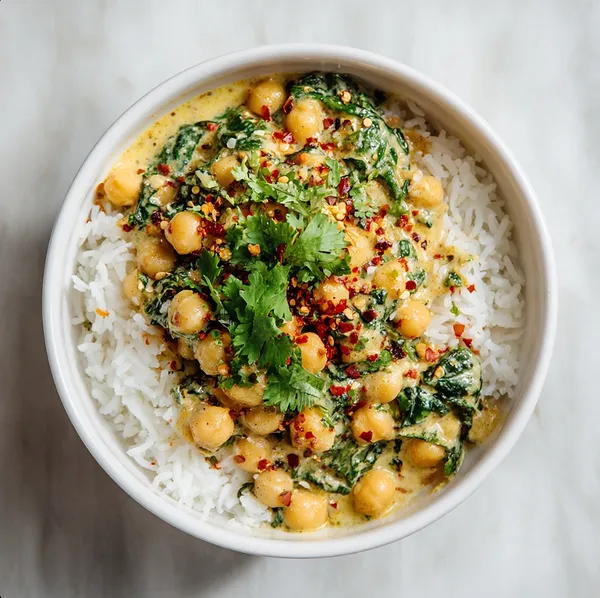
I first discovered chickpea curry during a trip to a small Indian restaurant in my college town, where I was blown away by how something so simple could be so incredibly flavorful. That experience sparked my love for Indian-inspired cuisine and sent me on a mission to recreate those complex, layered flavors at home. This recipe is my interpretation of that memorable meal - a creamy, coconut-based curry that's both authentic in spirit and approachable for home cooks. The curry builds flavor through careful layering: first caramelizing onions until golden, then blooming the spices in oil to release their essential oils, and finally simmering everything together until the chickpeas are tender and the sauce is thick and luscious. The fresh spinach wilts right into the curry at the end, adding color, nutrition, and a subtle earthiness that balances the richness of the coconut milk. What I love most is how the sauce coats each chickpea perfectly, creating little pockets of flavor in every bite. The finishing garnish of cilantro and chili flakes isn't just for looks - it adds a fresh, bright note and a gentle heat that brings everything together. Served over fluffy basmati rice, this curry becomes a complete, satisfying meal that feels special enough for guests but easy enough for a Tuesday night.
Why I love this recipe
This recipe holds a special place in my heart because it's my go-to answer for "what should we make for dinner?" It checks every box: it's healthy, budget-friendly, absolutely delicious, and comes together in under an hour. I love how versatile it is - some nights I make it mild for the kids, other times I amp up the heat with extra spices and fresh chilies. The fact that it uses pantry staples like canned chickpeas and coconut milk means I can make it on a whim without a special grocery trip. Beyond the practical aspects, there's something deeply comforting about this curry. The creamy coconut sauce, the warming spices, the way the spinach wilts into silky ribbons - it's like a hug in a bowl. I've made it for countless dinner parties and potlucks, and it always receives rave reviews from vegetarians and meat-eaters alike. Friends constantly text me asking for the recipe after trying it. What really makes me love this dish is watching people take that first bite and their eyes light up - that moment when they realize that plant-based food can be this satisfying, this rich, this full of flavor. It's become my ambassador recipe for showing people that vegetarian cooking isn't about sacrifice; it's about celebrating incredible ingredients and bold flavors.
What You Need From Your Kitchen
- Chickpeas: Drain and rinse thoroughly to remove excess sodium and starch
- Spinach: Wash well and remove any tough stems, roughly chop if leaves are very large
- Coconut milk: Shake the can well before opening to combine the cream and liquid
- Onion: Dice into small, even pieces for uniform cooking and sweetness
- Garlic: Mince finely or use a garlic press for maximum flavor distribution
- Basmati rice: Rinse thoroughly until water runs clear to remove excess starch for fluffy grains
- Curry powder: Use good quality curry powder for the best flavor depth
- Cilantro: Roughly chop just before serving to maintain freshness and bright color
Let's Make These Together
- Prepare your ingredients
- Begin by gathering all your ingredients and preparing them as needed. Rinse your basmati rice until the water runs clear - this removes excess starch and ensures fluffy grains. Drain and rinse your canned chickpeas thoroughly. Dice your onion into small, even pieces and mince the garlic. Wash your spinach well and set aside. Having everything prepped and ready makes the cooking process smooth and enjoyable.
- Cook the rice base
- Start your rice first since it needs time to cook and rest. Combine the rinsed rice with water in a pot, add a pinch of salt, and bring it to a boil. Once boiling, reduce the heat to the lowest setting, cover tightly, and let it simmer undisturbed for about 15-18 minutes. The key to perfect rice is not lifting the lid during cooking - this traps the steam that cooks the rice evenly. When done, remove from heat and let it rest covered while you make the curry.
- Build your flavor foundation
- Heat your oil in a large skillet over medium heat. Add the diced onions and let them cook slowly, stirring occasionally, until they turn golden and sweet - this takes about 5-7 minutes. Don't rush this step; caramelized onions add incredible depth to your curry. Add the minced garlic and cook for another minute until your kitchen smells amazing. Then add all your ground spices and stir constantly for about 30 seconds. This blooming process releases the essential oils in the spices, creating a more complex and aromatic curry.
- Create the creamy curry
- Pour in your coconut milk and stir everything together, scraping up any flavorful bits from the bottom of the pan. Add your chickpeas and bring the mixture to a gentle simmer. Let it bubble away for 10-12 minutes, stirring occasionally. You'll notice the sauce thickening and the chickpeas absorbing all those wonderful flavors. Season with salt and pepper to taste - don't be shy, the seasoning really brings everything together.
- Finish and serve with flair
- Add your fresh spinach to the curry in handfuls, stirring gently as it wilts down into the sauce. This only takes a couple of minutes. Taste your curry and adjust the seasonings if needed - maybe a touch more salt or an extra pinch of garam masala. Fluff your rested rice with a fork and divide it among serving bowls. Ladle the gorgeous curry over the rice, making sure everyone gets plenty of chickpeas and those beautiful ribbons of spinach. Finish with a generous handful of fresh cilantro and a sprinkle of red chili flakes. The bright green herbs and red flakes against the golden curry create a stunning presentation that's almost too pretty to eat - almost!
 pin it
Switch Things Up
I remember the first time I made this curry on a rainy Tuesday evening when I was craving something warm and nourishing. I had a can of chickpeas in the pantry and some wilting spinach in the fridge that needed using up. What started as a "clean out the fridge" dinner turned into one of my most-requested recipes. My partner walked in the door and immediately asked what smelled so amazing. Now, every time the weather turns cold or we need a cozy meal, this curry makes an appearance. I've tweaked the spice levels over time, sometimes adding extra chili flakes when we're feeling bold, or stirring in a squeeze of lime juice at the end for brightness. The best part? It somehow tastes even better the next day, which makes it perfect for lunch leftovers.
Perfect Pairings
This chickpea spinach curry pairs beautifully with warm naan bread for scooping up every last bit of that creamy sauce, or try it alongside crispy papadums for added texture. A cool cucumber raita or simple yogurt sauce helps balance the warming spices perfectly. For a complete meal, serve with mango chutney on the side and a fresh tomato-onion salad dressed with lemon juice. If you want to make it more substantial, add roasted cauliflower or sweet potato chunks. A glass of crisp white wine or a refreshing lassi complements the rich, spiced flavors wonderfully.
 pin it
Frequently Asked Questions
- → Can I make this curry ahead of time?
Absolutely! This curry actually tastes better the next day as the flavors have more time to meld together. Store it in an airtight container in the refrigerator for up to 4 days. When reheating, you may need to add a splash of water or coconut milk as the sauce thickens when chilled. Reheat gently on the stovetop or in the microwave until heated through.
- → Can I use dried chickpeas instead of canned?
Yes, you can definitely use dried chickpeas! You'll need about 1 cup of dried chickpeas, which you should soak overnight and then cook until tender (about 1-2 hours of simmering). Dried chickpeas give you more control over the texture and have no added sodium. Just make sure they're completely cooked and tender before adding them to the curry.
- → How can I make this curry spicier?
There are several ways to increase the heat level! Add fresh chopped green chilies or jalapeños when you sauté the onions, increase the amount of chili flakes, or add a pinch of cayenne pepper along with the other spices. You can also serve it with hot sauce on the side so everyone can adjust the heat to their preference. Start with small amounts and taste as you go.
- → What can I substitute for spinach?
You have many great options! Kale works wonderfully - just remove the tough stems and chop it into bite-sized pieces. Swiss chard, collard greens, or even arugula are excellent alternatives. You could also use frozen chopped spinach (about 2 cups, thawed and drained). Each green adds its own unique flavor and texture, so feel free to experiment with what you have on hand.
- → Is this recipe gluten-free?
Yes, this recipe is naturally gluten-free! All the main ingredients - chickpeas, spinach, coconut milk, rice, and spices - contain no gluten. However, always check your spice blends and curry powder labels to ensure they haven't been processed in facilities with gluten or contain any hidden gluten-containing additives. When in doubt, use individual spices that you know are certified gluten-free.
- → Can I freeze this curry?
Yes, this curry freezes beautifully! Let it cool completely, then transfer to freezer-safe containers or bags, leaving a little room for expansion. It will keep well for up to 3 months. I recommend freezing the curry without the rice, as rice can become mushy when frozen and reheated. Thaw overnight in the refrigerator and reheat gently on the stovetop, adding a splash of coconut milk if needed to restore the creamy consistency.
Conclusion
This Creamy Chickpea Spinach Curry is proof that plant-based meals can be incredibly satisfying and full of flavor. The combination of protein-rich chickpeas, nutrient-dense spinach, and aromatic spices creates a wholesome dish that's perfect for weeknight dinners or meal prep. Serve it over fluffy basmati rice and watch it disappear from the table. It's comfort food that loves you back!