
 pin it
I describe these chocolate coconut balls as little bites of pure joy wrapped in coconut clouds. The first time I encountered something similar was at a health food café in Portland, where they charged five dollars for two tiny balls. I took one bite and thought, I can make these at home. And I did – even better than the café version. What I love about this recipe is its beautiful simplicity. You're essentially taking nature's candy – dates – and transforming them into something that feels utterly indulgent. The dates provide natural sweetness and a caramel-like chewiness, while the cocoa powder adds that deep, rich chocolate flavor we all crave. The coconut coating isn't just for looks; it adds a delightful textural contrast and a subtle tropical note that makes each bite more interesting. These aren't just energy balls or protein bites – they're legitimate desserts that happen to be good for you. The texture is key here: slightly firm on the outside from the coconut, but soft and fudgy on the inside. When I make them, I always make sure to use Medjool dates because they're softer and sweeter than other varieties, which means the mixture comes together more easily and tastes more decadent.
Why I love this recipe
I love this recipe for so many reasons, but mainly because it proves that wholesome ingredients can create something truly spectacular. There's something deeply satisfying about making a treat that has no refined sugar, no butter, no flour, and yet tastes better than most conventional desserts. I love that I can pronounce every ingredient and feel good about serving these to my family. I love how forgiving this recipe is – you can't really mess it up. If the mixture is too dry, add another date. Too wet? Add more cocoa powder. I also love the versatility. Some days I add a tablespoon of almond butter to the mixture for extra richness, or a pinch of espresso powder to intensify the chocolate flavor. I've rolled them in crushed pistachios, chopped almonds, and even matcha powder when I'm feeling adventurous. But most of all, I love how these little balls have become a staple in my kitchen. They satisfy my chocolate cravings, fuel my afternoon slumps, and make me look like a kitchen genius when I serve them to guests. They're proof that the best recipes aren't always the most complicated ones.
What You Need From Your Kitchen
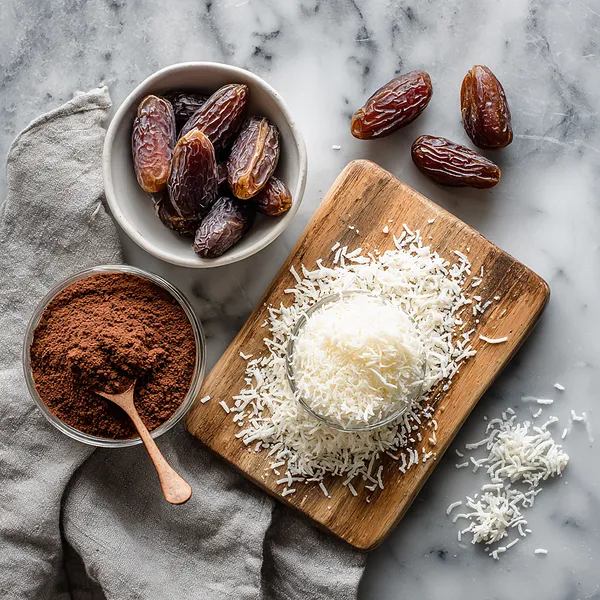
- Medjool dates: Soak in warm water if dry, then drain and pat completely dry before processing
- Cocoa powder: Sift if lumpy to ensure smooth incorporation into the date mixture
- Shredded coconut: Spread in a shallow bowl for easy rolling and coating of the balls
- Vanilla extract: Add to the food processor along with dates for enhanced flavor
- Sea salt: Pinch added to the mixture to balance sweetness and enhance chocolate flavor
Let's Make These Together
- Prepare Your Dates
- Start by making sure all your dates are properly pitted – nothing ruins the moment like biting into a pit! If your dates feel a bit firm or dry, don't worry. Simply place them in a bowl, cover with warm water, and let them soak for about 10 minutes. This rehydrates them and makes them much easier to blend. Once they're soft and plump, drain them well and pat them completely dry with paper towels. Any excess water will make your mixture too sticky and difficult to work with.
- Blend the Chocolate Base
- Add your prepared dates to a food processor along with the cocoa powder, vanilla extract, and a small pinch of sea salt. The salt might seem unnecessary, but trust me – it enhances the chocolate flavor beautifully and balances the natural sweetness of the dates. Pulse the mixture several times, stopping to scrape down the sides of the processor as needed. You want everything to come together into a thick, sticky, uniform mass. It should look like brownie batter and hold together when you press a bit between your fingers. If it's too crumbly, add one more date. If it's too wet, add a touch more cocoa powder.
- Roll into Perfect Balls
- Now comes the fun part! Scoop out about a tablespoon of the mixture – I usually use a cookie scoop to keep them uniform in size. Roll the mixture between your palms using gentle, circular motions until you have a smooth, round ball. If the mixture starts sticking to your hands, lightly dampen your palms with water and continue rolling. Place each finished ball on a plate as you go. You should end up with about 12 evenly-sized balls, each one looking absolutely perfect and ready for its coconut coat.
- Coat with Coconut
- Pour your shredded coconut into a shallow bowl – this makes the coating process much easier. Take each chocolate ball and roll it through the coconut, using your hands to press the flakes gently into the surface. Make sure each ball is completely and evenly coated – the coconut not only adds amazing flavor and texture, but it also keeps the balls from sticking together. Once coated, return them to your plate. They should look absolutely gorgeous at this point, like little snowballs or fancy truffles from a boutique chocolate shop.
- Chill and Enjoy
- Transfer your coconut-coated balls to an airtight container or keep them on the plate, then pop them in the refrigerator for at least 30 minutes. This chilling time is crucial – it firms up the balls, intensifies the flavors, and creates that perfect bite-through texture. Once chilled, they're ready to enjoy! Store them in the fridge for up to two weeks, or freeze them for up to three months. I like to keep a batch in the freezer so I always have a healthy treat ready whenever a craving hits.
 pin it
Switch Things Up
I first made these on a Sunday afternoon when I was craving something sweet but had almost nothing in my pantry. I remembered seeing a bag of dates in the back of my cabinet and thought, why not experiment? I threw them in the food processor with some cocoa powder, and the moment I tasted that sticky, fudgy mixture, I knew I was onto something special. I rolled them into balls, coated them in coconut I had leftover from making granola, and popped them in the fridge. Twenty minutes later, I bit into one and couldn't believe how much it tasted like an expensive truffle from a fancy chocolate shop. My kids came home from their playdate and devoured half the batch before dinner. Now I make them every week, sometimes adding a pinch of cinnamon or a splash of vanilla. They've become my secret weapon for potlucks and bake sales – everyone always asks for the recipe, and when I tell them it's just three ingredients, they never believe me. These little balls have saved me from so many dessert emergencies, and they've turned me into the person who always has a healthy treat ready to go.
Perfect Pairings
These chocolate coconut balls pair beautifully with a variety of beverages and foods. Serve them alongside a strong espresso or Turkish coffee for an authentic Middle Eastern experience – the bitterness of the coffee perfectly balances the natural sweetness of the dates. They're also wonderful with mint tea or a creamy chai latte. For a more indulgent pairing, try them with a glass of almond milk or coconut milk. If you're serving them as part of a dessert spread, they complement fresh berries, sliced oranges, or a fruit platter beautifully. They also work well on a cheese board alongside dark chocolate, nuts, and dried fruits. For breakfast, crumble one over Greek yogurt with granola, or pack them alongside apple slices and almond butter for a balanced snack.
 pin it
Frequently Asked Questions
- → Can I use regular dates instead of Medjool dates?
Yes, you can use regular Deglet Noor dates, but Medjool dates work best because they're softer, sweeter, and blend more easily. If using regular dates, you may need to soak them longer (15-20 minutes) to achieve the right texture. The final result will be slightly less sweet and may require an extra date or two.
- → Do I need to refrigerate these chocolate coconut balls?
Yes, refrigeration is recommended to maintain their texture and prevent them from becoming too soft. They'll keep in an airtight container in the fridge for up to 2 weeks. You can also freeze them for up to 3 months – just let them thaw for a few minutes before eating, or enjoy them frozen for a firmer, truffle-like texture.
- → Can I make these nut-free?
Absolutely! This recipe is naturally nut-free as written. Just be sure to check that your cocoa powder doesn't contain any nut-based ingredients. If you want to add extra nutrition without nuts, try mixing in some seeds like hemp hearts or ground flaxseed into the date mixture before rolling.
- → What can I use instead of coconut for coating?
There are tons of delicious alternatives! Try crushed nuts (almonds, pistachios, or pecans), cacao nibs, cocoa powder, crushed freeze-dried raspberries, or even finely chopped dark chocolate. You could also roll some in coconut and others in different coatings for variety. Mini chocolate chips pressed into the surface also work beautifully.
- → Why is my mixture too sticky or too dry?
If your mixture is too sticky, it likely means your dates were very fresh and moist, or you didn't dry them well enough after soaking. Add an extra tablespoon of cocoa powder to absorb the moisture. If it's too dry and crumbly, your dates may have been too dry to begin with. Add one or two more dates, or add a teaspoon of water and blend again until it comes together.
- → Can I add protein powder to make these more filling?
Yes! You can add 2-3 tablespoons of your favorite protein powder to the mixture. Vanilla or chocolate protein powder works best. Keep in mind that adding protein powder will make the mixture drier, so you may need to add an extra date or a splash of plant milk to get the right consistency. The flavor will also be slightly different depending on the protein powder you use.
- → How do I know when the mixture is properly blended?
The mixture is ready when it forms a sticky, cohesive ball in the food processor and holds together firmly when pressed between your fingers. It should look uniform with no visible date chunks, and should have a fudge-like consistency. If you can roll it into a ball without it falling apart, you're good to go!
Conclusion
These 3-ingredient chocolate coconut balls are proof that healthy snacking doesn't have to be complicated or boring. With just a handful of wholesome ingredients and a few minutes of your time, you can create a treat that satisfies your sweet tooth while actually nourishing your body. They're perfect for meal prep, lunchboxes, post-workout fuel, or those moments when you need something sweet but don't want the sugar crash. Store them in an airtight container in the fridge for up to two weeks, or freeze them for up to three months. The best part? You can customize them endlessly – add nuts, swap the coconut for crushed cookies, or roll them in different coatings. This recipe has become my go-to whenever I need a quick, impressive, and genuinely delicious treat.