
 pin it
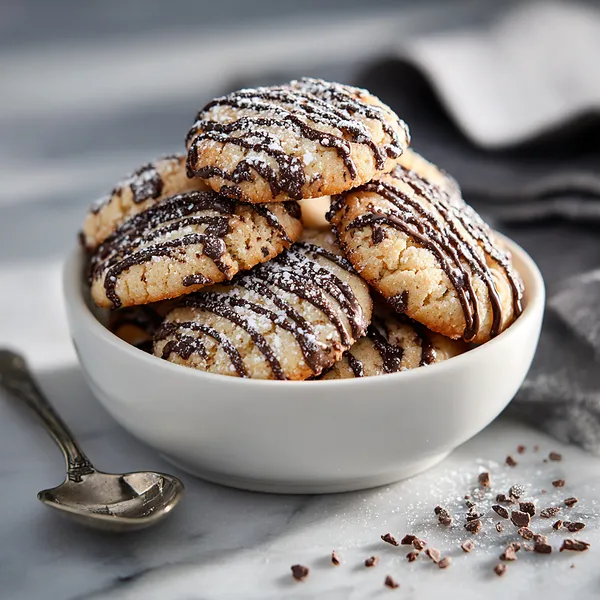
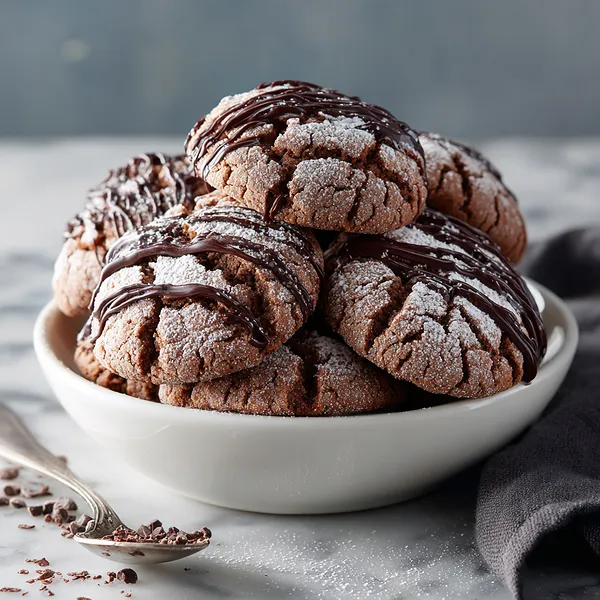
I stumbled upon the idea for these cookies during a late-night Pinterest scroll when I couldn't sleep. I was captivated by the image of cookies drizzled so artfully with chocolate – it looked almost too beautiful to eat. The next morning, I couldn't shake the craving, so I headed to my kitchen determined to recreate them. What I love most about this recipe is how it transforms a simple chocolate chip cookie into something extraordinary with just one extra step: that chocolate drizzle. The base cookie dough is incredibly forgiving and comes together quickly with ingredients you probably already have in your pantry. When I pulled the first batch from the oven, the kitchen smelled like a chocolate wonderland. After letting them cool just enough, I melted dark chocolate and used a spoon to create those artistic drizzles – it felt like I was a professional pastry chef! The final touch of powdered sugar dusted on top added that wow factor. Now, every time I make these, I'm transported back to that first successful batch and the pure joy of creating something both delicious and beautiful.
Why I love this recipe
There are so many reasons why this recipe has become one of my absolute favorites. First, the texture is absolutely perfect – these cookies have crispy edges with soft, chewy centers that stay tender for days. The chocolate chips scattered throughout provide pockets of melty goodness in every bite, while the dark chocolate drizzle adds an extra layer of richness and visual appeal that makes these cookies Instagram-worthy. What really sets them apart is the balance of sweetness; they're indulgent without being overwhelmingly sugary. I also love how versatile they are – you can dress them up for special occasions or enjoy them as an everyday treat. The recipe is foolproof enough for beginners but produces results that look and taste professional. Plus, they're crowd-pleasers that appeal to kids and adults alike. Every time I make them, I get requests for the recipe, which is always the ultimate compliment. The fact that they come together in under an hour from start to finish makes them my go-to when I need something impressive without spending all day in the kitchen.
What You Need From Your Kitchen
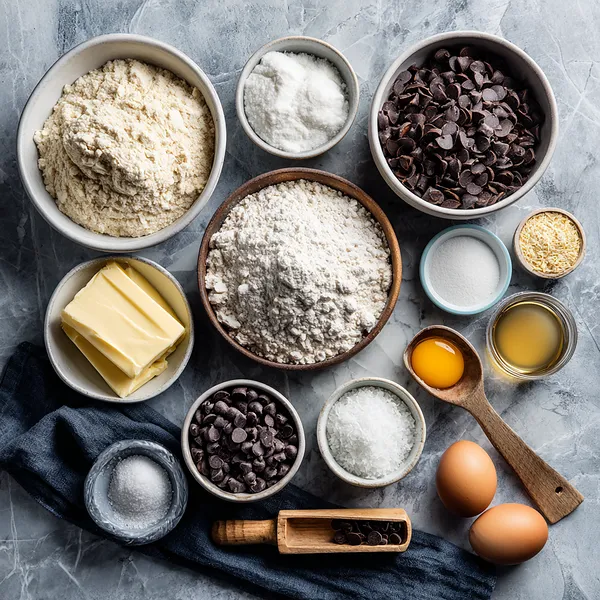
- All-purpose flour: Forms the base structure of the cookies, providing the perfect tender texture
- Unsalted butter: Cream with sugar until light and fluffy for rich, buttery flavor
- Eggs: Add one at a time to the creamed butter mixture for binding and moisture
- Semi-sweet chocolate chips: Fold into the dough for pockets of melty chocolate throughout
- Dark chocolate: Melt and drizzle artistically over cooled cookies for elegant decoration
- Powdered sugar: Dust generously over the finished cookies for a beautiful, snowy finish
Let's Make These Together
- Prepare Your Workspace
- Begin by preheating your oven to 350°F and lining your baking sheets with parchment paper. This preparation step ensures everything is ready when your dough is mixed, and the parchment prevents sticking while promoting even browning on the cookie bottoms. Having your workspace organized makes the entire baking process smoother and more enjoyable.
- Mix Dry Ingredients
- In a medium bowl, whisk together your flour, baking soda, and salt. This step is crucial because it evenly distributes the leavening agent and salt throughout the flour, ensuring every cookie has the perfect rise and flavor balance. Take your time with this step – proper mixing of dry ingredients is the foundation of great cookies.
- Cream Butter and Sugar
- Using an electric mixer, beat your softened butter and sugar together until the mixture becomes light, fluffy, and pale in color. This process incorporates air into the dough, which creates that perfect tender texture we're after. Don't rush this step – it typically takes 3-4 minutes and makes all the difference in the final cookie texture.
- Add Wet Ingredients
- Beat in your eggs one at a time, making sure each is fully incorporated before adding the next. This gradual addition prevents the mixture from breaking and ensures a smooth, homogeneous dough. Finish by mixing in the vanilla extract, which adds wonderful depth of flavor to complement the chocolate.
- Combine and Fold
- Gradually add your dry ingredients to the wet mixture, mixing on low speed just until you no longer see streaks of flour. Overmixing at this stage can lead to tough cookies, so mix just until combined. Finally, fold in your chocolate chips with a spatula, making sure they're evenly distributed throughout the dough for chocolate in every bite.
- Shape and Bake
- Drop rounded tablespoons of dough onto your prepared baking sheets, leaving about 2 inches between each cookie to allow for spreading. Bake until the edges are golden but the centers still look slightly soft – this is the secret to achieving that perfect chewy texture. Remember, the cookies will continue to bake on the hot pan after you remove them from the oven.
- Create the Chocolate Drizzle
- Once your cookies are completely cooled, melt your dark chocolate until it's smooth and glossy. Using a spoon or piping bag, create beautiful drizzle patterns over each cookie – this is where you can get creative and make each cookie a little work of art. Let the chocolate set for about 15 minutes before adding the final powdered sugar dusting for that professional bakery look.
 pin it
Switch Things Up
I first made these cookies for a family gathering last December, and let me tell you, they disappeared faster than any dessert I've ever brought. My nephew, who's usually picky about sweets, ate four in one sitting! What really sold everyone was the presentation – that chocolate drizzle makes them look like they came from a fancy bakery. I've since made them for countless occasions, and I've learned a few tricks along the way. The key is not over-baking them; take them out when they still look slightly underdone in the center, and they'll finish baking on the pan while staying perfectly soft. I also discovered that using high-quality dark chocolate for the drizzle makes a huge difference – it adds a sophisticated bitterness that cuts through the sweetness beautifully. Now, whenever someone asks me to bring dessert, these are my automatic go-to. They've become so popular with my friends that I've actually started making double batches because I know they'll request seconds.
Perfect Pairings
These chocolate drizzled cookies pair wonderfully with a variety of beverages and accompaniments. Serve them alongside a cold glass of whole milk for the classic combination that never disappoints. For a more adult pairing, try them with a strong espresso or cappuccino – the bitter coffee notes complement the sweet chocolate beautifully. They also make an excellent dessert when served warm with a scoop of vanilla ice cream melting on top. For holiday gatherings, pair them with hot cocoa topped with marshmallows or a spiced chai latte. If you're hosting a dessert board, arrange them alongside fresh strawberries, whipped cream, and chocolate truffles for an elegant chocolate-themed spread.
 pin it
Frequently Asked Questions
- → Can I use milk chocolate instead of dark chocolate for the drizzle?
Absolutely! While dark chocolate provides a nice contrast to the sweet cookie, milk chocolate works beautifully too and creates a sweeter overall flavor profile. You can even use white chocolate for a completely different look and taste. The key is to use good quality chocolate that melts smoothly.
- → Why do my cookies spread too much during baking?
Excessive spreading usually happens when the butter is too soft or melted, or when the dough is too warm. Make sure your butter is softened but still holds its shape, and consider chilling your dough for 30 minutes before baking if you live in a warm climate. Also, ensure your baking sheets aren't hot from a previous batch.
- → How do I get that perfect drizzle pattern?
The trick is to use a spoon and move quickly but deliberately. Dip your spoon in the melted chocolate, then move it back and forth over the cookies in a zigzag motion, allowing the chocolate to fall naturally. You can also transfer the melted chocolate to a piping bag or a plastic bag with a small corner cut off for more control.
- → Can I freeze these cookies?
Yes! These cookies freeze wonderfully. You can freeze the baked cookies without the chocolate drizzle and powdered sugar for up to 3 months. When you're ready to serve, thaw them at room temperature, then add the chocolate drizzle and sugar dust. Alternatively, you can freeze the dough in balls and bake fresh cookies whenever you want – just add a minute or two to the baking time.
- → What's the best way to store these cookies to keep them soft?
Store your cookies in an airtight container at room temperature with a piece of bread – this old baker's trick helps maintain moisture and keeps the cookies soft. Layer them with parchment paper to prevent the chocolate drizzle from sticking. They'll stay fresh and delicious for up to 5 days, though they rarely last that long in my house!
- → Can I make these cookies without a mixer?
Definitely! While an electric mixer makes the job easier, you can absolutely make these by hand. Use a wooden spoon to cream the butter and sugar together vigorously – it'll take a bit more elbow grease and about 5-7 minutes, but you'll get the same fluffy result. The rest of the mixing can also be done by hand with a sturdy spoon.
Conclusion
These chocolate drizzled cookies are everything a cookie should be – soft, indulgent, and absolutely stunning to look at. They strike the perfect balance between homemade comfort and bakery-quality presentation. Whether you're baking for a special occasion or simply craving something sweet, these cookies deliver on every level. The combination of buttery dough, melty chocolate chips, and that gorgeous dark chocolate drizzle creates a multi-layered chocolate experience that's hard to resist. Store them in an airtight container for up to five days, though I guarantee they won't last that long!