
 pin it
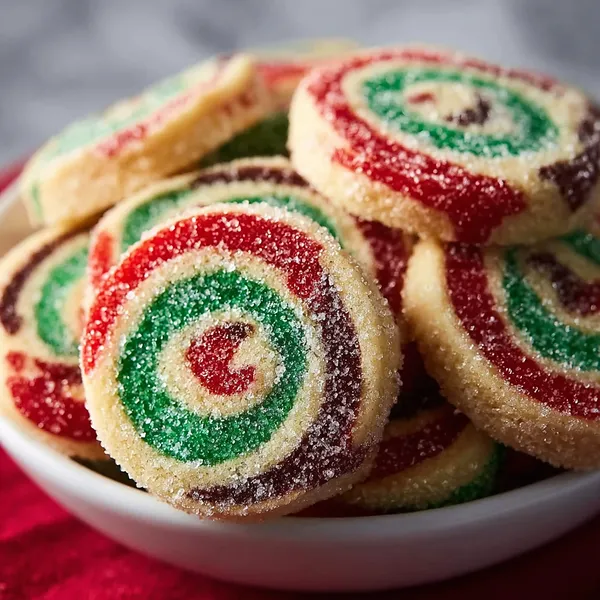
I first discovered pinwheel cookies at a neighborhood holiday party when I was about twelve years old. Our neighbor Mrs. Patterson had made this enormous platter of red and white swirl cookies, and I remember thinking they looked like something from a professional bakery. When she told me she'd made them herself, I was amazed. Years later, when I started my own Christmas baking traditions, I knew I had to master these. The recipe itself is fairly straightforward – you make a basic sugar cookie dough, divide it into portions, color each one, then stack and roll them together to create that mesmerizing spiral effect. The magic happens when you slice through the chilled dough log and see those perfect concentric circles. Rolling them in colored sparkling sugar before baking adds that festive sparkle that makes them truly special. What I love most is how customizable they are – you can do traditional Christmas colors like I've done here, or get creative with any color scheme that fits your celebration.
Why I love this recipe
What makes me come back to this recipe year after year is how it combines visual wow-factor with delicious simplicity. These cookies taste like classic sugar cookies – buttery, sweet, and perfectly tender – but they look like you spent hours on intricate decorating. The reality is that once you've got the rolling technique down, they're actually quite easy. I love that I can make the dough logs ahead of time and keep them in the freezer, then slice and bake fresh cookies whenever I need them. There's also something incredibly satisfying about slicing through that log and seeing each perfect pinwheel emerge. These cookies have become my signature holiday contribution to gatherings, and people actually request them now. They're also wonderful for gifting – I pack them in clear cellophane bags tied with ribbon, and they look absolutely gorgeous. Plus, they stay fresh for days in an airtight container, which is rare for homemade cookies. Every time I make these, I feel like I'm creating edible art.
What You Need From Your Kitchen
- All-purpose flour: Forms the base structure of the cookies; measure by spooning into cup and leveling off
- Unsalted butter: Provides rich flavor and tender texture; must be softened to room temperature for proper creaming
- Granulated sugar: Sweetens the dough and helps create a tender crumb when creamed with butter
- Egg: Binds the ingredients together and adds moisture; bring to room temperature before using
- Food coloring gel: Creates vibrant red, green, and brown colors; gel works better than liquid for intense hues
- Sparkling sugar: Adds festive sparkle and slight crunch to the cookie exterior; available in holiday colors
Let's Make These Together
- Prepare the Base Dough
- Begin by whisking your dry ingredients together so they're evenly distributed. Then cream the butter and sugar until it's light and fluffy – this incorporates air and creates a tender cookie. Add your egg and vanilla, then gently mix in the flour mixture just until combined. Overmixing develops gluten and creates tough cookies, so stop as soon as you don't see any dry flour.
- Create Colorful Portions
- Divide your dough into three equal portions and color each one separately. Use gel food coloring for the most vibrant results without adding extra liquid to your dough. Knead the color in thoroughly until there are no streaks. This step is fun and messy in the best way! Chill the colored dough so it's easier to work with in the next step.
- Roll and Layer
- Roll each colored portion into a rectangle of equal size – consistency here means prettier swirls later. Stack them like layers of a cake, then roll tightly from one long edge. The tighter you roll, the more defined your pinwheel pattern will be. Chill this log until it's very firm so it slices cleanly without squishing.
- Add Sparkle and Slice
- Roll your chilled log in sparkling sugar, pressing gently so it sticks. This creates that gorgeous glittery exterior. Then slice into rounds with a sharp knife, keeping everything cold for the cleanest cuts. If your log warms up, pop it back in the fridge for a few minutes.
- Bake to Perfection
- Arrange your beautiful pinwheel slices on baking sheets and bake just until the edges start to turn golden. Don't overbake – these cookies continue to firm up as they cool. Let them cool slightly on the pan before moving to a rack. Once cool, they're ready to serve, gift, or devour!
 pin it
Switch Things Up
I started making these pinwheel cookies about five years ago when I wanted to bring something extra special to my family's annual cookie swap. I was nervous about the rolling technique at first, but once I got the hang of it, I couldn't stop making them. Now, every December, I set aside an afternoon with holiday music playing and make batch after batch. I've experimented with different color combinations – sometimes doing red and white for peppermint vibes, or even purple and gold for New Year's. The key is keeping the dough cold between steps. One year I tried to rush it with warm dough and ended up with cookies that looked more like abstract art than pinwheels! Now I know that patience pays off. The smell of these baking fills the house with that perfect buttery sugar cookie scent that just screams Christmas.
Perfect Pairings
These cookies pair beautifully with hot chocolate topped with marshmallows or a creamy vanilla latte. For a more grown-up pairing, try them alongside a glass of dessert wine or Irish cream coffee. They also complement other holiday treats wonderfully – arrange them on a platter with gingerbread men, chocolate crinkle cookies, and peppermint bark for a stunning dessert spread. A small plate of these alongside eggnog or spiced apple cider makes for a perfect cozy evening snack.
 pin it
Frequently Asked Questions
- → Can I make these cookies ahead of time?
Absolutely! These are perfect for make-ahead baking. You can prepare the dough logs and freeze them for up to 3 months. When you're ready to bake, just slice the frozen log and add 1-2 minutes to the baking time. Baked cookies also store well in an airtight container for up to one week.
- → Why are my pinwheels not spiraling properly?
The most common issue is that the dough wasn't cold enough when slicing. Make sure your log is very firm from the refrigerator or freezer before cutting. Also, use a sharp knife and wipe it clean between cuts. If the dough starts to soften while you're working, pop it back in the fridge for 15 minutes.
- → Can I use different colors?
Definitely! While red, green, and brown are traditional for Christmas, you can customize the colors for any occasion. Try pink and white for Valentine's Day, orange and black for Halloween, or pastel colors for Easter. You can also use just two colors instead of three for a simpler spiral pattern.
- → Do I have to use sparkling sugar?
No, the sparkling sugar is optional but adds a beautiful festive touch. You can skip it entirely for plain pinwheel cookies, or substitute regular granulated sugar for a subtle texture without the sparkle. Some people also like to roll the logs in colored sanding sugar for a different look.
- → How do I prevent the colors from bleeding together?
When stacking your colored dough layers, make sure each one is chilled and firm. If the dough is too soft, the colors can blend during rolling. Also, roll tightly but don't press too hard, which can cause the layers to merge. Using gel food coloring instead of liquid helps maintain distinct color separation as well.
- → Can I make these gluten-free?
Yes, you can substitute a 1:1 gluten-free flour blend for the all-purpose flour. Make sure your blend contains xanthan gum or add 1/2 teaspoon separately. The dough may be slightly more delicate to work with, so keep it well-chilled and handle gently when rolling and slicing.
Conclusion
These Christmas Pinwheel Cookies are more than just a treat – they're a holiday tradition waiting to happen. The vibrant swirls bring instant cheer to any gathering, and the buttery vanilla flavor appeals to everyone. Whether you're hosting a cookie exchange, wrapping them as gifts, or simply enjoying them with hot cocoa by the tree, these cookies deliver on both beauty and taste. Make a double batch because they disappear fast!