
 pin it
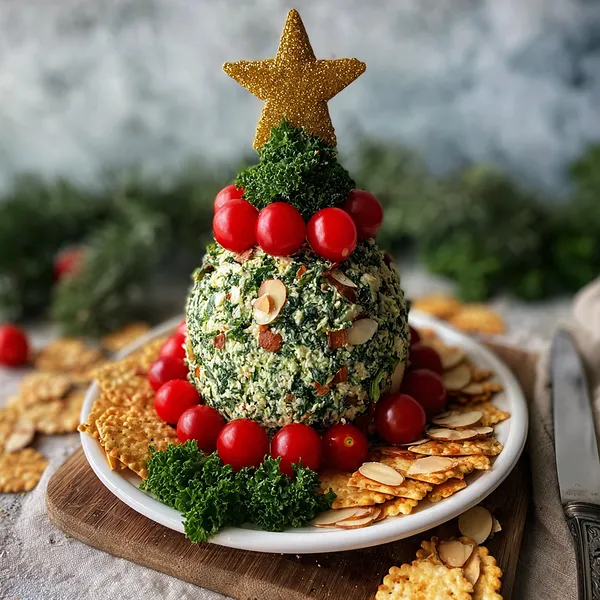
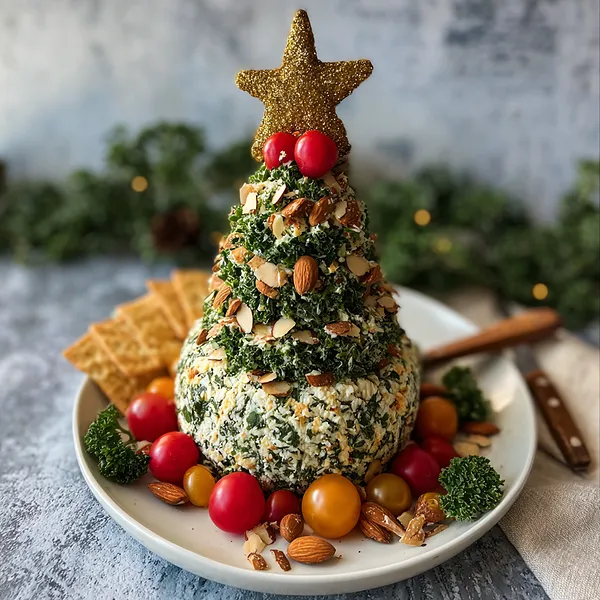
I first encountered this magical Christmas Tree Cheeseball at my neighbor's holiday open house about five years ago, and I knew immediately I had to recreate it. The way she had transformed something as simple as cream cheese into this stunning edible tree left me completely inspired. What I love most about this recipe is how it combines accessibility with impressive presentation – you don't need to be a professional chef to pull this off. The base is straightforward: cream cheese mixed with shredded cheddar and ranch seasoning for that perfect tangy, savory flavor. Then comes the artistic part – coating three graduated sizes of cheese balls in freshly chopped herbs. The vibrant green from parsley, basil, and chives creates that authentic tree appearance while adding incredible fresh flavor. Building the tree by stacking the balls from largest to smallest is where you feel like an artist. Decorating with cherry tomatoes as ornaments and sliced almonds gives it texture and visual interest. That golden star cut from bell pepper on top is the crowning glory. What makes this recipe truly special is that it's make-ahead friendly, so you can focus on your guests instead of last-minute prep.
Why I love this recipe
I love this Christmas Tree Cheeseball recipe because it brings together everything I value in holiday cooking: stunning visual impact, incredible taste, and the ability to prepare ahead. There's something deeply satisfying about creating food that makes people smile before they even take a bite. The fresh herbs aren't just for show – they add a brightness and complexity that elevates this beyond typical cheese balls. I appreciate how forgiving this recipe is; if your cheese balls aren't perfectly round or your decorations are slightly asymmetric, it still looks charming and homemade. The texture combination is genius – creamy cheese, crunchy almonds, and juicy tomatoes create interest in every bite. I also love that this recipe uses real, wholesome ingredients without any processed additions beyond the ranch seasoning. It's become my go-to contribution for holiday parties because it travels well and always gets rave reviews. Kids are drawn to it because it looks like a decoration, and adults love the sophisticated herb flavors. Most importantly, this recipe has become a cherished tradition in my family, and those memories we create while making it together are priceless. Every time I make this tree, I'm reminded that the best recipes are the ones that bring people together.
What You Need From Your Kitchen
- Cream cheese: Soften to room temperature and beat until smooth for the base
- Cheddar cheese: Shred finely and mix into cream cheese for added flavor and color
- Fresh herbs: Chop parsley, basil, and chives finely and combine for coating
- Sliced almonds: Press into cheese balls to create decorative garland effect
- Cherry tomatoes: Wash and dry, then attach with toothpicks as ornaments
- Yellow bell pepper: Cut into star shape using cookie cutter for tree topper
Let's Make These Together
- Mix the Cheese Base
- Start by ensuring your cream cheese is completely softened to room temperature – this is crucial for achieving a smooth, lump-free mixture. In your mixing bowl, combine the cream cheese, shredded cheddar, and ranch seasoning. Beat everything together using an electric mixer on medium speed for about 2-3 minutes, or mix vigorously by hand until the mixture is completely uniform. You want a creamy, spreadable consistency with no streaks of orange cheddar visible. Taste the mixture at this point and adjust seasoning if needed.
- Shape Your Tree Tiers
- Divide your cheese mixture into three distinct portions following a graduated size pattern. The largest ball should contain roughly half your mixture, the medium ball about a third, and the smallest ball the remaining cheese. Use lightly dampened hands to prevent sticking, and roll each portion between your palms using gentle pressure to create smooth, round balls. Don't worry about perfection – slight irregularities add to the homemade charm. Place your shaped balls on a parchment-lined tray and refrigerate for 30 minutes to firm up, making them easier to handle during the coating process.
- Create the Herb Coating
- While your cheese balls chill, prepare your herb mixture by combining the finely chopped parsley, basil, and chives in a shallow dish or plate. Mix the herbs thoroughly so you get an even distribution of colors and flavors. The key to a beautiful coating is having your herbs chopped fine enough to adhere well but not so fine that they become paste-like. When your cheese balls are firm, remove them from the fridge one at a time and roll each ball through the herb mixture, using your hands to gently press the herbs into the surface. Make sure every spot is covered with herbs for that lush, green tree appearance.
- Assemble Your Christmas Tree
- Now comes the fun part – building your tree! Place your largest herbed cheese ball on the center of your serving platter. Take the medium ball and gently press it onto the top of the large ball, applying just enough pressure to make it stable without squishing the bottom layer. If you're worried about stability, insert a long toothpick through the center before adding the top ball. Place your smallest ball on top to complete the classic Christmas tree shape. Step back and admire your work – you've just created an edible centerpiece!
- Decorate with Festive Flair
- This is where your Christmas tree truly comes to life. Start by pressing sliced almonds horizontally into the cheese at regular intervals around each tier, creating the appearance of garland or tinsel. Then insert toothpicks about halfway into your cherry tomatoes and push them gently into the tree at various points, alternating between red and yellow for a colorful ornament effect. Finally, cut your star from the yellow bell pepper using a small cookie cutter, and secure it proudly at the peak of your tree with a toothpick. Arrange crackers around the base like presents under a tree, and your showstopping appetizer is ready to impress!
 pin it
Switch Things Up
I'll never forget the first time I made this Christmas Tree Cheeseball for our family holiday party. I was nervous about the shaping part, but once I got started, it was actually therapeutic forming those cheese balls into perfect spheres. The real game-changer was using super fresh herbs from my garden – the aroma alone got everyone excited before we even tasted it. My kids insisted on helping me place the cherry tomato ornaments, and they treated it like decorating an actual tree. We ended up making it a family tradition. Now, every December, we gather in the kitchen, turn on holiday music, and create our cheeseball tree together. My daughter has gotten so good at arranging the almonds in perfect patterns. Last year, my son suggested adding different colored tomatoes for more variety, which made it even more festive. The best moment is always when we place that star on top – everyone cheers like we've just completed a masterpiece.
Perfect Pairings
This Christmas Tree Cheeseball pairs beautifully with an assortment of crackers – try buttery round crackers, whole grain varieties, or even crispy breadsticks arranged around the base like presents. For beverages, serve alongside sparkling wine, cranberry spritzers, or warm spiced cider. Create a complete holiday appetizer spread by adding a charcuterie board with cured meats, roasted nuts, and dried fruits. Fresh vegetable crudités like bell pepper strips, cucumber rounds, and celery sticks also complement the creamy cheese perfectly. For a sweet-savory balance, include some fig jam or honey on the side for those who like extra flavor with their cheese.
 pin it
Frequently Asked Questions
- → Can I make this cheeseball tree ahead of time?
Absolutely! This is actually one of the best make-ahead appetizers for holiday entertaining. You can prepare the cheese mixture and shape the balls up to 2 days in advance, storing them covered in the refrigerator. Coat them with herbs and assemble the tree up to 24 hours before your event. Add the almond and tomato decorations 2-4 hours before serving for the freshest appearance. Just keep it refrigerated until about 15 minutes before serving time.
- → What can I substitute for ranch seasoning?
If you don't have ranch seasoning or prefer a different flavor profile, you can use garlic powder, onion powder, dried dill, and a pinch of salt as a substitute. Alternatively, try Italian seasoning for a more Mediterranean flavor, or everything bagel seasoning for a savory twist. You could also use French onion dip mix for a similar tangy flavor. The key is to add something that provides seasoning and flavor complexity to the cream cheese base.
- → How do I prevent the tree from falling apart?
The secret to a stable tree is making sure your cheese balls are properly chilled and firm before stacking. Insert a long toothpick or wooden skewer vertically through the center of the bottom ball before adding the next layer, then push the medium ball onto this support. Repeat for the top ball. Additionally, make sure you're using the right ratio of sizes – the bottom should be significantly larger than the middle, which should be larger than the top. Gentle pressure when stacking helps the layers adhere without squishing.
- → Can I use different decorations?
Definitely! While cherry tomatoes and sliced almonds are classic choices, feel free to get creative with your decorations. Try using halved olives, small cubes of bell peppers in different colors, pomegranate seeds, dried cranberries, or even small fresh mozzarella balls. For nuts, pecans, walnuts, or pine nuts work beautifully. You could also use different fresh herbs for the coating, like cilantro or dill. The key is choosing items that complement the cheese flavor and can be easily secured to the surface.
- → What's the best way to serve this at a party?
Present your Christmas tree cheeseball as a centerpiece on a large platter surrounded by an assortment of crackers, bread slices, or vegetable crudités. Provide a small cheese spreader or knife nearby so guests can easily scoop portions onto their crackers. For the best texture and flavor, remove the cheeseball from the refrigerator 10-15 minutes before guests arrive to let it soften slightly. Consider placing it on a bed of fresh herbs or surrounded by small pine branches (not touching the food) for extra festive presentation. Remember to remove toothpicks from decorations as you serve.
- → How long will leftovers keep?
Store any leftover cheeseball in an airtight container in the refrigerator for up to 5 days. The herbs may darken slightly over time, but the flavor remains delicious. If you notice the cheese has become too soft, you can reshape it into a ball and re-coat with fresh herbs. Leftover cheeseball also freezes well for up to 2 months – just wrap it tightly in plastic wrap and then in aluminum foil. Thaw in the refrigerator overnight before serving and add fresh decorations.
Conclusion
This Festive Christmas Tree Cheeseball is more than just an appetizer – it's a conversation starter and a centerpiece that brings joy to your holiday celebrations. The combination of creamy cheese, fresh herbs, and colorful decorations creates a dish that's as delicious as it is beautiful. Whether you're hosting a large gathering or intimate dinner, this cheeseball adapts perfectly to any occasion. Make it ahead of time for stress-free entertaining, and watch as it becomes the star of your holiday spread year after year.