
 pin it
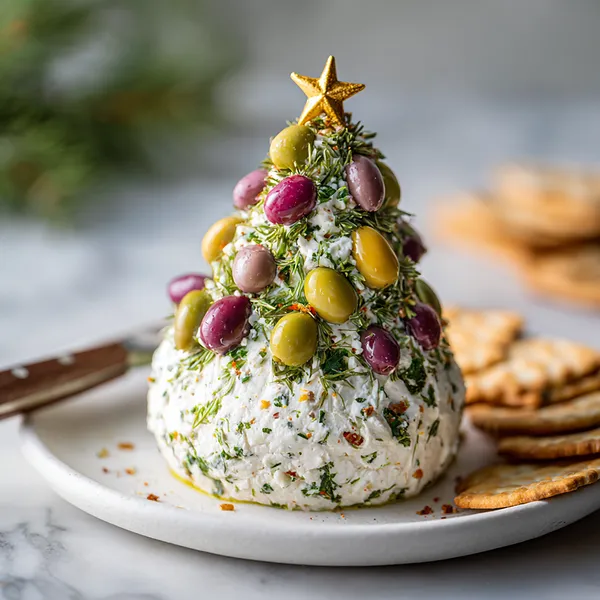
I remember the first time I saw a Christmas tree cheese ball at my friend's holiday party – I was absolutely mesmerized by how something so simple could be so stunning. I immediately asked for the recipe, and she laughed, telling me it was easier than it looked. When I got home, I couldn't wait to try it myself. The base is just cream cheese and cheddar mixed with ranch seasoning – nothing fancy, but the magic happens in the assembly. You shape it into a cone, then carefully press olives of different colors into the cheese, creating layers that mimic a Christmas tree. The fresh herbs tucked between the olives add that realistic pine tree effect. The first time I served it, I was worried it might be too simple for a holiday party, but the reactions proved me wrong. People were amazed, taking photos before they even tasted it. And when they did taste it? The combination of creamy, tangy cheese with the briny olives and aromatic herbs was a hit. Now, I can't imagine a Christmas without making this showstopper.
Why I love this recipe
This recipe holds a special place in my heart because it perfectly captures what I love about holiday cooking – it's creative, impressive, and brings people together. I love that something made from such simple ingredients can create such a wow-factor moment. There's something deeply satisfying about the construction process, carefully placing each olive and herb sprig to create something beautiful. I love how it appeals to all ages – kids are fascinated by its appearance, adults appreciate the sophisticated flavors. The recipe is forgiving, too; even if your tree isn't perfectly symmetrical, it still looks festive and charming. What I love most is the reaction it gets – that moment when guests first see it, their faces light up with delight. It's a reminder that food isn't just about taste; it's about creating experiences and memories. This cheese ball has become my signature dish, and every year when I make it, I feel that same excitement as if it were the first time.
What You Need From Your Kitchen
- Cream cheese: Must be softened to room temperature for easy mixing and smooth texture
- Cheddar cheese: Use pre-shredded or freshly grated sharp cheddar for best flavor
- Green olives: Drain well and pat dry before pressing into the cheese base
- Kalamata olives: Provides rich, deep purple color and robust Mediterranean flavor
- Black olives: Creates color contrast and adds mild, briny taste
- Fresh rosemary: Wash and dry sprigs, then tuck between olives for realistic tree appearance
- Fresh thyme: Adds delicate herbal notes and enhances the festive look
Let's Make These Together
- Mix the Cheese Base
- Begin by ensuring your cream cheese has been sitting at room temperature for at least 30 minutes – this is crucial for achieving that perfectly smooth, creamy base. In your mixing bowl, combine the cream cheese, shredded cheddar, and ranch seasoning. Beat everything together until it's completely smooth and fluffy, with no lumps remaining. The mixture should be light and easy to spread, with a pale yellow color from the cheddar blended throughout.
- Shape Your Tree
- Transfer your cheese mixture onto your serving platter and start shaping it into a cone. Think of building a pyramid – start with a wide circular base (about 6-7 inches across) and gradually taper it up to a point at the top. Use your hands or a spatula to smooth the sides, creating that classic Christmas tree silhouette. Pop it in the refrigerator for 30 minutes to firm up – this step is essential for making decoration easier.
- Create the Olive Pattern
- Once your cheese cone is slightly firm, it's time for the fun part! Pat all your olives completely dry – any excess moisture will make them slide off. Starting at the bottom, press olives into the cheese in circular rows, working your way around the tree. Alternate your colors to create visual interest – maybe a row of green, then kalamata, then black. Make sure each olive is pressed in firmly enough to stay put, but not so deep that it disappears into the cheese.
- Add Herbal Greenery
- Now bring your tree to life with fresh herbs! Take small sprigs of rosemary and thyme and gently tuck them between and around the olives. These herbs serve double duty – they make your tree look realistic and add wonderful aromatic notes to every bite. Don't be shy with the herbs; the more you add, the more lush and full your tree will look.
- Final Flourishes
- Top your tree with a star – either cut one from a slice of cheddar using a small cookie cutter, or form one by hand. This is your tree's crowning glory! Give your masterpiece one final refrigeration period of 1-2 hours. This allows everything to set properly and the flavors to meld together beautifully. Just before serving, arrange your favorite crackers around the base of the tree, and watch as your guests marvel at your creation!
 pin it
Switch Things Up
I first made this cheese ball for our family's Christmas Eve gathering three years ago, and it's become an annual tradition that everyone requests. The first time, I was nervous about the construction – would it hold its shape? Would it look like a tree or a lumpy mess? But as I carefully pressed each olive into place and tucked in the fresh herbs, I watched it transform into something truly magical. Now, I make it every year, and I've learned a few tricks: slightly chilling the cheese ball base makes it easier to shape, and using toothpicks to secure the bottom olives helps maintain the structure. My niece always insists on helping me place the final herbs, and my brother-in-law jokes that he comes to Christmas just for this cheese ball. It's become more than a recipe – it's a memory-maker.
Perfect Pairings
This Christmas Tree Cheese Ball pairs beautifully with an assortment of crackers – try buttery Ritz, multigrain wheat thins, or crispy crostini for variety. For beverages, serve alongside sparkling wine, crisp white wine, or a festive cranberry spritzer. Complete your appetizer spread by adding fresh vegetable crudités, roasted nuts, or a charcuterie board with cured meats and dried fruits. The salty, tangy flavors of this cheese ball also complement sweet elements like fig jam or honey, creating a perfect balance for your holiday table.
 pin it
Frequently Asked Questions
- → Can I make this cheese ball ahead of time?
Absolutely! This cheese ball is actually better when made ahead. You can prepare it up to 24 hours in advance and keep it refrigerated. Just wait until right before serving to arrange the crackers around the base so they stay crispy. Cover it loosely with plastic wrap to protect it in the fridge.
- → What if I don't like olives?
While olives are the traditional decoration for this recipe, you can get creative with alternatives! Try using cherry tomatoes (red and yellow for festive colors), small mozzarella balls, grapes, or even colorful bell pepper pieces. The key is to use items that will stick to the cheese base and provide visual interest.
- → How do I keep the cheese ball from getting too soft?
The trick is to keep it refrigerated until the last possible moment before serving. If you're serving it at a party, you can place the serving platter on a bed of ice to keep it cool. Also, make sure your cream cheese mixture is properly chilled after shaping and before decorating – this helps it hold its structure better.
- → Can I use different types of cheese?
Yes! While cream cheese and cheddar are classic, you can experiment with other combinations. Try mixing in some goat cheese for tanginess, adding blue cheese for a bolder flavor, or using pepper jack for a spicy kick. Just make sure whatever cheese you use is soft enough to shape and hold decorations.
- → My cheese ball is lopsided – how do I fix it?
No worries! Before decorating, you can reshape it with your hands or a spatula. If it's already decorated and looks uneven, remember that the olives and herbs naturally disguise any imperfections. The beauty of this recipe is that it doesn't have to be perfect to look impressive. Embrace the handmade charm!
- → How long will leftovers keep?
Stored in an airtight container in the refrigerator, this cheese ball will keep for 3-4 days. However, the olives may release some moisture over time, so it's best enjoyed within the first two days. If you have leftovers, you can spread the cheese mixture on sandwiches or use it as a dip for vegetables.
Conclusion
This Christmas Tree Cheese Ball is more than just an appetizer – it's a conversation starter, a photo opportunity, and a delicious addition to your holiday spread. The combination of creamy cheese with briny olives and aromatic herbs creates a perfect balance of flavors that keeps guests coming back for more. Whether you're hosting a large gathering or attending a potluck, this showstopping dish ensures you'll be remembered long after the holidays end.