
 pin it
I discovered church window cookies at my grandmother's house when I was about seven years old. She had them arranged on a beautiful crystal platter, and I remember being mesmerized by the colorful marshmallows that looked like tiny stained-glass windows. When I took my first bite, I was hooked – the combination of creamy chocolate, chewy marshmallows, crunchy nuts, and sweet coconut was unlike anything I'd ever tasted. Years later, when I asked her for the recipe, I was shocked to learn how simple they were to make. No baking required meant even a novice cook could create something that looked professionally made. The secret is in the technique of rolling the chocolate-marshmallow mixture into tight logs and coating them generously with coconut. Once chilled and sliced, each cookie reveals a unique pattern of colorful marshmallows suspended in dark chocolate. I've been making these for over twenty years now, and they never fail to impress. Whether I'm bringing them to a potluck, packing them in lunchboxes, or serving them at holiday gatherings, people always ask for the recipe.
Why I love this recipe
I love this recipe because it's foolproof, impressive, and absolutely delicious. There's something magical about creating such a stunning dessert without even turning on the oven. The no-bake aspect makes it perfect for hot summer days or when you're short on time but still want to make something special. I appreciate how forgiving the recipe is – if your chocolate mixture isn't perfectly smooth or your rolls aren't completely uniform, they'll still turn out beautifully. The texture combination is what really makes these cookies special: the smooth chocolate coating gives way to chewy marshmallows, crunchy nuts, and sweet coconut flakes. Every bite is a delightful surprise. I also love how customizable they are. You can use different types of nuts, experiment with dark or white chocolate, or even add in extras like dried cranberries or crushed candy canes during the holidays. The make-ahead nature of these cookies is another huge plus – they store well in the refrigerator for weeks and actually taste better after the flavors have had time to meld together. Most importantly, these cookies bring people together and create joyful memories in the kitchen.
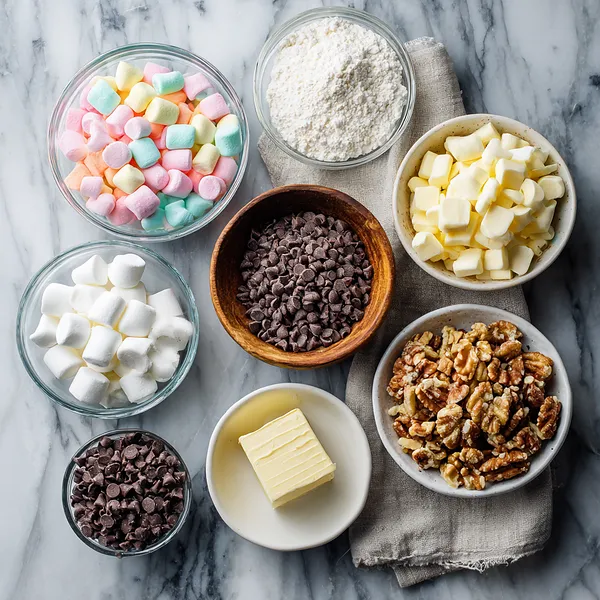
What You Need From Your Kitchen
- Chocolate chips: Use high-quality semi-sweet chips for the best flavor and smooth melting
- Mini marshmallows: Must be mini size for proper distribution and the signature stained-glass effect
- Nuts: Toast them lightly before adding for enhanced flavor and crunch
- Coconut: Use sweetened shredded coconut for the perfect coating and added sweetness
- Butter: Helps create a smoother, creamier chocolate mixture that's easier to work with
- Vanilla extract: Enhances the overall flavor and adds depth to the chocolate
Let's Make These Together
- Prepare Your Workspace
- Before you begin, lay out all your ingredients and equipment on a clean counter. Having everything ready makes the process smooth and enjoyable. Line a baking sheet with parchment paper where you'll place the finished logs to chill.
- Melt the Chocolate Base
- The foundation of these cookies is perfectly melted chocolate. Combine your chocolate chips and butter in a microwave-safe bowl and heat in short bursts, stirring frequently. This gentle approach prevents burning and ensures a glossy, smooth mixture. The butter adds richness and makes the chocolate easier to work with.
- Combine with Marshmallows
- This is where the magic happens! Once your chocolate has cooled slightly, gently fold in the colorful mini marshmallows and chopped nuts. Be careful not to stir too vigorously or you'll crush the marshmallows. You want them to stay intact so they create those beautiful windows when you slice the cookies later.
- Shape into Coconut-Coated Logs
- Working with half the mixture at a time, shape it into a log on your coconut-covered parchment paper. Roll it back and forth, pressing the coconut into the surface until it's completely covered. The coconut not only adds flavor but also makes the logs easier to handle and gives them a beautiful finished appearance.
- Chill and Slice
- Patience is key here! Wrap your logs tightly and refrigerate them for at least two hours. When they're firm, slice them into beautiful rounds that showcase those colorful marshmallow windows. Each slice will be unique and stunning.
 pin it
Switch Things Up
I first made these cookies for a holiday cookie exchange, and they were the absolute star of the show. Everyone kept asking for the recipe, amazed that something so beautiful required no baking at all. Now they've become my go-to whenever I need an impressive dessert in a hurry. I love experimenting with different nut combinations – sometimes I use pecans, other times walnuts, and occasionally I'll mix in some crushed graham crackers for extra crunch. The rolling process is my favorite part because you can see the colorful marshmallows getting suspended in the chocolate, creating that signature stained-glass effect. My kids love helping me slice them up and seeing each unique pattern emerge. These cookies freeze beautifully too, so I often make a double batch and keep some tucked away for unexpected guests or last-minute potlucks.
Perfect Pairings
Church window cookies pair wonderfully with a tall glass of cold milk or a steaming cup of hot cocoa – the creamy beverages complement the sweet chocolate perfectly. They also make an excellent addition to holiday cookie platters alongside gingerbread men, sugar cookies, and peppermint bark. For a fun dessert board, serve them with fresh strawberries, vanilla wafers, and chocolate-covered pretzels. Coffee lovers will appreciate how well these cookies go with a rich espresso or cappuccino. They're also fantastic alongside vanilla ice cream for an indulgent sundae topping.
 pin it
Frequently Asked Questions
- → Can I use regular-sized marshmallows instead of mini?
It's best to stick with mini marshmallows for this recipe. Regular marshmallows are too large and won't distribute evenly throughout the chocolate mixture. If you only have regular marshmallows, you can cut them into smaller pieces with kitchen scissors, but mini marshmallows work much better.
- → How long do church window cookies last?
When stored in an airtight container in the refrigerator, these cookies will stay fresh for up to 2 weeks. They can also be frozen for up to 3 months. Just make sure to wrap them tightly in plastic wrap and place them in a freezer-safe container or bag. Thaw in the refrigerator before serving.
- → Can I make these cookies nut-free?
Absolutely! You can omit the nuts entirely or substitute them with crispy rice cereal, crushed graham crackers, or even mini chocolate chips for added crunch. The cookies will still be delicious and maintain their beautiful appearance.
- → Why did my marshmallows melt into the chocolate?
This usually happens when the chocolate mixture is too hot when you add the marshmallows. Make sure to let the melted chocolate cool for about 5 minutes before folding in the marshmallows. It should be warm but not hot to the touch.
- → Can I use dark or white chocolate instead?
Yes! Dark chocolate will give you a richer, less sweet cookie, while white chocolate creates a sweeter, creamier version. You can even make half the batch with dark chocolate and half with white chocolate for variety. Just keep in mind that white chocolate can be more temperamental when melting.
- → My logs are too soft to slice – what went wrong?
The mixture needs to be fully chilled before slicing. Make sure you refrigerate the logs for at least 2 hours, or even overnight for best results. If they're still too soft, pop them in the freezer for 30 minutes before slicing. Also, make sure you wrapped them tightly so they hold their shape.
Conclusion
Church window cookies are a timeless treat that brings joy to every occasion. Their stunning appearance makes them look like you spent hours in the kitchen, but the no-bake method means they're actually one of the easiest desserts you'll ever make. The combination of smooth chocolate, chewy marshmallows, crunchy nuts, and sweet coconut creates a perfect texture and flavor balance. Make a batch today and watch them disappear!