
 pin it
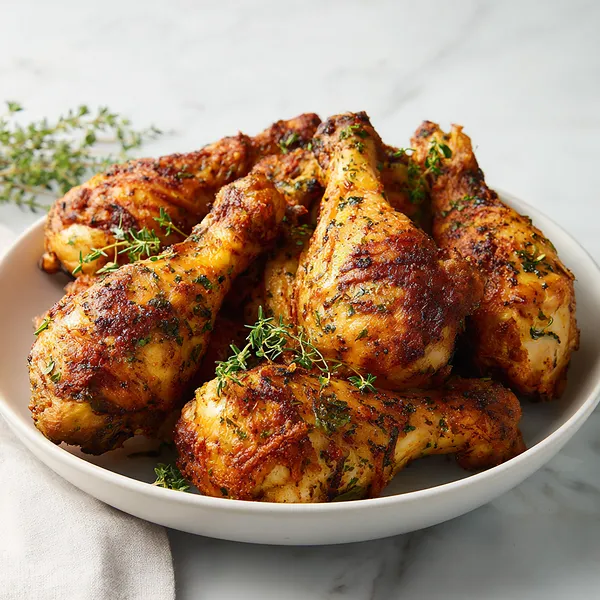
I describe this recipe as my foolproof path to chicken perfection. It all started when I was craving that satisfying crunch you get from fried chicken but wanted something a bit healthier and less messy. I experimented with different seasoning blends and baking techniques until I landed on this winning combination. The magic happens in how the dry rub clings to the chicken skin, creating an almost crust-like exterior while the inside stays incredibly moist and tender. What I love most is how the herbs perfume your entire kitchen as they bake – it's like aromatherapy and dinner prep rolled into one. Every time I make these, I'm reminded of Sunday dinners growing up, but with a modern twist that feels entirely my own. The simplicity of the ingredient list belies the complexity of flavors you get in each bite. When I pull these from the oven and see that gorgeous golden-brown color, I feel like a culinary wizard. This recipe represents everything I believe cooking should be: straightforward, delicious, and bringing people together around the table.
Why I love this recipe
I love this recipe for so many reasons, but mainly because it never lets me down. There's something deeply satisfying about creating restaurant-quality crispy chicken in my own oven without any special equipment or techniques. The reliability factor is huge – whether I'm cooking for myself on a Tuesday night or hosting friends on the weekend, these chicken legs always deliver. I love that the prep is minimal, which means I can have them in the oven quickly and then focus on other things while they bake. The hands-off cooking time is perfect for multitasking or just relaxing with a glass of wine. What really gets me though is that first bite – hearing that crackle of the skin, followed by the burst of herb-infused flavor and tender, juicy meat. It's comfort food that doesn't weigh you down. I also appreciate how adaptable this recipe is; it's become my base template for so many variations. Most importantly, I love how it brings smiles to everyone's faces. There's something universally appealing about perfectly cooked chicken, and knowing I can create that consistently makes me genuinely happy every single time.
What You Need From Your Kitchen
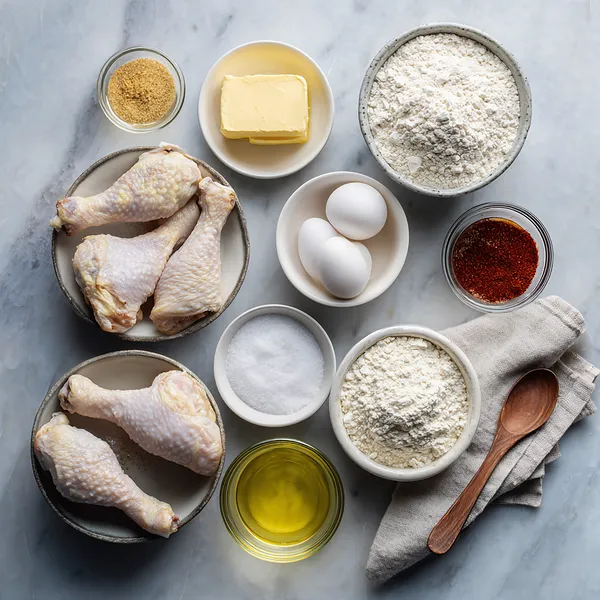
- Chicken legs: Choose fresh, high-quality drumsticks and pat them completely dry for the crispiest skin
- Olive oil: Use extra virgin olive oil to help the seasonings adhere and promote golden browning
- Dried thyme: Provides aromatic, earthy flavor that pairs perfectly with chicken
- Garlic powder: Adds savory depth without the moisture of fresh garlic
- Paprika: Contributes color and a subtle sweet-smoky flavor to the seasoning blend
- Fresh thyme sprigs: Reserved for garnish to add visual appeal and fresh herbal aroma
Let's Make These Together
- Prepare Your Workspace
- Start by preheating your oven to a high temperature of 425°F, which is essential for achieving that coveted crispy skin. While the oven heats, line your baking sheet with parchment paper to prevent sticking and make cleanup a breeze. Take your chicken legs out of the refrigerator and pat them completely dry with paper towels – this step cannot be skipped if you want crispy results, as moisture is the enemy of crispy skin.
- Create the Flavor
- Mix all your dried herbs and spices together in a small bowl, creating a fragrant seasoning blend that will transform these simple chicken legs into something extraordinary. The combination of thyme, garlic powder, onion powder, paprika, salt, and pepper creates a beautifully balanced flavor profile. Drizzle olive oil over your chicken legs and massage it into every surface, ensuring the oil reaches all the nooks and crannies.
- Season Generously
- Now comes the fun part – liberally coat each chicken leg with your seasoning mixture. Don't be shy here; use your hands to really work those seasonings into the skin, making sure every inch is covered. The oil will help the seasonings stick and create that beautiful crust as it bakes. Arrange the seasoned legs on your prepared baking sheet with adequate spacing between them.
- Bake to Golden Perfection
- Slide the baking sheet into your preheated oven and let the magic happen. After about 20-22 minutes, flip each leg over to ensure even browning on all sides. Continue baking until the skin turns a gorgeous golden brown and the internal temperature hits that safe zone of 165°F. If you want to take the crispiness to the next level, switch to broil for the final few minutes, but keep a close eye to avoid burning.
- Rest and Enjoy
- Resist the temptation to dive in immediately. Let those beautiful chicken legs rest for about 5 minutes after removing them from the oven. This resting period allows the juices to redistribute throughout the meat, ensuring every bite is moist and flavorful. Garnish with fresh thyme sprigs for a pop of color and fresh herbal aroma, then serve and prepare for the compliments to roll in.
 pin it
Switch Things Up
I'll never forget the first time I nailed the perfect crispy baked chicken leg. I had been struggling for weeks, always ending up with either rubbery skin or dried-out meat. Then one Sunday afternoon, I decided to really pay attention to the temperature and timing, and magic happened. The skin crackled as I lifted the first leg from the baking sheet, and when I bit into it, the meat was so juicy it practically fell off the bone. My partner walked into the kitchen, following the incredible aroma, and we ended up eating them straight from the pan, laughing at how we couldn't wait long enough to plate them properly. Now, every time I make these, I remember that victorious moment. Sometimes I switch up the herbs – rosemary works beautifully too – or add a squeeze of lemon at the end for brightness. The key I learned that day was patience: let the oven do its work, and don't peek too often. These chicken legs have since become my go-to when I need something reliable, delicious, and utterly satisfying.
Perfect Pairings
These crispy baked chicken legs pair wonderfully with so many sides. My favorite combination is creamy mashed potatoes and roasted vegetables – the contrast between the crispy skin and smooth potatoes is divine. For a lighter option, serve them alongside a fresh garden salad with a tangy vinaigrette or some garlic green beans. If you're feeling indulgent, mac and cheese is an absolute winner, or try them with buttery corn on the cob for a summer barbecue vibe. Don't forget crusty bread to soak up any delicious juices on the plate. For beverages, these pair nicely with a crisp white wine, a cold beer, or even a refreshing iced tea.
 pin it
Frequently Asked Questions
- → How do I make the skin extra crispy?
The key to extra crispy skin is removing all moisture before cooking. Pat the chicken legs thoroughly dry with paper towels, and if you have time, let them air-dry in the refrigerator uncovered for 1-2 hours. Also, avoid overcrowding the baking sheet and consider using the broiler for the last 2-3 minutes of cooking.
- → Can I use fresh herbs instead of dried?
Yes, you can use fresh herbs, but keep in mind that fresh herbs are milder in flavor than dried. Use about three times the amount of fresh herbs compared to dried. However, dried herbs work better for this recipe as they don't add extra moisture that could prevent the skin from crisping.
- → What temperature should the chicken reach?
Chicken legs should reach an internal temperature of 165°F (74°C) at the thickest part of the meat, away from the bone. Use a meat thermometer to check – it's the only reliable way to ensure your chicken is both safe to eat and not overcooked.
- → Can I marinate the chicken overnight?
While you can marinate the chicken, be aware that wet marinades will make it harder to achieve crispy skin. If you want to marinate, use a dry rub instead and refrigerate uncovered overnight. This allows the seasonings to penetrate while the skin dries out, leading to even crispier results.
- → How do I store and reheat leftovers?
Store leftover chicken legs in an airtight container in the refrigerator for up to 4 days. To reheat and restore crispiness, place them on a baking sheet and warm in a 375°F oven for about 10 minutes. Avoid using the microwave as it will make the skin soggy.
- → Can I cook these from frozen?
It's not recommended to cook chicken legs directly from frozen as they won't cook evenly and the skin won't crisp properly. Always thaw chicken completely in the refrigerator before cooking. Plan ahead and move frozen chicken to the fridge 24 hours before you plan to cook.
Conclusion
These Crispy Baked Chicken Legs are proof that simple ingredients can create something truly spectacular. The combination of herbs and spices creates a flavor profile that's both comforting and sophisticated, while the baking method ensures that crispy skin we all crave without the need for frying. Whether you're cooking for a weeknight family dinner or meal prepping for the week ahead, these chicken legs deliver every single time. Serve them hot from the oven with your favorite sides, and watch them disappear from the plate. This recipe has become a staple in my kitchen, and I know it will in yours too.