
 pin it
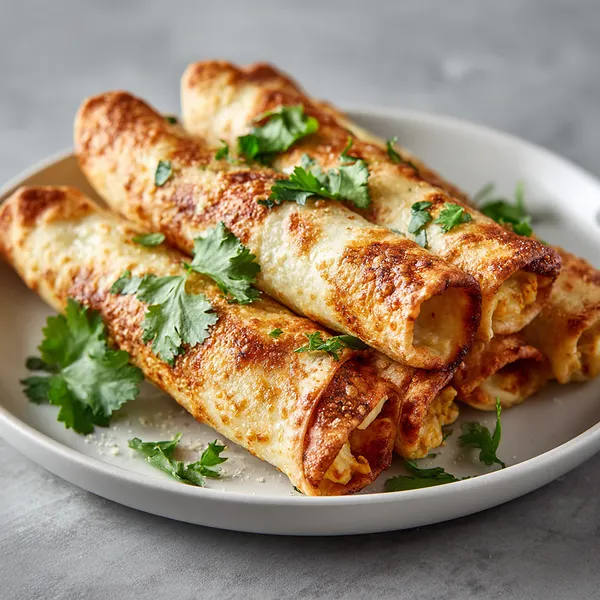
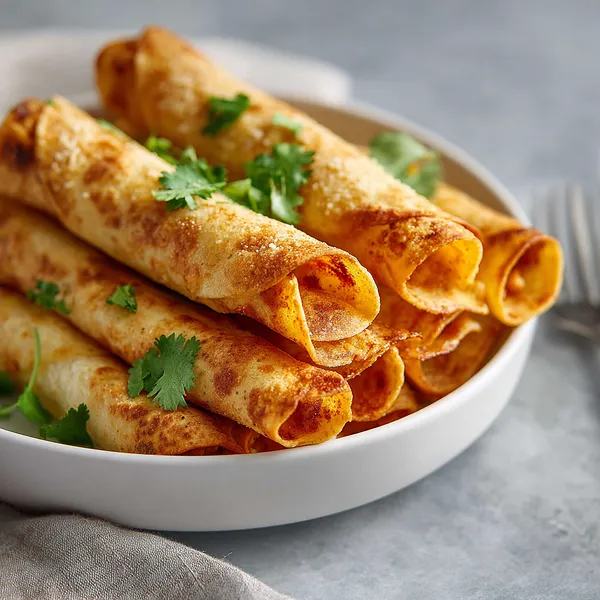
I first encountered taquitos at a small family-run Mexican restaurant during a road trip, and I was instantly hooked on their crispy, golden exterior and the tender, flavorful filling inside. What started as a quest to recreate that restaurant experience in my own kitchen turned into this recipe that I now make regularly. These Crispy Chicken Taquitos capture everything I loved about that first bite – the satisfying crunch, the stretchy melted cheese, and the perfectly seasoned chicken. What makes this version special is the baking method; instead of deep-frying, I brush the rolled taquitos with a bit of oil and bake them until they're gorgeously golden and crispy. The result is lighter but just as satisfying. I love how the spices – cumin, chili powder, and garlic – blend with the chicken to create layers of flavor in every bite. The fresh cilantro on top isn't just for looks; it adds a bright, herbaceous note that cuts through the richness. Over the years, I've tweaked the recipe countless times, adjusting spice levels and cheese ratios until I found the perfect balance. Now, these taquitos are my go-to whenever I need something that's crowd-pleasing, relatively quick, and absolutely delicious.
Why I love this recipe
What I truly love about this recipe is how it delivers restaurant-quality results with minimal effort and ingredients you probably already have in your kitchen. There's something incredibly satisfying about achieving that perfect crispy texture without the mess and calories of deep-frying. I love that I can prep these ahead of time – roll them up in the morning, refrigerate, and just pop them in the oven when I'm ready to eat. The versatility is another huge plus; this recipe is forgiving and adaptable to whatever you have on hand. Leftover rotisserie chicken? Perfect. Want to add some black beans or corn to the filling? Go for it! I also appreciate how kid-friendly these are – even picky eaters seem to love the fun rolled shape and the familiar flavors. But honestly, what I love most is that moment when you take that first bite and hear the crunch, then taste the warm, cheesy, perfectly seasoned chicken inside. It's comfort food at its finest, and it never fails to put a smile on my face. Whether I'm making them for a party, a family dinner, or just myself on a random Tuesday, these taquitos always deliver joy.
What You Need From Your Kitchen
- Cooked Shredded Chicken: Use rotisserie chicken for convenience or cook and shred chicken breasts yourself with your preferred seasonings.
- Shredded Cheese: Choose Mexican blend, cheddar, Monterey Jack, or pepper jack for a spicy kick; shred it fresh for best melting quality.
- Tortillas: Warm them slightly before rolling to prevent cracking; corn tortillas are traditional but flour tortillas work great too.
- Cumin: Provides the signature warm, earthy Mexican flavor that's essential to the filling.
- Chili Powder: Adds mild heat and depth; adjust the amount based on your spice preference.
- Sour Cream: Helps bind the filling together and adds creaminess; can substitute with Greek yogurt or cream cheese.
Let's Make These Together
- Prepare Your Chicken Mixture
- Start by combining your shredded chicken with cheese, spices, and sour cream in a large bowl. This is where the magic begins – make sure everything is evenly distributed so each taquito has the perfect flavor balance. The sour cream not only adds creaminess but also helps bind everything together, making it easier to roll. Don't be afraid to taste the mixture and adjust the seasonings to your preference. If you like it spicier, add some cayenne or use pepper jack cheese.
- Warm and Fill Tortillas
- Warming your tortillas is a crucial step that many people skip, but it makes all the difference in preventing cracks and tears. Wrap them in a damp paper towel and microwave for 20-30 seconds until they're pliable. Work quickly while they're warm – place about 2-3 tablespoons of filling along one edge of each tortilla. Don't overfill them or they'll be difficult to roll and might burst open during baking.
- Roll Them Tight
- Now comes the fun part – rolling! Start from the edge with the filling and roll tightly, keeping the sides tucked in as you go. Place each taquito seam-side down on your baking sheet, arranging them close together so they support each other and don't unroll. This also creates a nice presentation when they're all lined up. Brush or spray the tops with oil – this is what gives them that beautiful golden, crispy exterior without frying.
- Bake to Perfection
- Pop them in a hot oven (425°F) and let the magic happen. The high heat is key to getting that crispy texture. After about 20 minutes, they should be golden brown and crispy. If you want them extra crispy, flip them halfway through baking. In the last few minutes, sprinkle extra cheese on top and let it melt into a gooey, delicious topping. The aroma filling your kitchen at this point will be absolutely irresistible!
- Serve Fresh and Hot
- Let them cool for just a couple of minutes – you want them hot but not mouth-burning. Garnish with fresh cilantro for color and flavor, and serve with all your favorite dips and toppings. Guacamole, salsa, and sour cream are classics, but get creative! These are best enjoyed immediately while they're still crispy on the outside and warm and cheesy on the inside.
 pin it
Switch Things Up
I remember the first time I made these taquitos – I was hosting a casual get-together and wanted something fun that I could prep ahead. I was honestly a bit nervous about whether they'd actually get crispy in the oven without frying, but wow, was I pleasantly surprised! The key moment was when I pulled them out and heard that satisfying crunch as I bit into one. My guests couldn't stop eating them, and I caught myself sneaking back to the kitchen for "just one more." Now, I make double batches because they disappear so fast. I've tried them with different cheeses – pepper jack adds a nice kick, while a Mexican blend keeps it classic. Sometimes I add a bit of cream cheese to the filling for extra creaminess. The leftovers (when there are any) actually reheat beautifully in the oven or air fryer, so they're perfect for meal prep too.
Perfect Pairings
These Crispy Chicken Taquitos pair wonderfully with a variety of sides and dips. Serve them alongside fresh guacamole and chunky salsa for a classic Mexican feast. A dollop of sour cream or Mexican crema adds cooling creaminess that balances the crispy texture. For a complete meal, pair them with cilantro-lime rice and refried beans, or serve over a bed of shredded lettuce with pico de gallo for taquito salad bowls. Don't forget lime wedges – a squeeze of fresh lime juice takes these to the next level! For beverages, they go great with ice-cold Mexican beer, margaritas, or a refreshing agua fresca.
 pin it
Frequently Asked Questions
- → Can I make these taquitos ahead of time?
Absolutely! You can assemble the taquitos completely, place them on a baking sheet, cover tightly with plastic wrap, and refrigerate for up to 24 hours before baking. You can also freeze them for up to 3 months – just add a few extra minutes to the baking time if baking from frozen. This makes them perfect for meal prep or party planning.
- → Can I use corn tortillas instead of flour?
Yes, you definitely can! Corn tortillas are actually more traditional for taquitos. Just make sure to warm them properly before rolling to prevent cracking. They should be warm and pliable – if they're still cracking, wrap them in a damp paper towel and microwave for an additional 10-15 seconds. Corn tortillas will give you a slightly different texture and authentic flavor.
- → How do I keep the taquitos from unrolling while baking?
The key is to place them seam-side down on the baking sheet and arrange them close together so they support each other. The heat will seal the seam as the tortilla crisps up. If you're still having trouble, you can secure them with toothpicks before baking, just remember to remove them before serving. Make sure your filling isn't too wet, as excess moisture can also cause them to unroll.
- → Can I fry these instead of baking them?
Yes, you can absolutely fry these taquitos for an even crispier result! Heat about 1 inch of oil in a large skillet to 350°F. Fry the taquitos seam-side down first, turning them to brown all sides evenly, about 2-3 minutes total. Drain on paper towels. However, baking is a healthier option and still produces excellent crispy results with much less oil.
- → What can I substitute for the chicken?
These taquitos are very versatile! You can use shredded beef, ground beef, shredded pork, or even make them vegetarian with black beans and vegetables. For a seafood version, try using cooked shrimp or flaked fish. Just make sure whatever protein you use is well-seasoned and not too wet, as excess moisture can make the tortillas soggy.
- → How do I reheat leftover taquitos?
To maintain their crispy texture, reheat taquitos in the oven at 350°F for about 10-12 minutes, or in an air fryer at 375°F for 5-7 minutes. Avoid using the microwave as it will make them soggy. You can also reheat them in a skillet over medium heat, turning frequently until heated through and crispy again.
Conclusion
These Crispy Chicken Taquitos are the perfect combination of crispy, cheesy, and satisfying. They're easy enough for a weeknight dinner but impressive enough to serve at parties. The beauty of this recipe is its versatility – you can adjust the spices to your preference, swap the chicken for other proteins, or make them as mild or spicy as you like. Serve them with your favorite dipping sauces like guacamole, salsa, or sour cream for an extra layer of flavor. Once you master this basic technique, you'll find yourself making taquitos with all sorts of creative fillings!