
 pin it
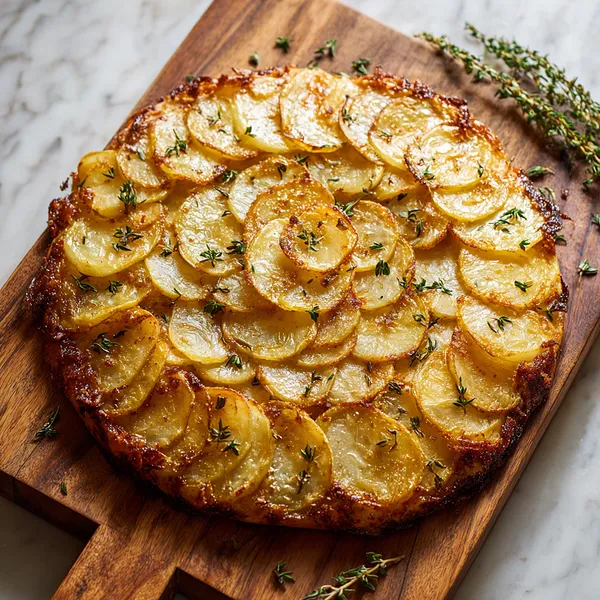
I first encountered potato galette at a small bistro in Paris during a college trip, and it completely changed how I thought about potatoes. The waiter brought out this gorgeous golden disc that looked almost too beautiful to eat, but one bite and I was hooked. The contrast between the crispy, caramelized exterior and the creamy interior was mind-blowing. When I returned home, I became obsessed with recreating it. After several attempts (and a few stuck-to-the-pan disasters), I finally cracked the code. The secret is using enough butter – don't be shy! – and making sure your potato slices are uniformly thin so they cook evenly. I love how this recipe transforms everyday potatoes into something that feels special and sophisticated. The methodical process of arranging each potato slice in overlapping circles is almost meditative. There's something deeply satisfying about creating those perfect concentric patterns. Now, every time I make this galette, I'm transported back to that little bistro, and I feel connected to a long tradition of French home cooking that celebrates simple ingredients done right.
Why I love this recipe
What I love most about this Crispy Potato Galette is how it manages to be both impressive and comforting at the same time. It's fancy enough for a dinner party but homey enough for a Tuesday night meal. There's also something incredibly satisfying about the process – the rhythmic slicing, the careful layering, and that moment of anticipation when you flip it over. Every single time, it feels like a small culinary victory. I love that it showcases the potato in a way that elevates this humble vegetable to star status. The crispy edges that get almost candy-like from the butter and heat, contrasted with the tender middle layers – it's textural heaven. Fresh thyme adds just the right aromatic note without overpowering the natural potato flavor. This recipe has also taught me patience and precision in the kitchen. You can't rush the slicing or the cooking, and that's actually a beautiful thing. It's a reminder that good food takes time and care. Plus, the fact that it's naturally gluten-free means I can serve it to almost anyone without worry. Most importantly, I love how it brings people together – there's always that collective "wow" moment when it comes to the table.
What You Need From Your Kitchen
- Yukon Gold Potatoes: Wash, peel, and slice into very thin rounds using a mandoline for uniform thickness
- Unsalted Butter: Melt completely and mix with garlic and herbs for coating the potato slices
- Fresh Thyme: Strip the leaves from the stems and mix into the butter, reserve some sprigs for garnish
- Garlic Cloves: Mince finely and incorporate into the melted butter mixture
- Sea Salt: Combine with the butter mixture to season all potato layers evenly
- Black Pepper: Freshly grind and add to the seasoning mixture for a subtle heat
Let's Make These Together
- Prepare Your Potatoes
- Start by washing and peeling your Yukon Gold potatoes thoroughly. Using a mandoline slicer set to 1/8-inch thickness, carefully slice all the potatoes into uniform rounds. This consistency is crucial for even cooking. Once sliced, immediately submerge them in a bowl of cold water to prevent oxidation and browning. While they soak, prepare your butter mixture by melting the butter and mixing in the minced garlic, fresh thyme leaves, salt, and pepper. The aroma at this stage is already incredible!
- Season the Slices
- Drain your potato slices completely and lay them out on clean kitchen towels. Pat them thoroughly dry – this is one of the most important steps for achieving that crispy texture we're after. Any moisture left on the potatoes will create steam in the oven instead of allowing proper crisping. Once dry, transfer the slices to a large bowl and pour the butter-herb mixture over them. Using your hands (it's messy but fun!), gently toss the potatoes to ensure every single slice is coated with the buttery goodness.
- Build Your Galette
- Take your well-buttered skillet and start creating your masterpiece. Begin at the outer edge of the pan and arrange potato slices in a circular pattern, overlapping each slice like roof shingles. Work your way toward the center, creating concentric circles. Continue building layers, occasionally pressing down gently to compact the galette. Don't worry if it's not perfect – the beauty is in the rustic charm. Use any remaining butter mixture to brush between layers for extra flavor and crispiness.
- Cook and Bake
- Place your assembled galette on the stovetop over medium heat for about 5 minutes. Listen for that satisfying sizzle – it means the bottom is starting to caramelize beautifully. Then transfer the skillet to your preheated oven and let it bake for 45-50 minutes. The kitchen will smell absolutely amazing as the butter caramelizes and the thyme releases its aromatic oils. You'll know it's done when a knife slides easily through all the layers and the top is gorgeously golden brown.
- The Grand Finale
- This is the moment of truth! Let the galette rest in the skillet for 5 minutes after removing it from the oven. Run a spatula around the edges to loosen any stuck bits. Place your serving plate or board upside down over the skillet. Take a deep breath, and with confidence, quickly flip the whole thing over. Slowly lift the skillet away to reveal your beautiful creation. Those golden concentric circles and caramelized edges are absolutely worth celebrating. Garnish with fresh thyme sprigs, cut into wedges, and watch everyone's faces light up when you bring this to the table!
 pin it
Switch Things Up
I'll never forget the first time I made this galette for a dinner party – I was so nervous about the flip! My hands were shaking as I placed the serving board on top of the skillet, but when I inverted it and lifted the pan, there it was: absolute perfection. Those golden concentric circles gleaming under the kitchen lights, and the room filled with the most incredible aroma of butter and thyme. My guests actually gasped when I brought it to the table. Now, I make this at least twice a month because it's become my secret weapon. Sometimes I add rosemary instead of thyme, or mix in some thinly sliced onions between the layers. Once, I even made mini galettes in muffin tins for a brunch – they were adorable! The best part? Even when the presentation isn't Instagram-perfect, it still tastes amazing. I've learned that a little uneven browning just adds character. This recipe has taught me that cooking is about confidence and having fun in the kitchen.
Perfect Pairings
This Crispy Potato Galette pairs beautifully with so many dishes! Serve it alongside a perfectly roasted herb chicken or a juicy ribeye steak for a classic French bistro experience. It's also incredible with pan-seared salmon or roasted lamb chops. For a vegetarian meal, pair it with a fresh arugula salad dressed with lemon vinaigrette and some sautéed mushrooms. The buttery richness of the galette loves acidic companions, so consider serving it with roasted tomatoes or a tangy yogurt sauce with herbs. A crisp white wine like Chardonnay or Sauvignon Blanc complements the dish wonderfully, cutting through the richness while enhancing the herbal notes.
 pin it
Frequently Asked Questions
- → Can I make this galette ahead of time?
Yes! You can assemble the galette up to 4 hours ahead and keep it covered in the refrigerator. When ready to cook, bring it to room temperature for 15 minutes, then proceed with the stovetop and baking steps. The galette is best served fresh and crispy, but you can reheat leftovers in a 350°F oven for 10-15 minutes.
- → What if I don't have a mandoline slicer?
No problem! You can use a sharp chef's knife or even a food processor with a slicing attachment. The key is to make the slices as uniform as possible – aim for about 1/8-inch thickness. It might take a bit longer, but the results will still be delicious. Just take your time and work carefully.
- → Can I use different types of potatoes?
Absolutely! While Yukon Gold potatoes are ideal because of their buttery flavor and perfect starch content, you can use Russet potatoes for a slightly fluffier interior, or even sweet potatoes for a different flavor profile. Red potatoes also work well and add a beautiful color contrast. Just keep in mind that cooking times may vary slightly depending on the potato variety.
- → My galette stuck to the pan. How can I prevent this?
The key is using enough butter in the pan before layering your potatoes. Make sure to generously coat the entire bottom and sides of the skillet. Cast iron skillets work best because they distribute heat evenly and develop a natural non-stick surface. Also, don't skip the stovetop step – it helps create that initial crust that actually makes flipping easier. If you're still worried, you can line the bottom of the skillet with parchment paper, though this isn't traditional.
- → Can I add other ingredients to this recipe?
Definitely! This recipe is very versatile. You can add thinly sliced onions between the potato layers, incorporate different herbs like rosemary or sage, add grated cheese (Gruyère is amazing), or even layer in some crispy bacon. Some people like to add a layer of caramelized onions or sautéed mushrooms in the middle. Just remember that adding too many wet ingredients might affect the crispiness, so use additions sparingly.
- → How do I know when the galette is done?
The galette is perfectly done when you can easily insert a knife or skewer through the center and it goes through all the layers without resistance. The top should be golden brown with some darker caramelized spots around the edges. If the top is browning too quickly but the inside isn't tender yet, cover it loosely with aluminum foil and continue baking. The total baking time can range from 45-55 minutes depending on your oven and potato thickness.
- → What's the best way to slice and serve the galette?
Use a sharp knife and cut it like a pie or cake, into wedges. A serrated knife works particularly well for cutting through the crispy layers without crushing them. Serve it hot right after flipping for the best texture contrast between the crispy exterior and tender interior. You can garnish each wedge with a small sprig of fresh thyme and a light sprinkle of flaky sea salt for that professional finishing touch.
Conclusion
This Crispy Potato Galette is proof that simple ingredients can create something truly spectacular. The combination of thinly sliced potatoes, butter, and fresh herbs transforms into a dish that's both rustic and elegant. Whether you're serving it alongside roasted chicken, grilled steak, or as part of a vegetarian feast, this galette never fails to impress. The crispy exterior gives way to tender, buttery layers that showcase the humble potato in its finest form. It's a recipe that looks complicated but is actually quite forgiving, making it perfect for both weeknight dinners and special occasions.