
 pin it
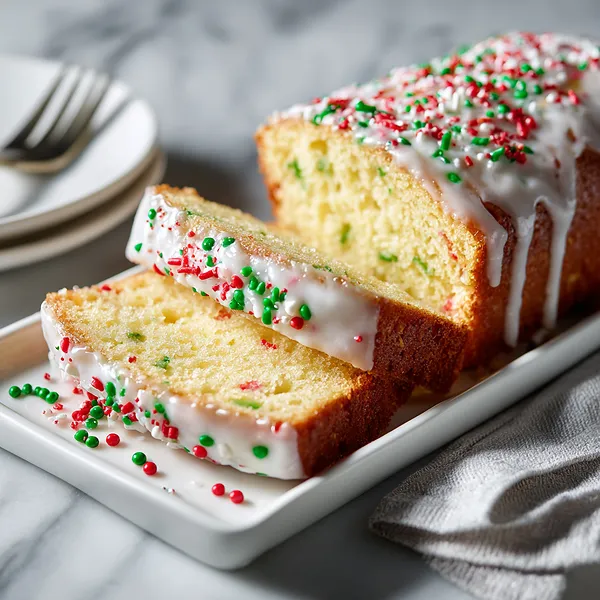
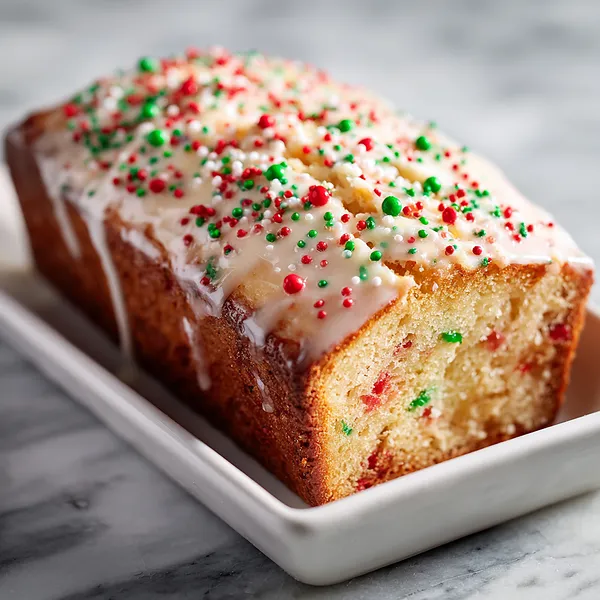
I first encountered this Festive Christmas Loaf at my neighbor's holiday open house about five years ago. She had it displayed on a vintage cake stand, and I couldn't stop staring at how the colorful sprinkles created this mosaic effect throughout each slice. The glaze was still slightly soft, and when I took my first bite, I was hooked. The cake itself was incredibly moist and buttery, with a delicate crumb that practically melted in my mouth. Those little candy pieces added just the right amount of sweetness and a fun textural surprise. What struck me most was how simple the concept was – just a classic pound cake elevated with festive touches – yet it looked like something from a professional bakery. I asked for the recipe immediately, and she laughed, saying it was her grandmother's basic loaf recipe that she'd simply dressed up for Christmas. That's when I realized the beauty of this dessert: it's approachable enough for beginner bakers but impressive enough to wow seasoned cooks. Since then, I've made it every December, sometimes twice, and it never fails to be the most photographed item on my dessert table.
Why I love this recipe
What I love most about this recipe is how it transforms a simple loaf cake into a festive masterpiece with just a few special touches. There's something magical about folding those colorful candies into the batter and knowing that every slice will reveal a different pattern. It's like opening a present every time you cut into it. The recipe itself is wonderfully forgiving – even if you're not an experienced baker, the straightforward mixing method and reliable baking time mean you'll get consistent results. I also appreciate that it's not overly sweet; the cake has a balanced flavor that lets the vanilla shine through, while the glaze adds just enough sweetness to satisfy without being cloying. Another reason I adore this loaf is its versatility. You can bake it days ahead and it actually tastes better as the flavors meld, making it perfect for busy holiday schedules. Plus, it freezes beautifully, so I often make extra loaves to have on hand for unexpected guests or last-minute gift needs. The nostalgia factor is huge too – something about that glossy white glaze and colorful sprinkles instantly transports me back to childhood Christmas mornings.
What You Need From Your Kitchen
- All-purpose flour: Forms the structure of the cake; measure accurately by spooning into cup and leveling off
- Unsalted butter: Provides richness and moisture; must be softened to room temperature for proper creaming
- Large eggs: Bind ingredients and add structure; bring to room temperature for better incorporation
- Whole milk: Adds moisture and tender crumb; can substitute with 2% milk if needed
- Festive holiday candies: Choose non-melting varieties like nonpareils or jimmies for best results
- Powdered sugar: Creates smooth, sweet glaze; sift if lumpy for best consistency
Let's Make These Together
- Prep Your Workspace
- Start by gathering all your ingredients and preheating your oven to 350°F. Prepare your loaf pan by greasing it generously and dusting with flour. Having everything ready makes the process smooth and enjoyable, letting you focus on creating this beautiful festive loaf.
- Create the Perfect Batter
- Beat your softened butter and sugar until it's light and fluffy – this is crucial for a tender crumb. Add eggs one at a time, mixing well between each addition. The batter should look smooth and creamy. Then gently fold in your dry ingredients alternating with milk, being careful not to overmix. This technique ensures your loaf stays light and airy.
- Add Festive Magic
- Toss your colorful candies in a bit of flour before folding them into the batter. This simple trick keeps them suspended throughout the cake rather than sinking to the bottom. As you fold them in, you'll see your batter transform into something truly festive and magical.
- Bake to Golden Perfection
- Pour your batter into the prepared pan and smooth the top. Bake for about 50-55 minutes until golden and fragrant. Your kitchen will smell absolutely incredible. Test with a toothpick – it should come out clean or with just a few moist crumbs. Let it cool before the final touch.
- Glaze and Decorate
- Once your loaf is completely cool, whisk together powdered sugar and milk to create a smooth, pourable glaze. Drizzle it generously over the top, letting it cascade down the sides naturally. While the glaze is still wet, shower it with festive sprinkles. This is where your loaf becomes a true showstopper that's almost too pretty to slice.
 pin it
Switch Things Up
I'll never forget the first time I made this loaf for a Christmas Eve gathering. I was nervous about the candies bleeding into the batter, but I tossed them in a bit of flour first, and they stayed perfectly suspended throughout. When I sliced it at the party, everyone gasped at how pretty it looked inside. My aunt immediately asked for the recipe, and now it's become our family tradition. I love that you can customize the sprinkles to match your holiday theme – I've done red and white for a candy cane vibe, and even gold and silver for New Year's. The glaze is forgiving too; if it's too thick, just add a drop more milk. This recipe has never let me down, even when I've made it at the last minute.
Perfect Pairings
This Christmas loaf pairs beautifully with a hot cup of coffee or spiced chai tea for a cozy morning treat. For an indulgent dessert experience, serve it alongside vanilla ice cream or fresh whipped cream with a dash of cinnamon. It also complements a cheese board featuring creamy brie and sharp cheddar, creating a delightful sweet and savory contrast. For holiday brunches, pair it with fresh berries, yogurt parfaits, and scrambled eggs. A glass of dessert wine or sparkling cider makes it feel extra special for evening celebrations.
 pin it
Frequently Asked Questions
- → Can I use a different size loaf pan?
Yes, but baking time will vary. A larger pan will require less time (check at 40 minutes), while smaller pans need more time. The loaf is done when a toothpick inserted in the center comes out clean.
- → What types of candies work best in this recipe?
Non-melting candies like nonpareil sprinkles, jimmies, or mini chocolate chips work best. Avoid candies with soft centers or chocolate that melts easily, as they can bleed into the batter and affect texture.
- → How do I store leftover Christmas loaf?
Store the glazed loaf in an airtight container at room temperature for up to 5 days. You can also wrap it tightly and freeze for up to 3 months. Thaw overnight at room temperature before serving.
- → Can I make this loaf ahead of time?
Absolutely! This loaf actually tastes better the next day as the flavors meld. You can bake it 2-3 days ahead and store it covered. Add the glaze and sprinkles on the day you plan to serve it for the freshest look.
- → Why did my candies sink to the bottom?
This usually happens when the batter is too thin or the candies weren't coated in flour first. Make sure to toss them in a tablespoon of flour before folding into the batter, which helps them stay suspended during baking.
- → Can I make this recipe dairy-free?
Yes, you can substitute the butter with dairy-free margarine and use almond milk or oat milk in place of regular milk. The texture will be slightly different but still delicious.
Conclusion
This Festive Christmas Loaf is everything you want in a holiday dessert: beautiful, delicious, and surprisingly simple to make. The combination of tender cake, sweet glaze, and festive decorations makes it a showstopper at any Christmas gathering. Whether you're serving it at brunch, dessert, or gifting it to loved ones, this loaf captures the magic of the season in every slice. The best part is watching everyone's faces light up when they see those colorful candies baked right into the cake.