
 pin it
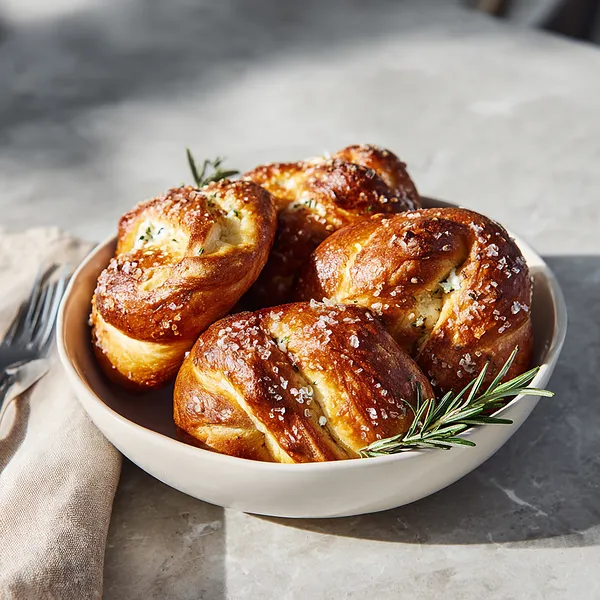
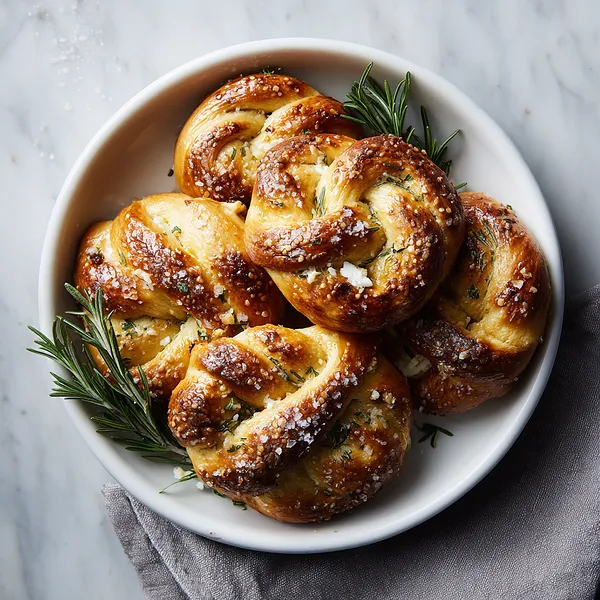
I stumbled upon this recipe during a trip through Bavaria, where I watched a baker in Munich expertly twist pretzels before dawn. The traditional pretzels were amazing, but I kept thinking about how incredible they'd be with a savory filling. Back home, I started experimenting with different cheeses and settled on feta because of its tangy flavor and perfect melting consistency. The herbs came naturally – rosemary for its aromatic punch and thyme for subtle earthiness. What makes these special is the traditional pretzel-making technique: boiling them in a baking soda bath before baking creates that distinctive chewy exterior and deep brown color. The process might seem intimidating at first, but once you get the hang of shaping the dough, it's actually quite meditative. Each pretzel is like a little edible work of art, with its twisted shape and golden crust studded with sea salt crystals.
Why I love this recipe
This recipe represents everything I love about baking – it's hands-on, creative, and incredibly rewarding. There's something magical about transforming simple ingredients into these beautiful twisted creations. I love that they're impressive enough for special occasions but comforting enough for a lazy Sunday afternoon. The way the feta gets all melty and combines with the fresh herbs creates pockets of flavor throughout each pretzel. What really gets me is the texture contrast: the chewy exterior giving way to the soft, fluffy interior with those surprise bursts of salty, herby cheese. These pretzels also bring people together – there's something about pulling them apart while they're still warm that encourages sharing and conversation. Plus, making them has taught me patience and technique, skills that have improved all my baking.
What You Need From Your Kitchen
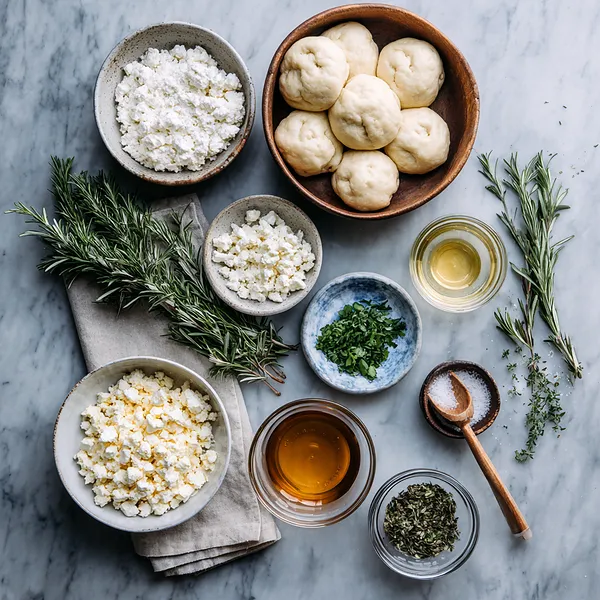
- All-purpose flour: Forms the base of the pretzel dough, providing structure
- Instant yeast: Leavens the dough and creates that soft, fluffy texture
- Feta cheese: Crumble and mix with herbs for the tangy, creamy filling
- Fresh rosemary: Chop finely and combine with feta for aromatic flavor
- Fresh thyme: Chop and add to the cheese mixture for herbaceous depth
- Baking soda: Dissolve in boiling water to create the alkaline bath that gives pretzels their characteristic flavor and color
- Egg: Beat and brush over pretzels before baking for a glossy, golden finish
Let's Make These Together
- Activate the yeast
- Begin by combining warm water with sugar and yeast in your mixing bowl. This step is crucial because it activates the yeast, allowing it to feed on the sugar and begin producing the carbon dioxide that will make your dough rise. You'll know it's working when you see a foamy layer forming on top after about 5 minutes. This is your assurance that the yeast is alive and ready to create those beautiful air pockets in your pretzel dough.
- Knead to perfection
- Once your wet ingredients are combined with the flour, salt, and melted butter, you'll begin the kneading process. This is where the magic happens – kneading develops the gluten structure that gives pretzels their characteristic chew. Work the dough on a lightly floured surface, pushing it away from you with the heel of your hand, then folding it back. Continue for 8-10 minutes until the dough becomes smooth, elastic, and slightly tacky but not sticky. The dough should spring back when you poke it.
- Create the filling
- While your dough is rising, prepare your herb and cheese filling. The key here is to use good quality feta that's been properly drained – excess moisture can make your filling leak during baking. Crumble the cheese into small pieces and gently fold in the freshly chopped herbs. The herbs should be finely chopped so they distribute evenly and don't tear the dough when you're sealing it.
- Shape with confidence
- Shaping stuffed pretzels requires a gentle touch. Roll your dough portions into long ropes, then flatten them slightly to create a channel for the filling. Place the feta mixture down the center, leaving space at the edges. Carefully fold the dough over the filling and pinch the seam firmly to seal – this step is critical to prevent cheese leakage. Then twist into the classic pretzel shape, making sure the seam is on the bottom when you place it on the baking sheet.
- The baking soda bath
- This step is what transforms regular bread into authentic pretzels. The alkaline solution created by the baking soda gives pretzels their distinctive mahogany color and slightly tangy, unique flavor. Lower your shaped pretzels into the gently boiling water for exactly 30 seconds – too long and they'll be too dense, too short and they won't develop that characteristic pretzel crust. Use a slotted spoon to carefully lift them out and let excess water drain before placing on your baking sheet.
 pin it
Switch Things Up
I first made these pretzels for a casual dinner party, and they completely stole the show from the main course. Everyone kept asking for the recipe, and two friends actually started arguing about who got the last one! Now they've become my go-to whenever I need to bring something to gatherings. I've experimented with different herbs too – sometimes I add a bit of oregano or even some garlic. My favorite variation is adding a tiny bit of lemon zest to the feta mixture; it brightens everything up beautifully. One time I made mini versions for my nephew's birthday party, and even the kids who claimed they didn't like cheese were sneaking seconds. The smell of these baking has become synonymous with weekend mornings in my house.
Perfect Pairings
These pretzels are incredibly versatile when it comes to pairings. Serve them alongside a cold German beer or craft lager for an authentic experience. They're also fantastic with a honey mustard dipping sauce or a creamy garlic aioli. For a complete appetizer spread, pair them with pickled vegetables, olives, and cured meats. I love serving these with a warm tomato soup for a comforting meal, or alongside a crisp green salad dressed with lemon vinaigrette. They also make an excellent accompaniment to cheese boards, especially when you want to add something warm and substantial.
 pin it
Frequently Asked Questions
- → Can I make the dough ahead of time?
Yes! You can make the dough up to 24 hours in advance. After the first rise, punch it down, cover tightly with plastic wrap, and refrigerate. Let it come to room temperature for 30 minutes before shaping. The cold fermentation actually develops more flavor.
- → My pretzels didn't turn brown enough, what happened?
The deep brown color comes from the baking soda bath. Make sure your water is at a rolling boil and you're using the full 1/3 cup of baking soda. Also ensure you're baking at 425°F – if your oven runs cool, increase the temperature slightly. The egg wash also contributes to browning.
- → Can I use a different cheese instead of feta?
Absolutely! Goat cheese works wonderfully and provides a similar tangy flavor. You could also use shredded mozzarella for a milder taste, or even cheddar for a sharper flavor. Just make sure whatever cheese you use isn't too wet, or it might leak out during baking.
- → Why did the cheese leak out of my pretzels?
This usually happens when the seam isn't sealed properly or the dough is rolled too thin. Make sure to pinch the edges firmly together and place the seam-side down when you boil and bake. Also, don't overfill – one tablespoon of filling is plenty for each pretzel.
- → Can these be made without the baking soda bath?
While you can skip it, you won't get authentic pretzels – they'll taste more like stuffed bread rolls. The baking soda bath is what creates the distinctive pretzel flavor, chewy crust, and deep brown color. It's really worth this extra step for the true pretzel experience.
- → How do I store and reheat leftovers?
Store cooled pretzels in an airtight container at room temperature for up to 2 days. To reheat, place in a 350°F oven for 5-7 minutes until warmed through and slightly crispy on the outside. Avoid microwaving as it makes them soggy. For longer storage, freeze for up to 3 months.
Conclusion
These Feta and Herb Stuffed Pretzels bring together the best of German baking tradition with a Mediterranean twist. They're perfect for game day, parties, or whenever you want to impress with minimal effort. The combination of tangy feta and aromatic herbs creates a flavor profile that's both comforting and sophisticated. Store any leftovers in an airtight container and reheat in the oven for a few minutes to restore that perfect texture.