
 pin it
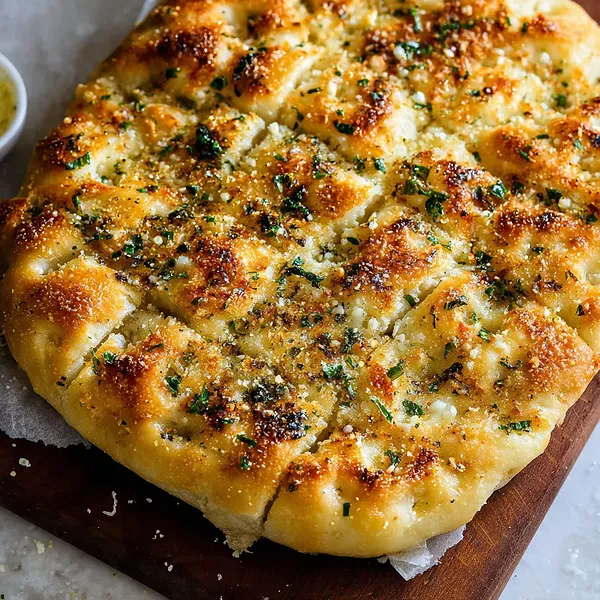
I first encountered this style of focaccia at a small Italian bakery in San Francisco's North Beach. The baker, an elderly Italian woman, was pulling tray after tray of these golden beauties from a massive stone oven. The dimpled surface, glistening with olive oil and scattered with fresh herbs, looked like edible art. When I tasted it, I was amazed by how something so simple could be so complex in flavor. The bread was pillowy soft inside with a perfectly crispy crust, and every bite delivered bursts of garlic and herbs. I knew I had to recreate this at home. After countless attempts and tweaks, I've perfected this recipe that captures that same rustic, artisanal quality. The key is in the long, slow rise that develops incredible flavor, and the generous olive oil that creates those characteristic crispy edges and tender crumb.
Why I love this recipe
What I absolutely love about this focaccia recipe is how it transforms simple pantry ingredients into something truly extraordinary. There's something deeply satisfying about working with the dough, feeling it become smooth and elastic under your hands, then watching it slowly rise and bubble. The dimpling process is almost therapeutic – pressing your fingers into the soft dough to create those perfect little wells that will hold pools of olive oil and herbs. But what really gets me is the anticipation as it bakes. That moment when the kitchen fills with the most incredible aroma, and you can see through the oven door as the surface turns golden and the herbs darken just slightly. It's bread that looks as good as it tastes, and every time I make it, I'm reminded why home baking is so special.
What You Need From Your Kitchen
- Bread flour: sifted and measured accurately for best texture
- Active dry yeast: dissolved in warm water until foamy
- Extra virgin olive oil: divided for dough and topping
- Fresh garlic: minced finely for even distribution
- Fresh parsley: chopped just before using
- Parmesan cheese: freshly grated for best flavor
Let's Make These Together
- Mix the foundation
- Start by dissolving your yeast in warm water - this activates it and ensures your bread will rise properly. Combine with flour, olive oil, and salt to form your basic dough.
- Let it rise and shine
- Transfer to a greased bowl and let the magic happen as your dough doubles in size. This first rise develops the flavor and creates that perfect airy texture we're after.
- Shape with love
- Gently stretch your risen dough into your oiled pan. Don't worry about perfect edges - rustic is beautiful! Let it rise again for that extra lift.
- Create those signature dimples
- Use your fingertips to press deep wells all over the surface. These dimples will hold pools of olive oil and create the characteristic focaccia texture.
- Top and bake to perfection
- Drizzle with olive oil, scatter your aromatic garlic and herbs, then bake until golden brown and irresistibly fragrant.
 pin it
Switch Things Up
I remember the first time I made this focaccia on a rainy Sunday afternoon. The whole house transformed into this cozy Italian trattoria with the most incredible garlic aroma filling every corner. My family kept wandering into the kitchen, drawn by the smell, asking when it would be ready. When I finally pulled it from the oven, that golden, herb-speckled surface was so beautiful I almost didn't want to cut into it. But that first bite – crispy edges, pillowy center, and those pockets of garlicky goodness – was pure magic. Now it's become our go-to comfort food whenever we want to make an ordinary meal feel special.
Perfect Pairings
This focaccia is incredibly versatile and pairs wonderfully with so many dishes. Serve it alongside a hearty minestrone soup or creamy tomato bisque for dipping. It's perfect with a fresh caprese salad, where the bread soaks up the balsamic and tomato juices beautifully. For entertaining, slice it into squares and serve with olive tapenade, hummus, or a selection of Italian cheeses. It also makes an excellent base for sandwiches – try it with prosciutto, fresh mozzarella, and arugula for a gourmet lunch.
 pin it
Frequently Asked Questions
- → Can I make this dough ahead of time?
Yes! You can prepare the dough up to 24 hours in advance. After the first rise, cover tightly and refrigerate. Bring to room temperature before shaping and continuing with the recipe.
- → What if I don't have bread flour?
All-purpose flour works fine, though the texture will be slightly less chewy. For best results, add 1 tablespoon of vital wheat gluten per cup of all-purpose flour used.
- → How do I know when it's fully baked?
The focaccia should be golden brown on top and sound hollow when tapped on the bottom. Internal temperature should reach 190-200°F if you have a thermometer.
- → Can I freeze leftover focaccia?
Absolutely! Wrap cooled focaccia tightly in plastic wrap and freeze for up to 3 months. Thaw at room temperature and reheat in a 350°F oven for 5-10 minutes to crisp up.
- → What other toppings can I use?
Try cherry tomatoes, olives, caramelized onions, rosemary, or different cheeses. Just avoid watery toppings that might make the bread soggy.
Conclusion
This garlic herb focaccia is more than just bread – it's a warm hug from your kitchen. The combination of aromatic garlic, fresh herbs, and golden olive oil creates a masterpiece that pairs beautifully with soups, salads, or simply enjoyed on its own. The crispy exterior gives way to a tender, airy crumb that's absolutely irresistible. Once you master this recipe, you'll find yourself making it weekly for family dinners and special occasions alike.