
 pin it
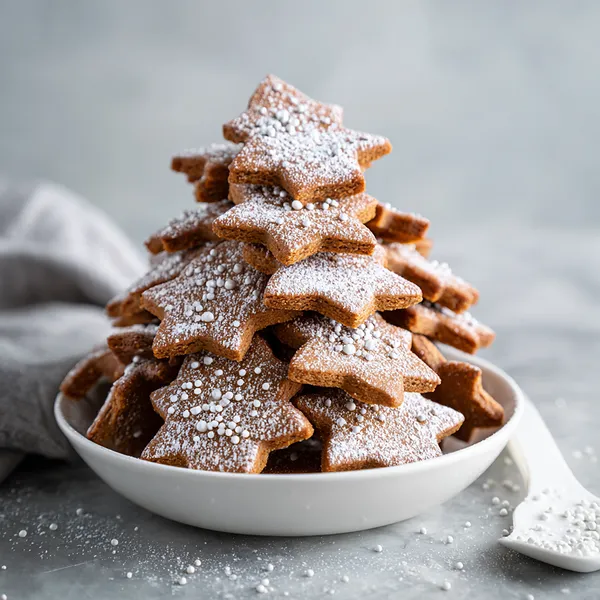
I'll never forget the first time I encountered a gingerbread cookie tree at a holiday market in Germany – I was completely mesmerized by how something so simple could be so elegant. The vendor had stacked these beautifully spiced cookies into perfect cone shapes, each layer slightly smaller than the last, creating an edible Christmas tree that smelled absolutely divine. I knew I had to recreate it at home. This recipe is my version of that magical discovery, combining classic gingerbread flavors with a stunning presentation that makes any table feel festive. The dough itself is a dream to work with – perfectly spiced with ginger, cinnamon, and nutmeg, enriched with molasses for that deep, complex sweetness. What I love most is how the cookies maintain their shape during baking, making the stacking process straightforward and stress-free. The royal icing adds that final touch of elegance, cascading down the sides like fresh snow on a pine tree. Every time I make this, I'm transported back to that Christmas market, surrounded by twinkling lights and the aroma of holiday spices. It's become my signature holiday dessert, and friends now request it specifically for their gatherings.
Why I love this recipe
This Gingerbread Christmas Tree recipe holds a special place in my heart for so many reasons. First, it's incredibly forgiving – even if your icing drizzles aren't perfect or your cookies are slightly different sizes, the end result still looks impressive and tastes amazing. I love that it's a recipe that brings people together; everyone wants to help cut shapes, stack cookies, or drizzle icing. The flavor is perfectly balanced with warm spices that aren't overpowering, and the molasses adds depth without being too strong. What really makes this recipe special is its versatility – you can make it as simple or as elaborate as you want. Some years I keep it minimal with just white icing, other times I go all out with colored sugars, edible glitter, and even tiny fondant decorations. It's also make-ahead friendly, which is crucial during the busy holiday season. I can bake the cookies a few days in advance and assemble the tree on the day I need it. Most importantly, this recipe creates memories – the joy on my family's faces, the photos we take each year, and the tradition we've built around making it together. It's not just about the cookies; it's about the experience and the love baked into every layer.
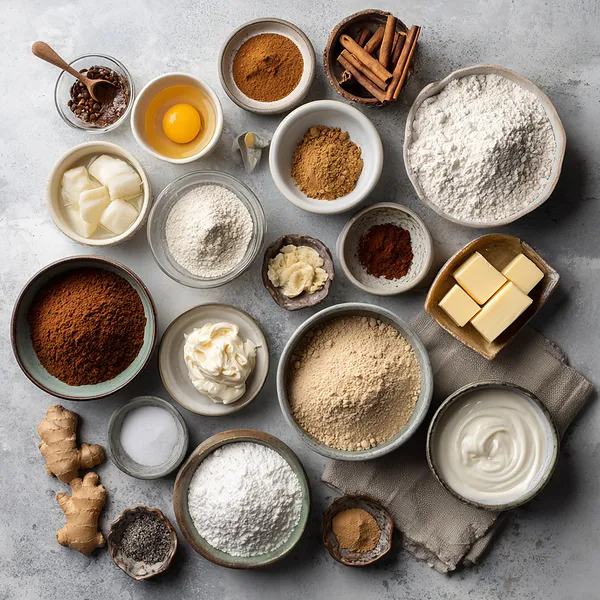
What You Need From Your Kitchen
- All-purpose flour: Forms the base structure of the cookies; combine with spices and leavening agents
- Unsalted butter: Cream with brown sugar until fluffy for a tender cookie texture
- Brown sugar: Beat with butter to add moisture and caramel-like sweetness
- Molasses: Mix into the wet ingredients for deep, rich flavor and dark color
- Ground ginger: Blend into dry ingredients for signature gingerbread warmth and spice
- Ground cinnamon: Whisk with other spices to create the classic holiday aroma
- Powdered sugar: Whisk with milk to create smooth royal icing for decoration
- Egg: Beat into butter mixture to bind ingredients and add richness
Let's Make These Together
- Prepare the Spiced Dough
- Begin by whisking your dry ingredients in a large bowl, making sure all the aromatic spices are evenly distributed throughout the flour. In a separate bowl, cream your softened butter and brown sugar until it becomes light and fluffy – this incorporation of air will help create a tender cookie. Add your molasses, egg, and vanilla to the butter mixture, beating until everything is smoothly combined. Gradually fold in your spiced flour mixture until a cohesive dough forms. Don't overmix, as this can make your cookies tough.
- Chill and Roll the Dough
- Divide your dough into two manageable portions and flatten each into a disk before wrapping tightly in plastic wrap. Refrigerate for at least an hour – this crucial step firms up the butter, making the dough much easier to roll out and helping the cookies maintain their shape during baking. When you're ready to bake, roll the chilled dough on a lightly floured surface to about 1/4-inch thickness, working with one disk at a time while keeping the other chilled.
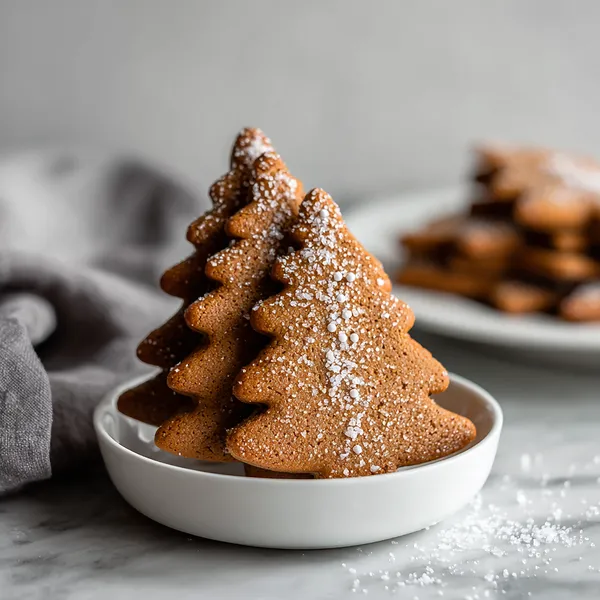
- Cut and Bake Star Cookies
- Using your graduated star cutters, cut out cookies in multiple sizes, creating several of each size to build your layered tree structure. Arrange the cut cookies on parchment-lined baking sheets with a bit of space between each one. Bake at 350°F until the edges are firm and the centers look set – smaller cookies will finish faster, so watch them carefully. Let the cookies cool on the pan for a few minutes before transferring to a wire rack to cool completely.
- Prepare and Assemble with Icing
- Whisk together your powdered sugar and milk until you achieve a smooth, drizzle-able consistency. Transfer the icing to a piping bag for easy application. Begin assembling by placing your largest star cookie on your serving plate, then pipe a small amount of icing in the center before adding the next smaller layer. Continue stacking in descending size order, rotating each cookie slightly to create visual interest. Once assembled, drizzle the remaining icing over the entire tree in decorative patterns and immediately sprinkle with pearl sugar. Allow the icing to set before serving your stunning centerpiece.
 pin it
Switch Things Up
I first made this Gingerbread Christmas Tree three years ago when I wanted to create something special for our family's Christmas Eve dinner. I was nervous about the stacking part, thinking it would collapse into a gingerbread disaster, but it turned out beautifully! Now I make it every year, and my kids love helping me cut out the star shapes in different sizes. Last year, we experimented with adding orange zest to the dough, and it added such a lovely brightness to the spices. My favorite moment is always when we drizzle the icing – my daughter calls it "making it snow" on the tree. I've also tried making mini versions as individual desserts, which worked surprisingly well for a holiday party. The smell of these cookies baking has become synonymous with Christmas morning in our house.
Perfect Pairings
This Gingerbread Christmas Tree pairs wonderfully with a variety of holiday beverages and treats. Serve it alongside hot spiced apple cider or mulled wine for adults, while kids will love it with cold milk or hot chocolate topped with marshmallows. For a complete dessert spread, place it near a cheese board with aged cheddar and cranberry chutney – the sweet spices complement sharp cheese beautifully. It also makes a stunning centerpiece when surrounded by peppermint bark, chocolate truffles, and candied nuts. For a morning treat, enjoy a piece with strong coffee or chai latte. The gingerbread's warm spices also pair nicely with vanilla ice cream if you want to serve it as a plated dessert.
 pin it
Frequently Asked Questions
- → Can I make the dough ahead of time?
Absolutely! The gingerbread dough actually benefits from resting. You can prepare it up to 3 days in advance and keep it refrigerated, or freeze it for up to 2 months. Just make sure it's wrapped tightly in plastic wrap to prevent it from drying out. When you're ready to use frozen dough, thaw it overnight in the refrigerator before rolling.
- → What if I don't have star-shaped cookie cutters?
No problem! While star shapes create that classic Christmas tree look, you can use round cutters, hearts, or any shape you like in graduating sizes. You could even cut circles and create a more abstract tree design. The key is having multiple sizes to create the layered, stacked effect. If you're feeling creative, you can even cut the shapes freehand using cardboard templates.
- → How do I prevent the tree from collapsing?
The royal icing acts as an edible glue between layers, which is essential for stability. Make sure each layer of icing has a minute or two to begin setting before adding the next cookie. Also, ensure your cookies are completely cool before assembly – warm cookies can cause the icing to melt and lose its adhesive properties. For extra stability, you can make the cookies slightly thicker (about 3/8 inch instead of 1/4 inch).
- → Can I decorate the tree differently?
Definitely! While this recipe uses white royal icing and pearl sugar, you can get creative with your decorations. Try colored icing, edible glitter, small candies, mini chocolate chips, or crushed candy canes. Some people like to pipe green-tinted icing to make it look more like a traditional evergreen tree. You could also dust the finished tree with powdered sugar for a snowy effect.
- → How long will the assembled tree last?
The assembled gingerbread tree is best enjoyed within 2-3 days of assembly, though the individual cookies can last up to a week if stored properly in an airtight container. The icing can soften over time, especially in humid conditions, which may affect the structural integrity. If you need to make it in advance, consider baking and storing the cookies separately, then assembling the tree on the day you plan to serve it.
- → Can I make this recipe gluten-free or vegan?
Yes, with some modifications! For a gluten-free version, substitute the all-purpose flour with a 1:1 gluten-free baking flour blend. For a vegan version, replace the butter with vegan butter, use a flax egg (1 tablespoon ground flaxseed mixed with 3 tablespoons water) instead of the regular egg, and use non-dairy milk in the icing. The texture may vary slightly from the original, but you'll still get a delicious result.
Conclusion
This Gingerbread Christmas Tree is more than just a dessert – it's a holiday tradition in the making. The combination of warm spices, rich molasses, and sweet royal icing creates a flavor profile that captures the essence of Christmas in every bite. Whether you're making it as a centerpiece for your holiday table or as a fun baking project with family, this recipe delivers both visual wow-factor and delicious taste. The best part is watching everyone's faces light up when you bring it out. Make it once, and it'll become your go-to festive showstopper year after year.