
 pin it
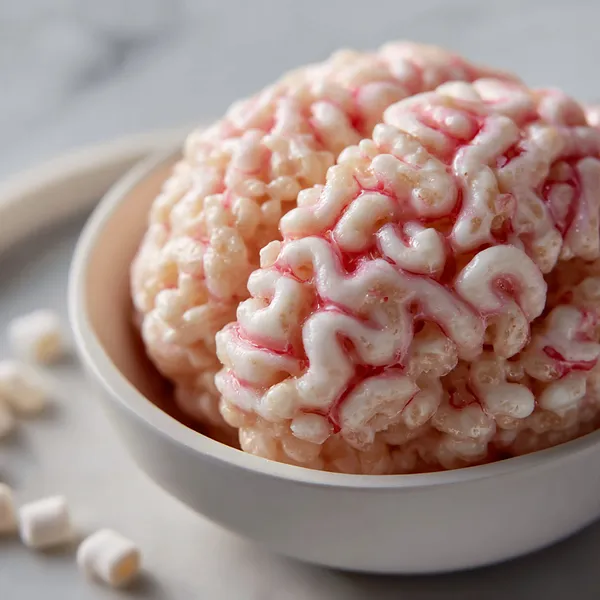
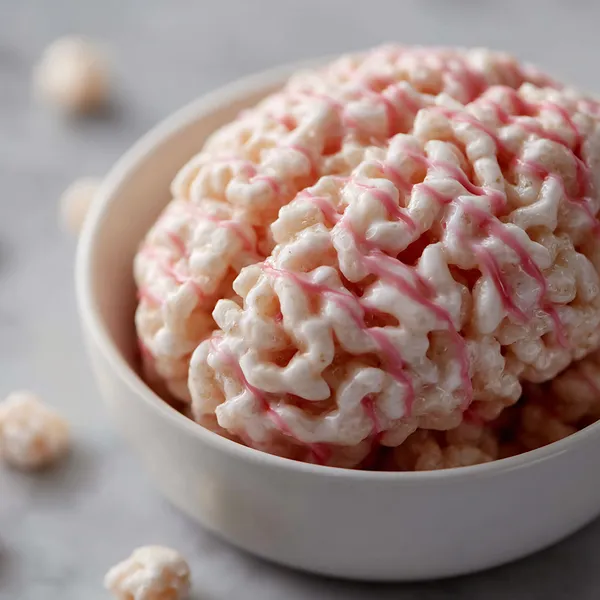
I stumbled upon the idea for these brain treats completely by accident. I was browsing Halloween party ideas online, desperately trying to find something that would impress my sister's spooky-themed birthday party, when I saw a simple Rice Krispies treat shaped like a brain. But the versions I found online looked too simple, too ordinary. I wanted something that would make people gasp and laugh at the same time. So I grabbed my traditional Rice Krispies recipe that my grandmother used to make and decided to get creative. The magic happened when I realized I could mold the warm mixture into brain shapes using my hands and a simple technique of pressing and folding. The real breakthrough was discovering that strawberry syrup, when carefully drizzled into the crevices, creates those realistic vein patterns that make these treats so unforgettably creepy. The texture is everything – that perfect balance of crispy cereal held together by gooey, sweet marshmallow. When you bite into one, you get that satisfying crunch followed by the soft, melt-in-your-mouth marshmallow center. What I love most is how forgiving this recipe is. Unlike temperamental baked goods, these treats are nearly impossible to mess up. The shaping process is actually therapeutic, like edible playdough for adults. Each brain ends up with its own unique personality, which makes them even more charming.
Why I love this recipe
This recipe holds a special place in my heart for so many reasons. First, it bridges generations – my grandmother's classic Rice Krispies treat recipe meets modern Halloween creativity. There's something deeply satisfying about taking a beloved childhood treat and transforming it into something unexpectedly spooky. I love how this recipe brings people together. Every single time I make these, people gather in the kitchen, fascinated by the process, wanting to help shape or decorate. It becomes an activity, not just a recipe. Kids especially love the slightly gross-out factor combined with the familiar, comforting taste they already know and love. From a practical standpoint, I appreciate that it requires minimal ingredients and no special equipment beyond a brain mold (or just your hands). No oven means no stress about timing or temperature. The recipe is endlessly adaptable – you can adjust the sweetness, add flavor extracts, or experiment with different colored syrups for various effects. What really makes me love this recipe is the reactions it generates. The combination of "eww" and "yum" creates this perfect Halloween moment. People are simultaneously impressed by the realistic appearance and delighted by the nostalgic flavor. It's become my signature Halloween contribution, and honestly, people now expect me to bring them to every autumn gathering. The recipe also teaches patience and creativity, especially when shaping the brains. There's no right or wrong way to do it, which makes it accessible for all skill levels.
What You Need From Your Kitchen
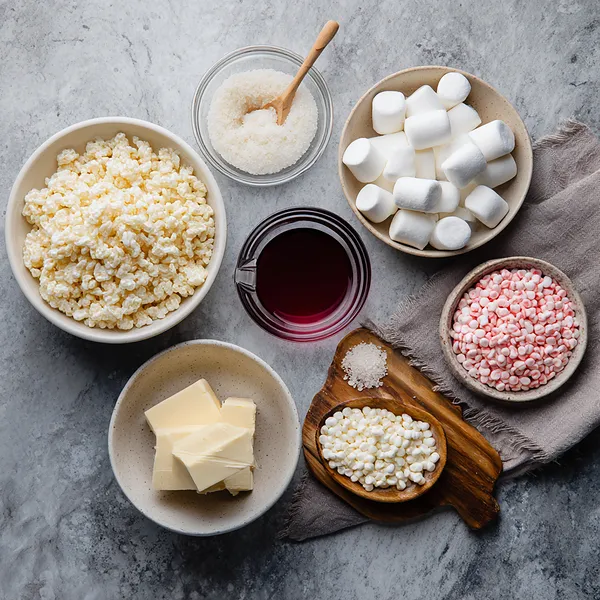
- Rice Krispies cereal: Provides the signature crispy texture and forms the base of the treats
- Mini marshmallows: Melt down to create the sticky, sweet binding agent that holds everything together
- Butter: Helps melt the marshmallows smoothly and adds richness to the flavor
- Strawberry syrup: Creates the realistic blood vein effect and adds a subtle fruity sweetness
- Cooking spray: Prevents sticking during shaping and makes handling the mixture easier
- Brain mold: Optional tool for creating uniform brain shapes, though hands work perfectly fine
Let's Make These Together
- Melt the marshmallow mixture
- Start by melting butter in a large pot over low heat, then add your mini marshmallows and stir constantly until you achieve a smooth, glossy mixture. The key here is patience and low heat to prevent burning. This creates the foundation that will bind all your cereal together into those delightfully spooky brain shapes.
- Combine with cereal quickly
- Once your marshmallows are perfectly melted, remove from heat and immediately fold in the Rice Krispies cereal. Speed is crucial here because the mixture begins firming up quickly. Make sure every single piece of cereal gets coated with that sticky marshmallow goodness for the best texture and holding power.
- Shape into brain forms
- This is where the magic happens! Spray your hands generously with cooking spray and grab portions of the warm mixture. Press, fold, and manipulate the mixture to create those characteristic brain wrinkles and folds. Don't worry about perfection – real brains aren't symmetrical, and neither should yours be. The organic shapes actually look more realistic and give each treat its own personality.
- Add spooky vein details
- After your brain shapes have cooled just enough to hold their form, it's decoration time. Using a squeeze bottle filled with strawberry syrup, carefully drizzle the syrup into all those crevices and wrinkles you created. Watch as the syrup naturally settles into the grooves, creating those gorgeously grotesque vein patterns that make these treats truly Halloween-worthy.
- Let cool and enjoy
- Exercise patience one final time and allow your brain treats to cool completely at room temperature. This ensures they're firm enough to handle and that the syrup has properly set. Once cooled, they're ready to horrify and delight your party guests in equal measure.
 pin it
Switch Things Up
I first made these brain treats three years ago for my nephew's Halloween party, and let me tell you, I wasn't prepared for the chaos that followed. Twenty kids screaming with delight over "edible brains" was both hilarious and slightly terrifying. The funniest part was watching the adults try to act sophisticated while clearly wanting to grab one. I've tweaked the recipe over the years – initially, I used plain red food coloring, but strawberry syrup adds a subtle fruity sweetness that elevates the whole experience. One year, I experimented with adding vanilla extract to the marshmallow mixture, and it was a game-changer. Now I make double batches because my family raids the kitchen before the party even starts. The trick to getting those realistic brain wrinkles is to work quickly while the mixture is still warm and pliable. I've also learned that lightly greased hands are your best friend when shaping these. Last Halloween, I even made a "brain surgery" station where kids could add their own syrup veins, and it was the highlight of the party.
Perfect Pairings
These Halloween Brain Treats pair wonderfully with a variety of spooky beverages and snacks. Serve them alongside blood-red fruit punch or vampire-themed cranberry juice for a cohesive Halloween spread. They also complement savory party foods like mini mummy hot dogs, witch finger pretzels, or spider web dip with crackers. For a dessert table, arrange them next to chocolate "dirt" cups with gummy worms, ghost-shaped sugar cookies, or candy corn bark. The sweetness of these treats balances well with slightly salty popcorn or roasted pumpkin seeds. If you're serving adult guests, try pairing them with apple cider cocktails or pumpkin spice lattes for a festive autumnal combination.
 pin it
Frequently Asked Questions
- → Can I make these brain treats ahead of time?
Absolutely! These treats stay fresh for up to 3 days when stored in an airtight container at room temperature. However, I recommend adding the strawberry syrup veins on the day you plan to serve them for the best appearance, as the syrup can make them slightly sticky over time. You can shape the brains ahead and store them, then add the decorative veins right before your party.
- → What if I don't have a brain-shaped mold?
No problem at all! I actually prefer shaping these by hand because it gives you more control over the details. Simply spray your hands with cooking spray and shape the warm mixture into brain forms by pressing and folding to create wrinkles and crevices. Each one will be unique, which makes them even more interesting. Your hands are the best tool for this recipe.
- → Can I use regular marshmallows instead of mini marshmallows?
Yes, you can substitute regular marshmallows for mini marshmallows. You'll need about 40 regular marshmallows to equal 4 cups of mini marshmallows. Keep in mind that regular marshmallows may take slightly longer to melt completely, so stir patiently until the mixture is smooth and fully melted before adding the cereal.
- → How do I prevent the mixture from sticking to my hands?
The secret is generous application of cooking spray! Spray your hands thoroughly before handling the mixture, and reapply as needed while shaping. You can also coat your hands with a thin layer of butter if you prefer. Some people like to dampen their hands with cold water, but I find cooking spray works best for preventing sticking while still allowing you to shape the treats effectively.
- → Can I add food coloring to make the brains more colorful?
Definitely! While the natural cream color of the marshmallow mixture looks realistic, you can add a few drops of pink or light red food coloring to the melted marshmallow before mixing in the cereal to create a more pinkish "brain tissue" color. Just be careful not to add too much or it might look unappetizing. You can also experiment with different colored syrups for the veins – dark red, purple, or even black would create different spooky effects.
- → Are these treats suitable for people with dietary restrictions?
These treats can be adapted for various dietary needs. For gluten-free diets, use certified gluten-free Rice Krispies cereal. For vegan versions, substitute the butter with vegan butter and use vegan marshmallows (they work just as well). The recipe naturally doesn't contain eggs or nuts, making it suitable for those allergies. Always check your specific ingredient labels to ensure they meet your dietary requirements.
Conclusion
These Marshmallow Rice Krispies Halloween Brains are the ultimate party pleaser that combines nostalgia with spooky creativity. They're easy enough for beginners yet impressive enough to wow your guests. The combination of crispy cereal, gooey marshmallow, and that perfectly creepy strawberry syrup detail makes them unforgettable. Whether you're hosting a costume party, trick-or-treaters, or just want to celebrate the season, these brain treats deliver on both flavor and frightful fun. Make them once, and they'll become your go-to Halloween tradition.