
 pin it
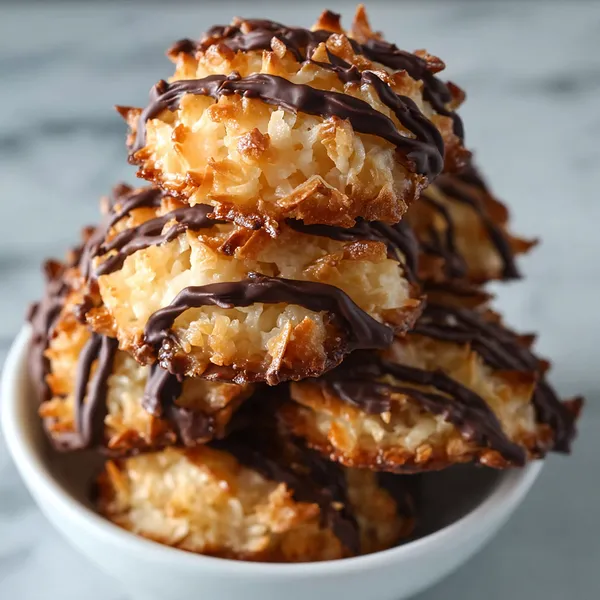
I first encountered Samoas during a Girl Scout cookie sale in my neighborhood years ago, and I was instantly hooked. That perfect combination of textures and flavors—crispy, chewy, crunchy, sweet, and chocolatey all at once—made them my absolute favorite. When I realized I could make them at home, I knew I had to try. This recipe captures everything I love about the original but gives you complete control over the quality of ingredients. The shortbread base is buttery and tender, providing the perfect foundation. The caramel and coconut topping is where the magic happens—toasting the coconut brings out incredible nutty notes, and coating it in smooth caramel creates this addictive chewiness. Finally, that dark chocolate drizzle adds richness and makes them look professionally crafted. Making these from scratch means you get to enjoy them year-round, not just during cookie season. Every time I make a batch, I'm transported back to that first bite, but somehow these homemade versions taste even better. There's something special about creating these iconic treats in your own kitchen.
Why I love this recipe
This recipe holds a special place in my heart because it transforms something I thought I could only buy into something I can create with my own hands. I love that it teaches you several baking techniques—making shortbread, working with caramel, toasting coconut, and tempering chocolate—all in one recipe. The process is therapeutic, from cutting out those cookie rings to carefully dipping them in caramel. I love how impressive these look when they're finished; people always assume they came from a fancy bakery. But mostly, I love the taste. That first bite where you get the crunch of the cookie, the chew of the coconut, and the smoothness of the chocolate all together is pure bliss. These cookies remind me that the best treats are often the ones made with patience and care. They're perfect for gifting because they show real effort and thoughtfulness. Every batch I make gets better as I refine my technique, and that continuous improvement keeps me coming back to this recipe again and again.
What You Need From Your Kitchen
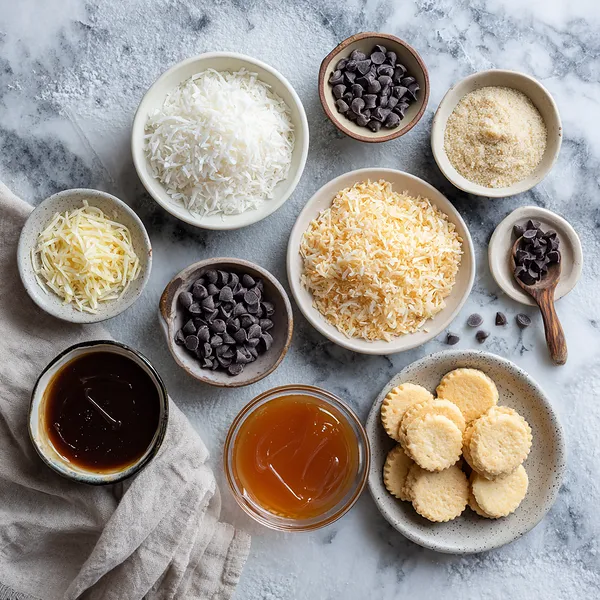
- All-purpose flour: Forms the base of the buttery shortbread cookies that provide structure
- Cold butter: Cut into cubes and worked into the dough for a tender, crispy shortbread texture
- Shredded coconut: Toasted until golden and mixed with caramel for the signature topping
- Soft caramel candies: Melted with cream and combined with toasted coconut for the chewy middle layer
- Heavy cream: Added to caramels to create a smooth, spreadable consistency
- Dark chocolate chips: Melted and drizzled over the finished cookies for rich chocolate flavor
Let's Make These Together
- Prepare the Shortbread Dough
- Start by combining your dry ingredients and working cold butter into the mixture until it forms a crumbly texture. This technique creates that signature crispy shortbread base. Once the dough comes together, roll it out evenly and cut into ring shapes. The key is keeping everything cold so the butter doesn't melt before baking, which ensures those perfectly crisp edges we're after.
- Toast the Coconut Perfectly
- Spread your coconut on a baking sheet and toast it in the oven, stirring frequently to prevent burning. This step transforms ordinary shredded coconut into something magical with deep, nutty flavors. Watch it carefully during the last few minutes because it can go from golden to burnt very quickly. That toasted coconut flavor is what sets homemade Samoas apart from store-bought versions.
- Create the Caramel Coating
- Melt your caramel candies with heavy cream until you have a smooth, glossy mixture. The cream helps thin out the caramel just enough to coat the coconut evenly without being too runny. Stir the toasted coconut into this warm caramel until every strand is coated. This mixture should be sticky and hold together when pressed, creating that iconic chewy topping.
- Assemble with Care
- Take your cooled shortbread rings and generously top each one with the caramel-coconut mixture. Press down gently to help it adhere to the cookie base. Don't be shy with the topping—you want a substantial layer that covers the entire surface. Work while the mixture is still slightly warm and pliable, but not so hot that it melts the cookie underneath.
- Finish with Chocolate
- Melt your dark chocolate until silky smooth, then drizzle it artistically over each cookie. You can create classic stripes or get creative with your pattern. The chocolate not only adds flavor but also helps seal in the caramel-coconut topping. Let everything set up properly in the refrigerator so the chocolate is firm and snappy when you bite into it.
 pin it
Switch Things Up
I first made these on a rainy Saturday afternoon when I was craving Samoas but couldn't wait until cookie season. My kitchen turned into a delicious mess of toasted coconut and melted chocolate, but it was so worth it. The hardest part? Not eating all the toasted coconut before it made it onto the cookies. I've learned that toasting the coconut is absolutely crucial—it brings out this nutty, caramelized flavor that makes all the difference. Now I make double batches because they disappear within hours. My sister calls them "dangerous" because she can't stop at just one. I've experimented with milk chocolate versus dark chocolate, and while both are delicious, the dark chocolate cuts through the sweetness perfectly. These have become my go-to treat for cookie swaps and bake sales.
Perfect Pairings
These Homemade Samoas pair beautifully with a hot cup of coffee or a cold glass of milk. The rich, sweet flavors are perfectly balanced by the slight bitterness of espresso or cold brew. For an indulgent dessert experience, serve them alongside vanilla ice cream or use them to make an over-the-top ice cream sandwich. They also complement a cheese board surprisingly well—the salty-sweet contrast with aged cheddar or gouda is unexpectedly delicious. For a cozy evening treat, enjoy them with hot chocolate topped with whipped cream, or pair them with a chai latte for a spiced twist.
 pin it
Frequently Asked Questions
- → Can I use homemade caramel instead of caramel candies?
Absolutely! Homemade caramel will give you even better flavor. Just make sure it's thick enough to coat the coconut without being too runny. You'll want it to have a similar consistency to the melted caramel candies—spreadable but not liquid.
- → How do I prevent the coconut from burning when toasting?
The key is to stir frequently—every 2-3 minutes—and keep a close eye on it, especially during the last few minutes. Coconut has natural oils that can burn quickly, so spread it in a thin, even layer and remove it from the oven as soon as it reaches a golden brown color. It will continue to darken slightly as it cools.
- → Can I make these cookies ahead of time?
Yes! These cookies actually store beautifully. You can make them up to a week in advance and store them in an airtight container at room temperature. You can also freeze the baked shortbread rings for up to three months before adding the toppings, or freeze the fully assembled cookies for up to two months.
- → What if I don't have ring-shaped cookie cutters?
No problem! You can use any round cutters you have—use a larger one for the outer circle and a smaller one for the center hole. In a pinch, you can even use drinking glasses or jar lids of different sizes. The exact size doesn't matter as much as getting that signature ring shape.
- → Can I use milk chocolate instead of dark chocolate?
Definitely! While dark chocolate provides a nice balance to the sweet caramel and coconut, milk chocolate is delicious too and creates a sweeter overall cookie. You can also try a combination of both, or even white chocolate for a different twist. Just use whatever chocolate you prefer or have on hand.
- → Why are my cookies spreading too much during baking?
This usually happens when the butter in the dough gets too warm before baking. Make sure you're using cold butter and not overworking the dough. If your kitchen is warm, you can chill the cut-out cookies on the baking sheet for 15-20 minutes before baking. This helps them hold their shape better.
Conclusion
These Homemade Samoas are a labor of love that pays off in every single bite. The combination of crispy shortbread, chewy caramel-coated coconut, and rich dark chocolate creates a flavor experience that rivals—and honestly surpasses—the store-bought version. Whether you're making these for a special occasion or just because you're craving that iconic Girl Scout cookie taste, this recipe delivers. The best part is knowing exactly what goes into each cookie, and the pride you'll feel when friends and family can't believe you made these from scratch.