
 pin it
I first tasted real teriyaki sauce when I was studying abroad in Tokyo, and it was nothing like the thick, overly sweet stuff I'd grown up with in the States. It was balanced, nuanced, with just the right amount of sweetness to complement the savory soy base. When I came home, I was determined to recreate that flavor. After a few attempts, I nailed it. This recipe is my tribute to those incredible meals I had in tiny izakayas and bustling ramen shops. The key is using good quality soy sauce—it really makes a difference. Fresh ginger and garlic add brightness and depth that dried spices just can't match. The cornstarch slurry at the end gives the sauce that signature glossy, clingy texture that coats your food perfectly. I love making a double batch because it keeps so well in the fridge, and having homemade teriyaki on hand means I'm always just minutes away from a delicious meal. It's one of those recipes that makes you feel like a kitchen wizard, even though it's almost embarrassingly simple.
Why I love this recipe
I love this teriyaki sauce recipe because it gives me complete control over the flavor and ingredients. Store-bought versions often have preservatives, artificial colors, and way too much sodium. With this homemade version, I know exactly what's going into my food, and I can adjust the sweetness or saltiness to match my preferences. It's also incredibly quick to make—no special equipment needed, just a saucepan and a whisk. The versatility is another huge plus; I use it for marinades, glazes, stir-fries, and even as a dipping sauce. The flavor is so much more vibrant and fresh than anything bottled. There's something deeply satisfying about making your own condiments, especially when they taste this good. Plus, when friends come over and ask what my secret ingredient is, I love telling them it's homemade teriyaki. It always impresses, and then I share the recipe because it's too good to keep to myself. This sauce has become a staple in my kitchen, and I genuinely can't imagine cooking without it anymore.
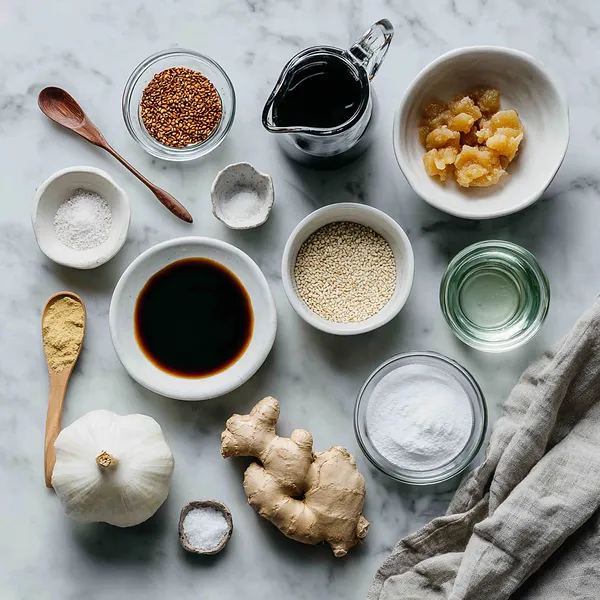
What You Need From Your Kitchen
- Soy Sauce: Forms the savory, umami-rich base of the sauce. Choose a good quality brand for best results.
- Brown Sugar: Provides sweetness and helps create that signature caramelized glaze. Can substitute with coconut sugar for a deeper flavor.
- Fresh Ginger: Adds brightness and a subtle spicy warmth. Peel and mince finely for even distribution.
- Garlic: Contributes aromatic depth and savory notes. Fresh cloves are essential here.
- Honey: Adds natural sweetness and helps the sauce cling to food. Use maple syrup for a vegan version.
- Cornstarch: Thickens the sauce to that perfect glossy, coating consistency. Mix with cold water before adding.
- Sesame Seeds: Provide nutty flavor and authentic visual appeal. Toast them first for extra depth if desired.
Let's Make These Together
- Combine and Heat
- Start by gathering your saucepan and measuring out all your ingredients—this recipe comes together quickly, so having everything ready is key. Pour the soy sauce and water into the saucepan, then add the brown sugar and honey. Give it a good stir to help the sugar start dissolving. Toss in your freshly minced ginger and garlic, letting their aromatic oils infuse into the liquid. Turn the heat to medium-high and bring the mixture to a gentle boil, stirring occasionally to ensure the sugar fully dissolves and the flavors begin to marry together.
- Simmer and Infuse
- Once you see those bubbles forming, reduce the heat to medium-low to maintain a gentle simmer. This is where the magic happens—the ginger and garlic release their flavors, the soy sauce mellows slightly, and the sweetness deepens. Let it bubble away for about 5 minutes, stirring every so often. You'll notice the sauce starting to reduce slightly and the aroma filling your kitchen. This simmering step is crucial for developing that complex, balanced flavor that makes homemade teriyaki so much better than store-bought.
- Prepare Thickening Agent
- While your sauce is simmering, grab a small bowl and whisk together the cornstarch and cold water until completely smooth. This is called a slurry, and it's what will give your teriyaki that beautiful, glossy, syrupy texture. Make sure there are absolutely no lumps—they'll create clumps in your finished sauce. The cold water is important because it prevents the cornstarch from cooking prematurely and becoming gummy.
- Thicken to Perfection
- Here comes the satisfying part. Slowly drizzle your cornstarch slurry into the simmering sauce while whisking constantly. You'll see the transformation happen almost immediately—the thin liquid will start to thicken and become glossy. Keep stirring for another 2-3 minutes to ensure the cornstarch cooks through and the sauce reaches that perfect consistency where it coats the back of a spoon. Don't rush this step; proper thickening is what separates amateur sauce from restaurant-quality glaze.
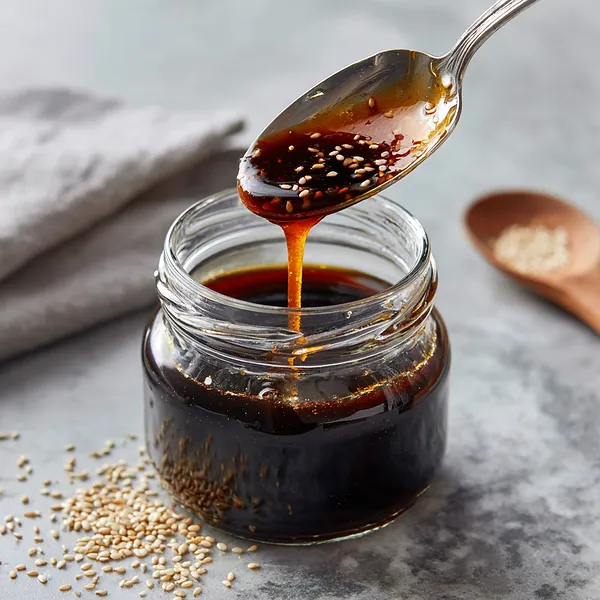
- Finish and Store
- Remove the saucepan from heat and stir in those sesame seeds for authentic flavor and texture. Let the sauce cool completely at room temperature—it will continue to thicken as it cools, so don't worry if it seems slightly thin. Once cooled, pour it into a clean glass jar or airtight container. Pop it in the fridge where it'll keep beautifully for up to three weeks. Now you have liquid gold ready to transform any meal into something extraordinary!
 pin it
Switch Things Up
I started making this teriyaki sauce on a whim one Sunday afternoon when I realized I was out of the bottled stuff and had chicken marinating in the fridge. I thought, how hard could it be? Turns out, not hard at all! I threw together soy sauce, brown sugar, fresh ginger, and garlic, and within minutes, my kitchen smelled like a Japanese steakhouse. The sauce thickened beautifully, and when I brushed it on my grilled chicken, the glaze was absolutely stunning. My family couldn't believe I made it from scratch. Now I make a big batch every couple of weeks and keep it in the fridge. I've used it on everything from salmon to tofu to roasted vegetables. It's become my secret weapon for weeknight dinners. Sometimes I add a pinch of red pepper flakes for heat, or a splash of mirin when I'm feeling fancy. The beauty of homemade is that you can tweak it to your taste.
Perfect Pairings
This teriyaki sauce pairs beautifully with so many dishes. Brush it on grilled chicken thighs, salmon fillets, or shrimp skewers during the last few minutes of cooking for a gorgeous glaze. Toss it with stir-fried vegetables and rice noodles for a quick weeknight dinner. Use it as a marinade for beef or pork before grilling or pan-searing. It also works wonderfully as a dipping sauce for spring rolls, dumplings, or tempura. For a complete meal, serve teriyaki-glazed protein over steamed rice with a side of sautéed bok choy or snap peas. Don't forget to sprinkle extra sesame seeds and sliced green onions on top for that authentic finish.
 pin it
Frequently Asked Questions
- → Can I use this sauce as a marinade?
Absolutely! This teriyaki sauce makes an excellent marinade for chicken, beef, pork, salmon, or tofu. For best results, marinate proteins for at least 2 hours or overnight in the refrigerator. Reserve some fresh sauce for basting during cooking, as you shouldn't use marinade that's been in contact with raw meat without boiling it first.
- → How can I make this teriyaki sauce gluten-free?
Simply substitute regular soy sauce with tamari or a certified gluten-free soy sauce alternative. The rest of the ingredients are naturally gluten-free, so this one swap makes the entire recipe safe for gluten-sensitive individuals without compromising flavor.
- → Why is my teriyaki sauce too thick or too thin?
If your sauce is too thick, simply whisk in water one tablespoon at a time until you reach your desired consistency. If it's too thin, make another small cornstarch slurry (1 teaspoon cornstarch mixed with 2 teaspoons cold water) and simmer it into the sauce for another minute or two. Remember, the sauce thickens significantly as it cools.
- → Can I freeze homemade teriyaki sauce?
Yes, you can freeze teriyaki sauce in airtight containers or freezer bags for up to 3 months. Leave some headspace in the container as the sauce will expand when frozen. Thaw overnight in the refrigerator before using. Give it a good stir after thawing as some separation may occur.
- → What can I substitute for honey to make it vegan?
Maple syrup, agave nectar, or brown rice syrup work perfectly as vegan substitutes for honey in this recipe. Use the same amount called for in the recipe. Each will provide sweetness while keeping the sauce plant-based, though maple syrup will add a subtle maple flavor note.
- → How do I know when the sauce is thick enough?
The sauce is ready when it coats the back of a spoon and leaves a clear trail when you run your finger through it. It should have a glossy, syrupy consistency similar to maple syrup. Remember, it will thicken more as it cools, so don't over-reduce it on the stove.
Conclusion
This homemade teriyaki sauce is a game-changer for your kitchen repertoire. It's incredibly versatile, wonderfully balanced, and so much fresher than anything you can buy. Store it in the fridge for up to three weeks, and use it whenever you need that perfect sweet-savory glaze. Whether you're grilling, stir-frying, or marinating, this sauce will elevate your cooking to restaurant quality. The best part? You made it yourself, and you know exactly what's in it.