
 pin it
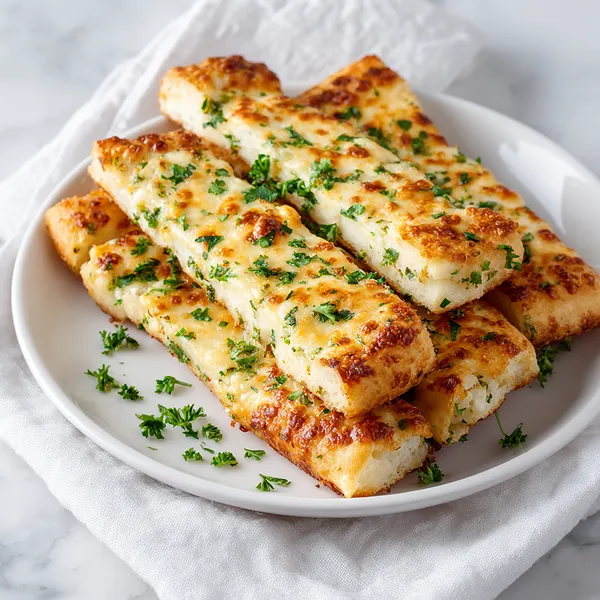
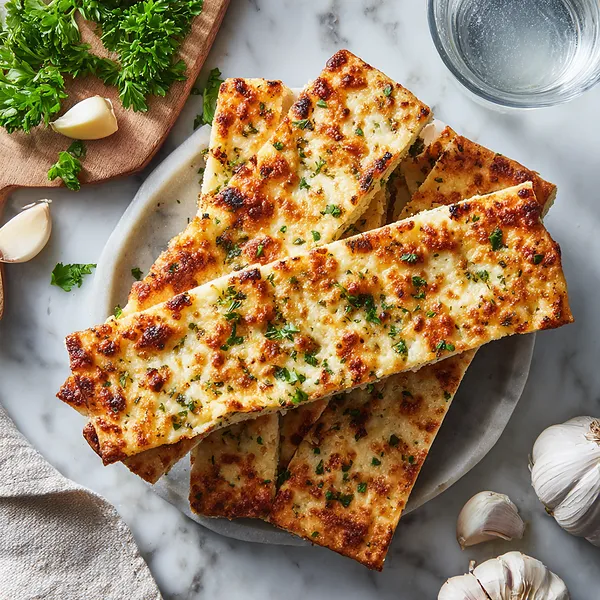
I'll never forget the first time I tried making keto breadsticks. I was skeptical that anything without traditional flour could taste like real bread, but I was so wrong. The moment I mixed that warm mozzarella with almond flour and watched it transform into actual dough, I was hooked. These breadsticks became my gateway into low-carb baking. What I love most is how the cheese creates this incredible golden crust while staying soft and stretchy inside. The garlic powder infuses every bite with flavor, and that sprinkle of fresh parsley at the end makes them feel restaurant-quality. I've made these for potlucks, family dinners, and quiet nights at home. Each time, people are shocked when I tell them they're keto. The texture is spot-on – crispy edges that give way to a tender, cheesy center. They've completely changed how I think about low-carb eating. No more feeling deprived; these breadsticks make keto feel like a celebration. Whether I'm serving them to keto veterans or carb-loving skeptics, everyone reaches for seconds.
Why I love this recipe
This recipe holds a special place in my heart because it proved that eating keto doesn't mean giving up the foods you love. I adore how simple it is – just a handful of ingredients and minimal prep time, yet the results are restaurant-worthy. The versatility is another huge win; I can customize them with different herbs, cheeses, or seasonings depending on my mood. What really gets me is the texture – that perfect balance between crispy and cheesy that makes every bite satisfying. I love that I can feel good about eating them, knowing they're low in carbs but high in flavor and protein. These breadsticks have saved me on countless busy weeknights when I needed something quick but didn't want to compromise on taste. They're also incredibly forgiving – even if you're new to keto baking, these turn out great every time. I appreciate that they appeal to everyone, not just people following a specific diet. Most importantly, they bring people together around my table, sparking conversations and creating memories over good food.
What You Need From Your Kitchen
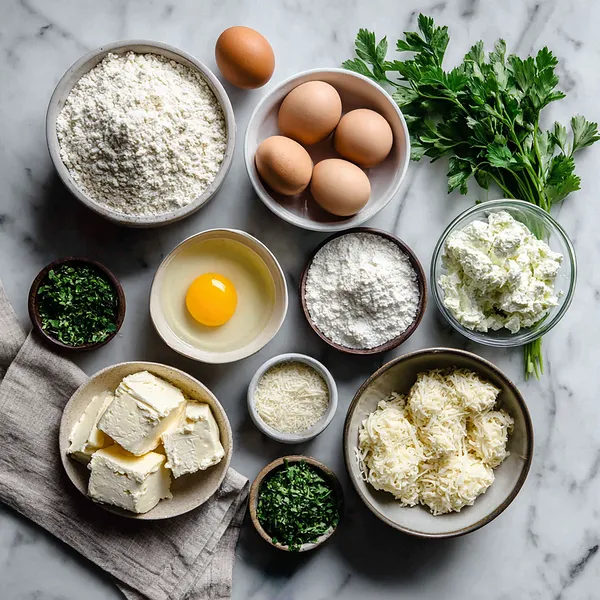
- Mozzarella cheese: Melt with cream cheese until smooth and stretchy to form the base of the dough
- Almond flour: Mix into melted cheese to create the breadstick texture and keep them low-carb
- Cream cheese: Combine with mozzarella and melt to add richness and help bind the dough
- Egg: Beat and incorporate into the dough to help bind ingredients and add structure
- Garlic powder: Mix throughout the dough for savory garlic flavor in every bite
- Fresh parsley: Chop and sprinkle on top after baking for color and fresh herb flavor
Let's Make These Together
- Melt the cheese mixture
- Start by combining your mozzarella and cream cheese in a microwave-safe bowl. Heat them together until they're completely melted and smooth – this creates the magical base that holds everything together. The melted cheese acts as both binder and main ingredient, giving these breadsticks their signature texture.
- Form the dough
- Once your cheese is melted and smooth, quickly stir in the almond flour, egg, and seasonings. Work fast here because the mixture will start to firm up as it cools. You want a cohesive dough that's pliable enough to shape but firm enough to hold its form.
- Shape your breadsticks
- Transfer the dough to your prepared baking sheet and press it into a rectangle. You can use your hands or a rolling pin – whatever feels comfortable. Then cut it into individual strips. Don't worry about making them perfect; rustic breadsticks have their own charm!
- Add the finishing touches
- Brush those beautiful breadsticks with melted butter before baking. This step is crucial for achieving that golden, crispy exterior. The butter also adds richness and helps the parsley stick after baking.
- Bake to perfection
- Pop them in a hot oven and watch them transform. They'll puff up slightly and develop those gorgeous golden edges. The smell alone will have everyone gathering in the kitchen. Let them cool just slightly before diving in – they're worth the wait!
 pin it
Switch Things Up
I first made these on a rainy Sunday afternoon when I was desperately craving pizza but didn't want to break my keto streak. I had all these ingredients sitting in my fridge and thought, why not experiment? The moment I pulled them from the oven, that garlicky aroma filled my entire kitchen. My roommate came running in asking what smelled so amazing. We both stood there, burning our mouths because we couldn't wait for them to cool down. The crispy edges with that pull-apart cheese center were exactly what I needed. Now I make these at least twice a week. Sometimes I add extra garlic, sometimes I throw in some red pepper flakes for heat. They've become my go-to for game nights, and even my non-keto friends request them. The best part? They're ready in half an hour, which means I can whip them up anytime the craving hits.
Perfect Pairings
These breadsticks are incredibly versatile when it comes to pairings. Serve them alongside a warm bowl of tomato soup or creamy broccoli cheddar for the ultimate comfort meal. They're also perfect for dipping – try them with marinara sauce, ranch dressing, or a garlic aioli. For a complete Italian-inspired dinner, pair them with zucchini noodles and meatballs or a fresh Caprese salad. They also work wonderfully as an appetizer before grilled steak or roasted chicken. Don't forget a crisp white wine or sparkling water with lemon to cut through the richness!
 pin it
Frequently Asked Questions
- → Can I make these ahead of time?
Absolutely! You can prepare the dough and cut the breadsticks, then refrigerate them covered for up to 24 hours before baking. You can also bake them completely and reheat in a 350°F oven for 5-7 minutes until crispy again. They freeze well too – just reheat from frozen at 375°F for about 10 minutes.
- → What can I substitute for almond flour?
Coconut flour can work, but you'll need much less – about 1/4 cup instead of 3/4 cup, as it's more absorbent. The texture will be slightly different. For a nut-free option, try sunflower seed flour in equal amounts, though it may turn slightly green due to a harmless chemical reaction with baking.
- → Why is my dough too sticky or too dry?
If your dough is too sticky, add a tablespoon of almond flour at a time until it's workable. If it's too dry or crumbly, microwave it for 10-15 seconds to soften the cheese again, or add a teaspoon of water. Humidity and cheese moisture content can affect the dough consistency.
- → Can I use pre-shredded cheese?
While you can, freshly shredded cheese from a block works much better. Pre-shredded cheese contains anti-caking agents that can prevent it from melting smoothly and creating that stretchy, cohesive dough you need. For best results, shred your own mozzarella.
- → How do I keep them crispy?
The key to crispy breadsticks is a hot oven and not overcrowding the baking sheet. Make sure they have space between them for air circulation. After baking, don't cover them while they're hot – let them cool on a wire rack. Store cooled breadsticks in an airtight container with a paper towel to absorb any moisture.
- → Are these suitable for meal prep?
Yes! These are excellent for meal prep. Bake a batch on Sunday and you'll have quick snacks or sides all week. They reheat beautifully in the oven, toaster oven, or even an air fryer. I don't recommend microwaving as they can become rubbery. They're perfect for lunch boxes too – kids love them!
Conclusion
These Keto Cheesy Garlic Breadsticks prove that low-carb eating doesn't mean sacrificing flavor or texture. They're incredibly versatile – serve them as an appetizer, side dish, or snack. The combination of almond flour and mozzarella creates a surprisingly bread-like texture that satisfies those carb cravings. Whether you're fully committed to keto or just looking for healthier alternatives, these breadsticks deliver on taste and nutrition. Make a double batch because they disappear fast!