
 pin it
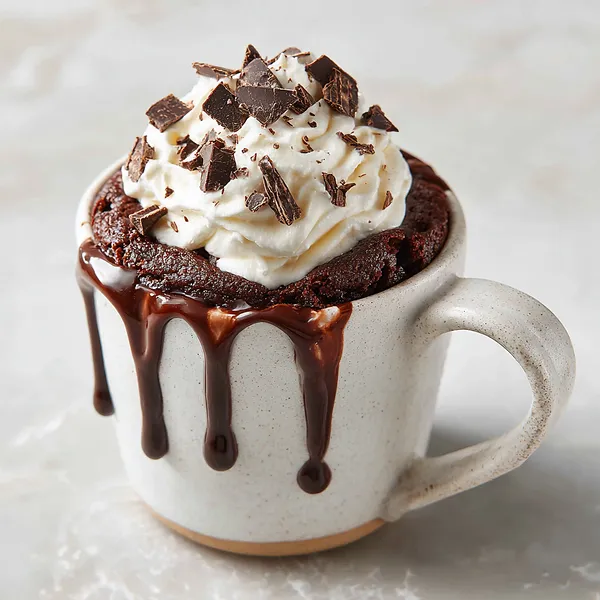
I remember the first time I made a mug brownie — I was honestly skeptical. Could something this quick actually taste like a real brownie? The answer is a resounding yes. What you get is a deeply chocolatey, slightly gooey center with a just-set outer edge that pulls away from the mug like a dream. The whipped cream melts slowly into the warm top, and the dark chocolate chunks add little pockets of intense richness. It smells incredible — like a bakery in your kitchen in under 2 minutes. Every time I make this I'm genuinely amazed that something this simple can feel this indulgent. It has become my go-to dessert for solo nights in, and I make it at least once a week without apology.
Why I love this recipe
I love this mug brownie because it respects my time and my cravings equally. There's no waiting, no dishes piled up in the sink, no portioning out a whole tray. It's just me, my mug, and pure chocolate satisfaction in minutes. I also love how forgiving it is — you can customize it endlessly. Add a spoonful of peanut butter, toss in some caramel bits, or swirl in Nutella before microwaving. The base recipe is foolproof and the results are consistently amazing. It's become my little act of self-care when I need a sweet reset, and I genuinely look forward to every single mug.
What You Need From Your Kitchen
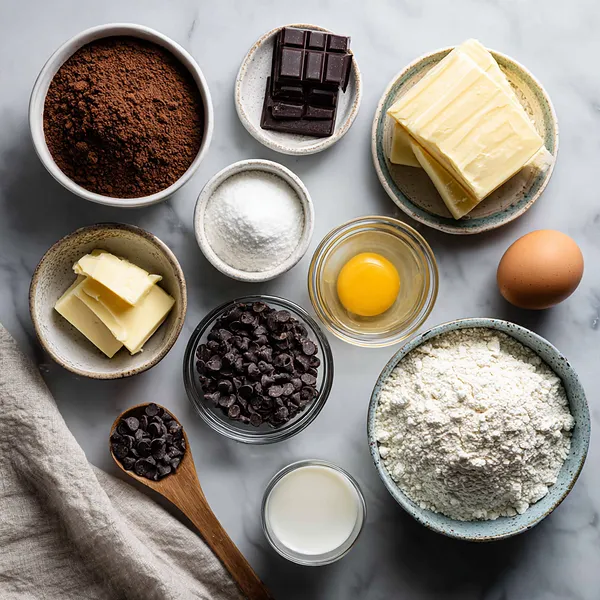
- Unsweetened Cocoa Powder: Sifted and measured into the mug to form the deep chocolate base of the brownie batter
- All-Purpose Flour: Combined with the cocoa to provide the brownie's structure and fudgy body
- Butter: Melted and stirred in to add richness, moisture, and that classic brownie texture
- Egg: Cracked directly into the mug and mixed in to bind the batter and add depth
- Dark Chocolate Chips: Folded into the batter to create molten pockets of intense chocolate throughout
- Milk: Added to loosen the batter to the perfect consistency for microwave cooking
- Whipped Cream: Dolloped generously on top right before serving for a cool, creamy contrast to the warm brownie
Let's Make These Together
- Mix Your Dry Base
- Add flour, sugar, cocoa powder, and a pinch of salt to your largest microwave-safe mug. Use a fork to stir them together until fully combined, making sure there are no pockets of dry cocoa hiding at the bottom. This dry base is what gives your brownie its structure and deep chocolate flavor.
- Pour In The Wet Ingredients
- Crack your egg directly into the mug, then pour in the melted butter, milk, and vanilla extract. Mix everything together firmly with your fork until the batter is completely smooth and there are no streaks of dry flour remaining. Scrape the sides and bottom of the mug as you go.
- Fold In The Chocolate Chips
- Drop in your dark chocolate chips and give the batter one final stir so they're evenly distributed. These little chips will melt into dreamy pockets of liquid chocolate as your brownie cooks — don't skip this step!
- Microwave To Perfection
- Place the mug in the center of your microwave and cook on high for 60 seconds. Check the brownie — the edges should look set but the center should still have a slight jiggle. If needed, cook in 10-second bursts until just set. Remember, slightly underdone gives you that perfect gooey fudgy center.
- Rest, Top And Devour
- Let the mug sit for 30 to 60 seconds out of the microwave so the brownie can finish setting. Then pile on the whipped cream, shower it with chocolate chunks, and dig in immediately while it's still warm and the chocolate is still melting.
 pin it
Switch Things Up
One night I had a serious chocolate craving but absolutely zero desire to bake an entire batch of brownies. I looked at my pantry, grabbed a mug, and started throwing in cocoa, flour, and sugar. When I pulled that mug out of the microwave 90 seconds later and saw that perfectly domed, fudgy top, I nearly screamed. A spoonful of whipped cream and some chocolate chunks later, I had the best dessert of my week — and it took me less time than scrolling for a dessert delivery app.
Perfect Pairings
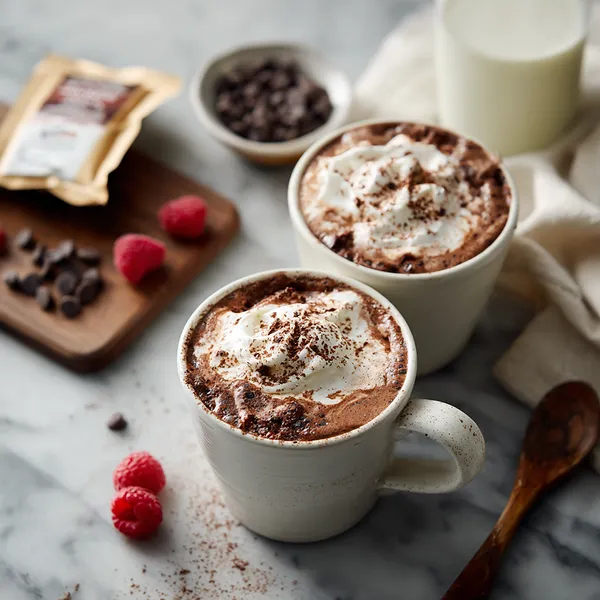
This mug brownie pairs beautifully with a tall glass of cold whole milk or a creamy oat latte. For an extra indulgent experience, serve alongside a scoop of vanilla bean ice cream that melts right into the warm brownie. Fresh raspberries on the side cut through the richness perfectly — just like the ones you see peeking into the frame of this gorgeous photo.
 pin it
Frequently Asked Questions
- → Can I make this mug brownie without an egg?
Yes! You can substitute the egg with 2 tablespoons of unsweetened applesauce or a flax egg (1 tablespoon ground flax mixed with 3 tablespoons water, rested for 5 minutes). The texture will be slightly denser but still delicious.
- → Why did my mug brownie turn out rubbery?
It was overcooked. Microwave brownie recipes are very sensitive to cook time. Always start at 60 seconds and add 10-second intervals only if needed. The center should still look slightly underdone when you take it out — it finishes cooking as it rests.
- → Can I use a different type of chocolate?
Absolutely. Milk chocolate chips will give you a sweeter, creamier result, while semi-sweet chips keep it balanced. Dark chocolate chips (as in this recipe) give the most intense, rich brownie flavor.
- → Can I add mix-ins to this mug brownie?
Yes and it's highly encouraged! Try a spoonful of peanut butter swirled into the center, a few caramel bits, a teaspoon of espresso powder to deepen the chocolate flavor, or even crushed cookies folded into the batter before cooking.
- → Is this mug brownie recipe gluten-free?
Not as written, since it uses all-purpose flour. However, you can easily substitute a 1:1 gluten-free flour blend and get very similar results. Make sure your cocoa powder and chocolate chips are also certified gluten-free.
- → Can I double the recipe and make it in a bowl?
Yes, you can double all ingredients and cook in a larger microwave-safe bowl. You will need to increase the cook time — start at 2 minutes and check every 20 seconds after that. The result will be more like a shareable brownie for two.
Conclusion
This microwave mug brownie is the ultimate one-person dessert that delivers all the gooey, chocolatey satisfaction of a full batch brownie in under 2 minutes. It's the perfect late-night treat, after-dinner indulgence, or anytime chocolate craving fix. Once you try it, you'll never reach for a boxed mix again.