
 pin it
I first discovered no-bake cookies at my grandmother's house when I was about seven years old. She had them cooling on sheets of wax paper across her entire kitchen counter, and I was mesmerized by how they could look so perfectly formed without ever going in the oven. She explained that the magic happened on the stovetop - sugar, milk, butter, and cocoa bubbling together into this glossy mixture that would harden as it cooled. When she stirred in the oats and peanut butter, I watched the mixture transform from liquid to this thick, chocolatey mass that smelled like heaven. She let me help drop spoonfuls onto the paper, and I felt so proud when they cooled into actual cookies! That memory stuck with me, and now I make these whenever I want something that feels both nostalgic and effortlessly delicious. The recipe is forgiving, the ingredients are simple, and the results are always crowd-pleasing. It's become my signature contribution to bake sales and potlucks.
Why I love this recipe
What I love most about these cookies is their perfect balance of simplicity and satisfaction. There's something almost therapeutic about standing at the stove, stirring the chocolate mixture and watching it come together. Unlike traditional cookies that require careful measuring, creaming butter, and precise baking times, these are wonderfully forgiving. If your mixture boils a minute longer, they'll be a bit fudgier; a minute less, and they'll be chewier - both versions are delicious! I also appreciate how they're ready in the time it takes most cookies just to bake. The combination of textures gets me every time - that slight crunch on the outside giving way to a soft, almost fudge-like interior with chewy oats throughout. They satisfy chocolate cravings without being overly sweet, and the peanut butter adds a savory depth that keeps you reaching for just one more. Plus, they're incredibly versatile - I've made them for kids' birthday parties, elegant dinner parties, and everything in between.
What You Need From Your Kitchen
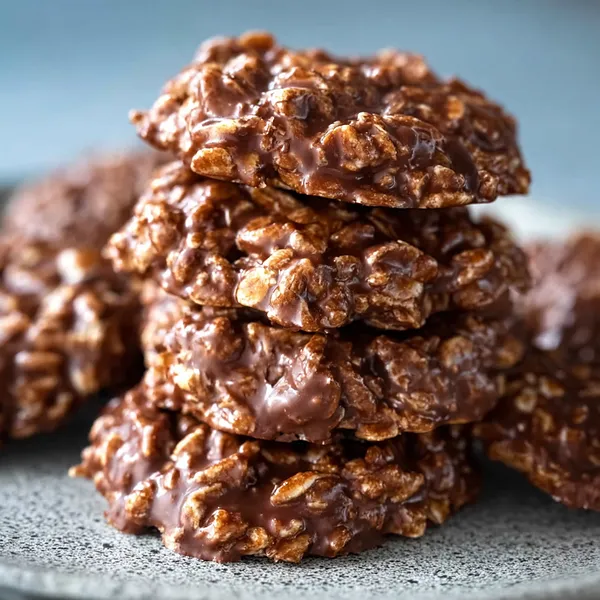
- Granulated Sugar: Provides sweetness and helps create the glossy coating when heated with milk and butter
- Whole Milk: Adds creaminess and helps the mixture reach the proper consistency for boiling
- Unsalted Butter: Creates richness and helps bind all ingredients together while adding smooth texture
- Unsweetened Cocoa Powder: Delivers deep chocolate flavor without added sugar for balanced taste
- Quick-Cooking Oats: Forms the base structure of the cookies with perfect chewy texture
- Creamy Peanut Butter: Adds nutty flavor, protein, and helps cookies set with fudgy consistency
- Vanilla Extract: Enhances all other flavors and adds aromatic depth to finished cookies
Let's Make These Together
- Prep Your Workspace
- Before you start cooking, lay out your wax paper or parchment on two baking sheets. This is essential because once your mixture is ready, you'll need to work fast! Having everything prepared means you won't be scrambling when the chocolate mixture is setting. I also like to measure out my oats, peanut butter, and vanilla in advance so they're ready to go the moment I pull the pan off the heat.
- Create the Chocolate Base
- This is where the magic begins! Combine your sugar, milk, butter, and cocoa powder in your saucepan over medium heat. Stir constantly as the butter melts and everything comes together into a smooth, chocolatey mixture. You'll see it transform from grainy to silky as the sugar dissolves. Keep stirring until it reaches a full rolling boil - you'll know it's ready when big bubbles break the surface even while you're stirring.
- The Critical Boil
- Here's the secret to perfect no-bake cookies: timing the boil. Once your mixture reaches that full rolling boil, stop stirring and let it boil for 60-90 seconds. Set a timer! This crucial step ensures your cookies will set properly. Too short and they'll be gooey forever; too long and they'll be dry and crumbly. While it boils, resist the urge to stir - just let it do its thing.
- Mix in the Good Stuff
- The moment your timer goes off, remove the pan from heat immediately. Now work quickly but calmly - add your oats, peanut butter, vanilla, and salt. Stir vigorously until everything is completely combined and you have a thick, glossy mixture. The peanut butter should melt right in, coating all those oats in chocolatey goodness. The mixture will start to thicken as you stir, which is exactly what you want.
- Shape and Set
- Using a tablespoon, scoop up portions of the warm mixture and drop them onto your prepared baking sheets. Don't worry about making them perfect - rustic and slightly irregular actually looks more appealing! Space them about an inch apart, though they won't spread. Then comes the hardest part: waiting! Let them sit undisturbed at room temperature until they're firm and no longer sticky to the touch. Pop one in your mouth once they're set and enjoy that perfect chewy-fudgy texture you worked so hard to achieve!
 pin it
Switch Things Up
I remember the first time I made these on a rainy Saturday afternoon when I was craving something sweet but didn't want to wait for the oven to preheat. My kitchen smelled absolutely amazing as the chocolate mixture bubbled away on the stove - that rich cocoa aroma mixed with the nutty scent of peanut butter was intoxicating. I got a little impatient and tried one before it fully set, and let me tell you, warm no-bake cookies are dangerous! Now I always make a double batch because they disappear so quickly. My kids love helping me drop spoonfuls onto wax paper, racing to see who can make the prettiest rounds. Sometimes we add mini chocolate chips or crushed nuts for extra texture.
Perfect Pairings
These cookies pair beautifully with a tall glass of cold milk - it's the classic combination that never fails. For an adult twist, try them with strong black coffee or a creamy latte to balance the sweetness. They also make an excellent accompaniment to vanilla ice cream for an indulgent dessert. If you're serving them at a party, place them alongside fresh strawberries or banana slices for a nice contrast. Hot cocoa topped with mini marshmallows is another winning pairing, especially during colder months.
 pin it
Frequently Asked Questions
- → Why didn't my no-bake cookies set properly?
The most common reason is not boiling the mixture long enough. The sugar mixture needs to reach the soft-ball stage (about 234-240°F) which happens after 60-90 seconds of full rolling boil. If underboiled, the cookies will remain sticky and gooey. If overboiled, they'll be dry and crumbly. Use a timer for best results!
- → Can I use old-fashioned oats instead of quick-cooking oats?
While you can substitute old-fashioned oats, the texture will be chewier and the cookies may not set as firmly. Quick-cooking oats are smaller and absorb the chocolate mixture better. If using old-fashioned oats, consider pulsing them a few times in a food processor to break them down slightly.
- → How should I store these cookies and how long do they last?
Store no-bake cookies in an airtight container at room temperature for up to one week. You can also freeze them for up to three months - just place parchment paper between layers to prevent sticking. Thaw at room temperature for about 15 minutes before serving.
- → Can I make these without peanut butter due to allergies?
Absolutely! You can substitute the peanut butter with almond butter, cashew butter, sunflower seed butter (for nut-free), or even Nutella for a different chocolate flavor. The consistency should be similar, but taste will vary. Some people also use 1/4 cup additional butter as a substitute, though the texture will be slightly different.
- → My mixture got too thick before I finished dropping all the cookies. What do I do?
If your mixture thickens too much while you're working, simply return the pan to low heat for 30 seconds to 1 minute, stirring constantly until it loosens up again. Then continue dropping the cookies. This happens sometimes, especially on humid days or if you're working slowly. Don't worry - it's an easy fix!
- → Can I add extra ingredients like nuts or coconut to these cookies?
Yes! No-bake cookies are very versatile. You can stir in 1/2 to 1 cup of add-ins like chopped walnuts, pecans, shredded coconut, mini chocolate chips, or dried fruit after adding the oats. Just make sure to work quickly as the additional ingredients can make the mixture set faster.
Conclusion
These no-bake chocolate cookies are a timeless classic that never goes out of style. They're perfect for busy weeknights, last-minute gatherings, or whenever you need a chocolate fix without turning on the oven. The combination of cocoa, peanut butter, and oats creates a texture that's both chewy and satisfying. Store them in an airtight container at room temperature for up to a week, or freeze them for longer storage. Once you master this simple recipe, you'll find yourself making batch after batch!