
 pin it
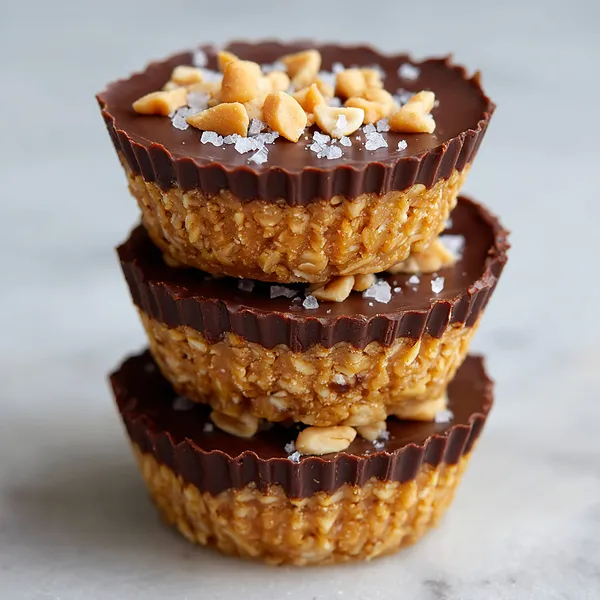
I first discovered these no-bake peanut butter oat cups at a friend's potluck, and I practically begged for the recipe on the spot. What struck me immediately was how something so simple could taste so decadent. The base is essentially just oats bound together with peanut butter and a touch of honey – nothing fancy, yet it creates this incredible chewy-crunchy texture that's completely addictive. The dark chocolate topping adds that rich, slightly bitter contrast that keeps these from being too sweet. I love that you can see the distinct layers when you bite into them: the golden oat base, the creamy peanut butter middle, and that glossy chocolate cap. They remind me of those expensive peanut butter cups you find at artisan chocolate shops, but honestly, these taste even better because you made them yourself. The recipe is so forgiving too – if your peanut butter is a bit runny, add more oats; if it's too thick, add more honey. I've experimented with different nut butters, various chocolates, and even added in mini chocolate chips to the base. Every variation has been incredible, but the classic version remains my favorite.
Why I love this recipe
What I love most about this recipe is how it proves that simple ingredients can create something truly special. There's no complicated technique, no precise temperatures to worry about, no risk of overbaking. Just mix, press, top, and freeze. It's the kind of recipe that builds your confidence in the kitchen because it's virtually foolproof yet yields impressive results. I also appreciate the flexibility – make them in a muffin tin for perfect portions, or press everything into a pan and cut into bars. The nutritional profile is surprisingly good too, with protein from the peanut butter, fiber from the oats, and antioxidants from the dark chocolate. These cups have gotten me through countless situations: last-minute dessert emergencies, healthy snack cravings, gifts for neighbors, and late-night study sessions. My favorite thing is keeping a batch in the freezer and grabbing one whenever I need a pick-me-up. They taste like an indulgent treat but fuel you like a wholesome snack. That's the magic of this recipe – it doesn't make you choose between delicious and nutritious.
What You Need From Your Kitchen
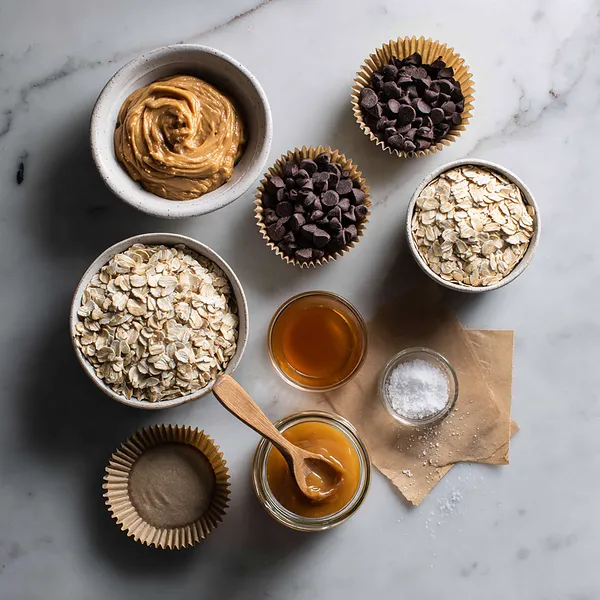
- Rolled oats: Use old-fashioned rolled oats for best texture; quick oats will make the base too soft
- Peanut butter: Creamy works best for smooth consistency; natural peanut butter can be used but may need extra honey
- Honey or maple syrup: Acts as the binder and natural sweetener; adjust amount based on peanut butter consistency
- Dark chocolate chips: Choose 60-70% cacao for balanced sweetness; milk chocolate can be substituted for sweeter cups
- Coconut oil: Helps chocolate melt smoothly and creates a glossy finish when set
- Sea salt flakes: Enhances the sweet-salty flavor profile; use sparingly for best results
- Crushed peanuts: Optional topping that adds crunch and visual appeal
Let's Make These Together
- Prepare Your Workspace
- Start by lining your muffin tin with paper liners or greasing it lightly with coconut oil. This prevents sticking and makes removal easy. Having everything ready before you start mixing ensures a smooth process. Gather all your ingredients and measuring tools so you can work efficiently without interruptions.
- Create the Oat Base
- In a medium bowl, combine the rolled oats, peanut butter, and honey. Mix everything together thoroughly – you want every oat coated in that creamy peanut butter mixture. The consistency should be sticky and hold together when pressed. If it seems too crumbly, add a bit more honey or peanut butter, one tablespoon at a time. The mixture should feel dense and moldable, similar to cookie dough.
- Form Perfect Layers
- Divide your oat mixture evenly among the 12 muffin cups, using about 1-2 tablespoons per cup. Here's the key: press down firmly with your fingers or the back of a spoon to create a compact, even layer. The firmer you press, the better the cups will hold together. Make sure the surface is relatively smooth and level – this creates a perfect foundation for the chocolate topping. Pop the tin in the freezer while you prepare the chocolate; this helps the base firm up.
- Melt the Chocolate
- Combine your chocolate chips and coconut oil in a microwave-safe bowl. Microwave in 30-second bursts, stirring well between each interval. This gradual heating prevents the chocolate from burning and ensures a silky-smooth consistency. Keep going until the mixture is completely melted and glossy. The coconut oil makes the chocolate easier to work with and gives it that beautiful shine when it sets.
- Top and Garnish
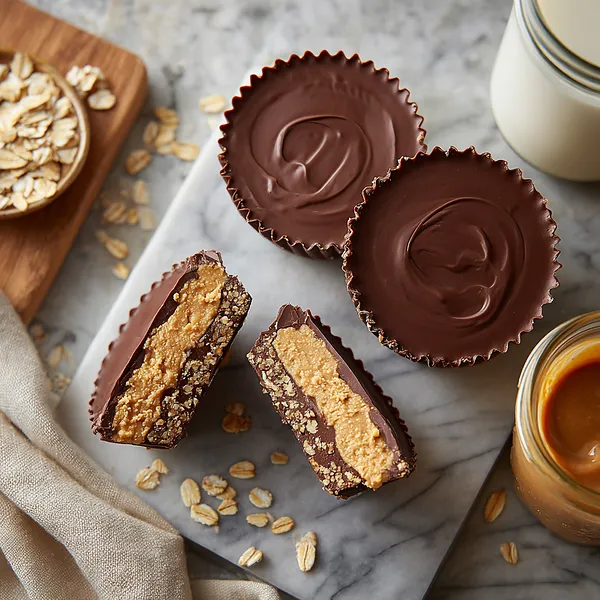
- Remove your muffin tin from the freezer. Working quickly, spoon the melted chocolate over each oat base, using about 1-2 tablespoons per cup. Gently tap the pan on your counter a few times – this smooths out the chocolate and releases any air bubbles. While the chocolate is still wet, sprinkle on your sea salt flakes and crushed peanuts. The salt enhances all the flavors beautifully, and the peanuts add a delightful crunch.
- Set and Store
- Return the muffin tin to the freezer for at least 30 minutes. You'll know they're ready when the chocolate is completely firm and solid to the touch. Once set, carefully remove the cups from their liners. Store them in an airtight container in the freezer for up to 3 months, or keep them in the refrigerator for up to 2 weeks. For the best eating experience, let them sit at room temperature for 5-10 minutes before enjoying – this softens them just enough for the perfect bite.
 pin it
Switch Things Up
I started making these cups during finals week in college when I needed brain food but had zero time to bake. My roommate walked in while I was pressing the peanut butter-oat mixture into muffin tins and asked what magic I was creating. After the chocolate set and we took our first bite, we both just stood there in silence, eyes wide. The creamy peanut butter layer against the firm chocolate was perfection. We ended up making three batches that week – one for studying, one for our study group, and one that mysteriously disappeared before we could even portion it out. Now, years later, I make these every Sunday for the week ahead. My favorite moment is when I come home exhausted and remember there's a batch waiting in the freezer. That first cold, chocolatey bite instantly makes everything better.
Perfect Pairings
These peanut butter oat cups pair beautifully with a cold glass of milk or your morning coffee. For a more sophisticated dessert experience, serve them alongside fresh berries and a dollop of Greek yogurt. They're also fantastic crumbled over vanilla ice cream for a deconstructed sundae. If you're hosting a brunch, arrange them on a platter with fresh fruit, cheese, and nuts for an impressive grazing board. For kids' lunchboxes, pack them with apple slices and carrot sticks for a balanced snack. They also complement a warm cup of chai tea or hot chocolate perfectly.
 pin it
Frequently Asked Questions
- → Can I use quick oats instead of rolled oats?
While you can use quick oats, rolled oats are recommended for the best texture. Quick oats will create a softer, less substantial base that may not hold together as well. If you only have quick oats, reduce the amount of liquid (honey/peanut butter) slightly to compensate for their finer texture.
- → How long do these cups last in the freezer?
These peanut butter oat cups will keep beautifully in the freezer for up to 3 months when stored in an airtight container. They maintain their texture and flavor perfectly, making them ideal for meal prep. In the refrigerator, they'll last about 2 weeks.
- → Can I make these without a muffin tin?
Absolutely! You can press the oat mixture into a lined 8x8 inch baking pan, pour the chocolate over the top, and cut into bars or squares once set. You can also use silicone molds in various shapes for fun presentations. The recipe is very versatile.
- → What can I substitute for peanut butter if I have allergies?
Any nut or seed butter works wonderfully in this recipe. Try almond butter, cashew butter, or sunflower seed butter for a nut-free option. Keep in mind that different butters have varying consistencies, so you may need to adjust the honey slightly to achieve the right texture.
- → Why is coconut oil needed in the chocolate?
Coconut oil serves two purposes: it makes the chocolate easier to melt and spread smoothly, and it helps create that glossy, professional-looking finish. It also makes the chocolate slightly softer when frozen, so it's easier to bite through. You can omit it if needed, but the texture will be slightly different.
- → Can I use milk chocolate instead of dark chocolate?
Yes! Milk chocolate will make these cups sweeter and more dessert-like. Dark chocolate provides a nice bitter-sweet contrast that balances the sweet peanut butter base, but use whatever chocolate you prefer. You can even mix dark and milk chocolate for a custom flavor.
- → Do these need to be kept frozen, or can I store them at room temperature?
These cups are best stored in the freezer or refrigerator because the chocolate will soften at room temperature, especially in warm weather. However, they're perfect to eat slightly softened – just remove from the freezer 5-10 minutes before serving for the ideal texture.
Conclusion
These No-Bake Peanut Butter Oat Cups are the perfect solution when you're craving something sweet but don't want to turn on the oven. They're wholesome enough for breakfast yet indulgent enough for dessert. The combination of protein-rich peanut butter, fiber-filled oats, and antioxidant-packed dark chocolate makes these treats surprisingly nutritious. Store them in the freezer for a quick grab-and-go snack that satisfies your sweet tooth while keeping you energized. They're ideal for busy weekdays, post-workout fuel, or when unexpected guests drop by!