
 pin it
I describe this No Bake Peppermint Oreo Cheesecake as pure festive magic in dessert form. My first encounter with a similar dessert was at a holiday potluck where a coworker brought a mint chocolate cheesecake that had everyone asking for seconds. I was amazed that something so elegant and delicious didn't require baking, which inspired me to create my own version. The Oreo crust provides that satisfying chocolate crunch that contrasts beautifully with the smooth, minty cream cheese filling. What makes this recipe special is the way the peppermint extract brightens everything without being overpowering—it's refreshing rather than medicinal. The crushed candy canes add both visual appeal and little bursts of minty sweetness throughout. I love how the texture plays out: crunchy crust, creamy filling with cookie chunks, and fluffy whipped cream on top. It's like eating a deconstructed peppermint patty but so much better. The no-bake aspect means you can make it year-round, though it feels especially magical during winter. Every time I serve this, people are shocked when I tell them how simple it is to make. The chilling time does most of the work, and you're left with a dessert that looks like it came from a fancy bakery.
Why I love this recipe
I love this recipe because it brings together everything I adore about holiday baking without the stress of actual baking. There's something incredibly satisfying about creating a stunning dessert without turning on your oven, especially during the busy holiday season when oven space is precious. The flavor combination is nostalgic yet sophisticated—peppermint and chocolate remind me of childhood candy canes and hot cocoa, but the creamy cheesecake filling elevates it to something adults appreciate just as much. I love that this recipe is foolproof; even if you've never made cheesecake before, you can nail this one. The Oreo crust comes together in minutes, and the filling is just a matter of whipping and folding. What really gets me is how impressive it looks—those layers, the festive colors, the garnishes—people always think I spent hours on it. I also appreciate its make-ahead nature; I can prepare it the day before a party and just add the final decorations before serving. The recipe is flexible too; I've made versions with different cookies, added chocolate chips, or even swapped peppermint for other extracts. But this classic version with Oreos and candy canes remains my favorite because it captures the essence of the holidays in every bite.
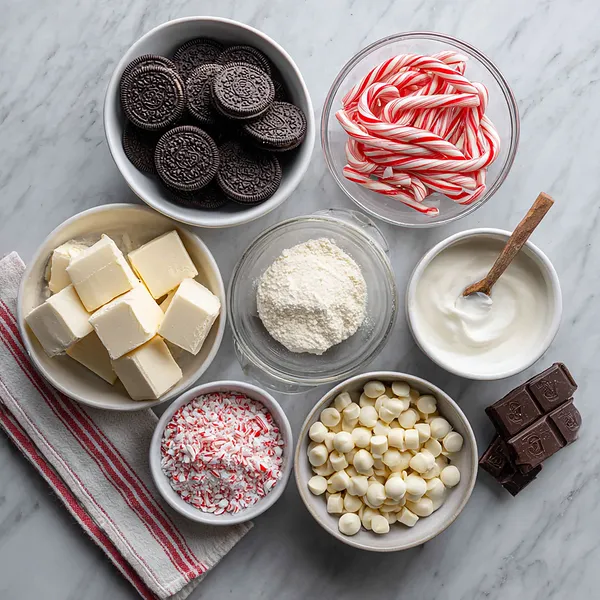
What You Need From Your Kitchen
- Oreo cookies: Crush into fine crumbs for the crust and chop some for mixing into the filling
- Cream cheese: Soften to room temperature and beat until smooth and creamy for the base of the filling
- Heavy whipping cream: Whip to stiff peaks and fold into the cream cheese mixture for a light, fluffy texture
- Candy canes: Crush into small pieces and fold into the filling, reserving some for garnish
- Peppermint extract: Add to the cream cheese mixture for that signature minty flavor
- Powdered sugar: Beat into the cream cheese to sweeten and stabilize the filling
Let's Make These Together
- Create the Oreo crust base
- Start by crushing your Oreo cookies into fine crumbs and mixing them with melted butter. Press this mixture firmly into the bottom of your springform pan to create a solid, delicious foundation. The crust should be compact and even, which will hold up beautifully when you slice the cheesecake later. Pop it in the fridge while you work on the filling.
- Prepare the cream cheese mixture
- Beat your softened cream cheese until it's completely smooth and fluffy—no lumps allowed! This is the base of your filling, so take your time here. Add the powdered sugar and peppermint extract, beating until everything is perfectly combined. The mixture should be light and creamy.
- Whip and fold the cream
- In a separate bowl, whip your heavy cream until it forms stiff peaks. This adds that incredible light, mousse-like texture to the cheesecake. Gently fold the whipped cream into your cream cheese mixture in two additions, being careful not to deflate all that air you just whipped in. The folding technique is key to keeping everything fluffy.
- Add the festive mix-ins
- Now comes the fun part! Fold in your crushed candy canes and chopped Oreos. These add amazing texture and pops of flavor throughout every bite. Be gentle with your folding to keep the mixture light and airy while still distributing the mix-ins evenly.
- Assemble and chill thoroughly
- Pour your beautiful filling over the Oreo crust and smooth the top. This needs to chill for at least 4 hours, but overnight is even better. The chilling time allows everything to set properly so you get perfect, clean slices when serving. Patience pays off here!
- Decorate and serve with style
- Once fully chilled, release your cheesecake from the pan and decorate the top with swirls of whipped cream, crushed candy canes, and extra Oreo pieces. This is where your cheesecake transforms into a showstopper. Slice with a clean knife and watch everyone's faces light up!
 pin it
Switch Things Up
I first made this cheesecake three years ago when I volunteered to bring dessert to our family's Christmas Eve dinner. I was nervous because my aunt is known for her elaborate baked goods, and here I was showing up with something that didn't even require an oven. But when I set that cheesecake on the table, decorated with swirls of whipped cream and crushed candy canes, everyone gathered around. My aunt was the first to try it, and her eyes lit up. She asked for the recipe right there! What I love most is how forgiving this recipe is—the first time I made it, I was worried about the filling being too soft, so I added extra chill time, and it turned out perfectly. Now I make it every December, and my family actually requests it specifically. Sometimes I'll crush extra Oreos on top or drizzle melted chocolate for extra flair. The best moment is always cutting that first slice and seeing the beautiful layers.
Perfect Pairings
This Peppermint Oreo Cheesecake pairs beautifully with a hot cup of peppermint mocha or rich hot chocolate topped with marshmallows. For a complete dessert spread, serve it alongside gingerbread cookies and eggnog panna cotta. If you're hosting a holiday party, complement this cheesecake with fresh berries like raspberries or strawberries to cut through the richness. A glass of cold milk is always a classic pairing, especially for the kids. For adult gatherings, try serving small slices with Irish cream liqueur or peppermint schnapps on the side. The minty freshness also pairs wonderfully with vanilla ice cream for those who want an extra indulgent experience.
 pin it
Frequently Asked Questions
- → Can I make this cheesecake ahead of time?
Absolutely! This no-bake cheesecake is perfect for making ahead. You can prepare it up to 2 days in advance and keep it covered in the refrigerator. Just wait to add the whipped cream topping and garnishes until you're ready to serve for the freshest presentation.
- → Can I use regular Oreos or do they need to be a specific type?
Regular Oreos work perfectly for this recipe! You can use standard Oreos, Double Stuf, or even mint Oreos if you want an extra minty kick. The key is crushing them well for the crust and chopping them for the filling mix-ins.
- → My filling seems too soft, what did I go wrong?
The most common reason for soft filling is not chilling long enough. Make sure to refrigerate for at least 4 hours, but overnight is best. Also, ensure your cream cheese was at room temperature when you mixed it, and that you whipped the heavy cream to stiff peaks before folding it in. If it's still soft after adequate chilling, pop it in the freezer for 30 minutes.
- → Can I freeze this cheesecake?
Yes! This cheesecake freezes beautifully for up to 2 months. Wrap it tightly in plastic wrap and then aluminum foil before freezing. Thaw it overnight in the refrigerator before serving. Add the whipped cream topping and garnishes after thawing for the best texture.
- → What can I substitute for peppermint extract?
If you're not a fan of peppermint, you can substitute with vanilla extract for a classic cheesecake flavor, almond extract for a nutty twist, or even coffee extract for a mocha version. You can also leave out the candy canes and add chocolate chips or fresh berries instead.
- → How do I get clean slices when cutting?
The secret is to use a sharp knife that you've run under hot water and then dried completely. Make one cut, wipe the knife clean with a paper towel, heat it again, and repeat for each slice. This ensures clean, professional-looking slices every time.
- → Do I need to use a springform pan?
A springform pan makes this recipe much easier because you can release the sides cleanly. However, you can use a regular 9-inch pie pan or even a square baking dish. Just know that you won't be able to remove it from the pan as easily, so you'll need to serve slices directly from the dish.
Conclusion
This No Bake Peppermint Oreo Cheesecake is the ultimate holiday showstopper that requires minimal effort but delivers maximum wow factor. The combination of rich cream cheese, refreshing peppermint, crunchy Oreos, and festive candy canes creates a dessert that's both nostalgic and exciting. Whether you're serving it at Christmas dinner, a New Year's party, or just treating yourself on a cozy winter evening, this cheesecake never fails to impress. The no-bake aspect means you can make it ahead and have more time to enjoy with loved ones. Store any leftovers covered in the refrigerator for up to five days, though I doubt it'll last that long!