
 pin it
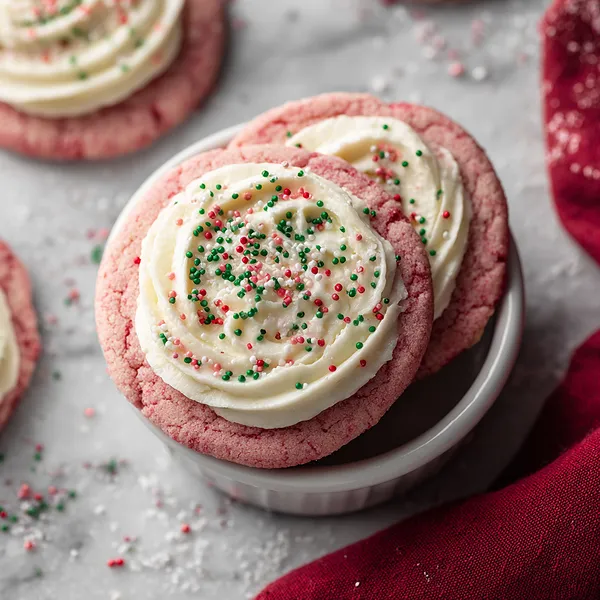
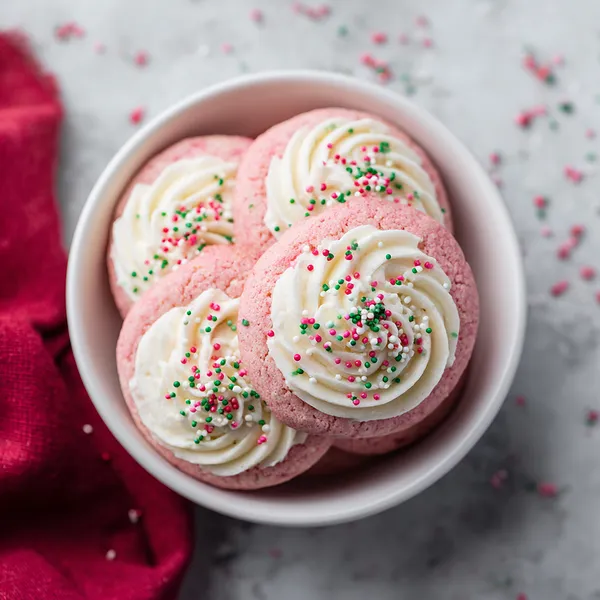
I first discovered pink velvet cookies at a holiday market about five years ago, and I was immediately captivated by their beautiful color and that intriguing hint of cocoa. Unlike traditional red velvet, the pink version feels lighter and more festive – perfect for Christmas celebrations. What makes these cookies truly special is the balance between the subtle cocoa flavor in the cookie base and the tangy sweetness of the cream cheese frosting. The texture is incredibly soft and tender, almost cake-like, which provides the perfect foundation for that rich, creamy frosting. When I started developing my own version, I experimented with different frosting techniques and finally settled on piping it in swirls – it not only looks professional but also gives you the perfect ratio of frosting to cookie in every bite. The festive sprinkles aren't just decoration; they add a delightful little crunch that contrasts beautifully with the soft cookie. I love how these cookies capture the essence of holiday baking – they're festive, delicious, and bring smiles to everyone who sees them. They've become my go-to recipe for cookie exchanges and holiday gatherings.
Why I love this recipe
There are so many reasons why I absolutely adore this recipe. First, the visual appeal is undeniable – that gorgeous pink color immediately catches everyone's eye and adds such a festive touch to any holiday spread. But beyond the looks, these cookies deliver incredible flavor. The subtle cocoa in the cookie base gives them depth without being overwhelmingly chocolatey, and it pairs perfectly with the tangy cream cheese frosting. I love that they're soft and tender rather than crispy – they practically melt in your mouth. The recipe is also wonderfully forgiving for bakers of all skill levels. Even if your piping isn't perfect, these cookies still look amazing and taste incredible. What really makes me love this recipe, though, is the joy it brings to people. Every single time I serve these cookies, I get compliments and recipe requests. There's something about the combination of nostalgia (they remind people of red velvet cake), festivity (that beautiful pink color), and pure deliciousness that just resonates with everyone. Plus, they actually taste better the next day once the flavors have melded together, which makes them perfect for holiday baking ahead. These cookies represent everything I love about holiday baking – they're beautiful, delicious, and create wonderful memories.
What You Need From Your Kitchen
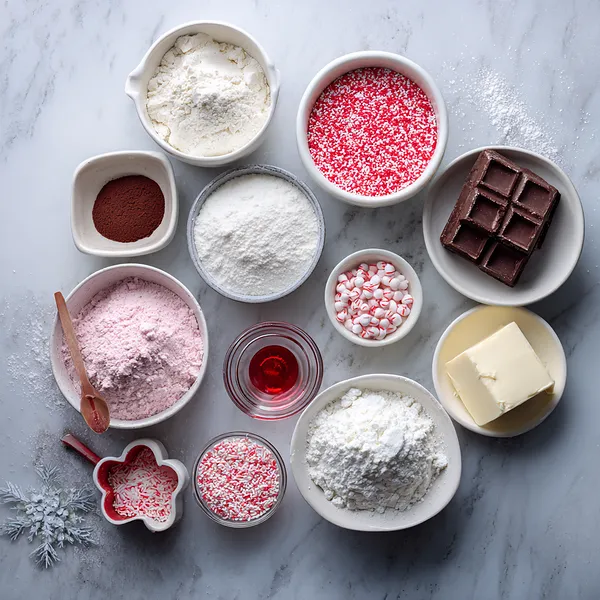
- All-purpose flour: Forms the base structure of these soft cookies, providing the perfect tender crumb
- Cocoa powder: Adds subtle chocolate flavor without overwhelming the pink velvet taste
- Unsalted butter: Creates richness and helps achieve that melt-in-your-mouth texture in both cookies and frosting
- Granulated sugar: Sweetens the cookies and helps create a tender, soft texture through proper creaming with butter
- Eggs: Bind the ingredients together and add moisture for soft, cake-like cookies
- Red food coloring: Creates the signature beautiful pink color that makes these cookies so festive and eye-catching
- Cream cheese: The star of the frosting, providing tangy richness that perfectly balances the sweet cookie
- Powdered sugar: Sweetens and stabilizes the frosting while creating that smooth, pipeable consistency
Let's Make These Together
- Mix Your Cookie Dough
- Start by whisking together your dry ingredients in one bowl – the flour, cocoa powder, baking powder, and salt create the foundation for these tender cookies. In another bowl, cream your softened butter and sugar until it's light and fluffy, which takes about 3-4 minutes. This step is crucial for creating that perfect soft texture. Add your eggs one at a time, then mix in the vanilla and food coloring until you achieve a beautiful, even pink color. Gradually fold in your dry ingredients until just combined – overmixing will make tough cookies, and we want these to be pillowy soft.
- Bake to Perfection
- Scoop your cookie dough onto parchment-lined baking sheets, giving them plenty of space to spread. The key to perfect pink velvet cookies is not overbaking them – they should look slightly underdone in the center when you pull them out. They'll continue cooking on the hot baking sheet and will firm up as they cool. Let them rest on the baking sheet for 5 minutes before moving them to a cooling rack. This resting time helps them set without breaking apart.
- Create Luxurious Frosting
- While your cookies cool completely, whip up that incredible cream cheese frosting. Beat your cream cheese and butter until smooth and creamy, then gradually add powdered sugar, beating well after each addition. The frosting should be smooth, fluffy, and hold its shape when piped. If it's too thick, add a splash of milk; too thin, add more powdered sugar. The tangy cream cheese perfectly balances the sweet cookie, creating that signature flavor everyone loves.
- Pipe and Decorate
- Once your cookies are completely cool, transfer your frosting to a piping bag fitted with a star tip. Pipe generous swirls onto each cookie, starting from the outside edge and working your way to the center. Don't be shy with the frosting – these cookies can handle it! Immediately add your festive sprinkles while the frosting is still soft so they stick properly. Let the frosting set for about 30 minutes before serving, though I know it's hard to wait when they look so beautiful and smell so amazing.
 pin it
Switch Things Up
I'll never forget the first time I made these pink velvet cookies for our family's Christmas party. I was nervous about the food coloring – would it be too much? But when I pulled them from the oven, that soft pink hue was absolutely perfect. The real magic happened when I piped on the cream cheese frosting. My niece walked into the kitchen, saw them cooling on the counter, and her eyes lit up like it was Christmas morning. She declared them "princess cookies" and insisted we save some for Santa. Now, three years later, these cookies have become our family's holiday tradition. My sister-in-law requests them specifically, and I've shared the recipe with at least a dozen friends. There's something about that combination of soft cookie and tangy frosting that just captures the spirit of the season. Every time I make them, I remember that first batch and my niece's delighted face.
Perfect Pairings
These Pink Velvet Cookies pair beautifully with a variety of holiday beverages. Serve them alongside hot chocolate topped with marshmallows for the ultimate cozy Christmas treat. They're also wonderful with a cup of peppermint tea or a glass of cold milk – classic for a reason! For adult gatherings, try pairing them with vanilla-flavored coffee or even a sweet dessert wine. If you're creating a holiday dessert spread, these cookies complement other traditional treats like gingerbread, sugar cookies, and brownies. The cream cheese frosting also makes them substantial enough to serve as a light dessert after a holiday dinner.
 pin it
Frequently Asked Questions
- → Can I make these cookies ahead of time?
Absolutely! You can bake the cookies up to 2 days in advance and store them unfrosted in an airtight container. Frost them the day you plan to serve for the best presentation. You can also freeze unfrosted cookies for up to 3 months and frost them after thawing.
- → Why are my cookies spreading too much?
If your cookies are spreading excessively, your butter might be too soft or melted. Make sure you're using softened butter (should leave a slight indent when pressed, but not be greasy). Also, ensure you're not overmixing the dough, and try chilling the dough for 30 minutes before baking if the problem persists.
- → Can I use gel food coloring instead of liquid?
Yes! Gel food coloring actually works better because it's more concentrated and won't thin out your dough. Start with a small amount and add more until you achieve your desired pink shade. Gel colors also tend to hold their vibrancy better during baking.
- → How do I get my frosting the right consistency for piping?
The key is having your cream cheese and butter at proper room temperature – not too cold or too warm. If your frosting is too soft, refrigerate it for 15-20 minutes and it will firm up. If it's too stiff, add a tablespoon of milk at a time until it reaches the perfect pipeable consistency. It should hold its shape but not be so stiff that it's hard to pipe.
- → Can I make these without the cocoa powder?
While the cocoa powder adds depth of flavor, you can omit it if you prefer. If you do, replace those 2 tablespoons of cocoa with 2 additional tablespoons of flour to maintain the proper dry ingredient ratio. The cookies will taste more like sugar cookies with cream cheese frosting, which is still delicious but won't have that signature velvet flavor.
- → How should I store frosted cookies?
Store frosted cookies in an airtight container in the refrigerator for up to 5 days. The cream cheese frosting needs to be kept cool. Bring them to room temperature about 30 minutes before serving for the best flavor and texture. You can layer them between sheets of parchment paper to prevent the frosting from getting smashed.
Conclusion
These Christmas Pink Velvet Cookies are the perfect addition to your holiday baking lineup. The soft, tender cookies paired with the tangy cream cheese frosting create a flavor combination that's simply irresistible. Whether you're hosting a cookie exchange, preparing treats for Santa, or just want to spread some holiday cheer, these cookies deliver both in taste and presentation. The beautiful pink color makes them stand out on any dessert table, and that swirled frosting topped with festive sprinkles adds the perfect finishing touch. Make a double batch – trust me, they disappear fast!