
 pin it
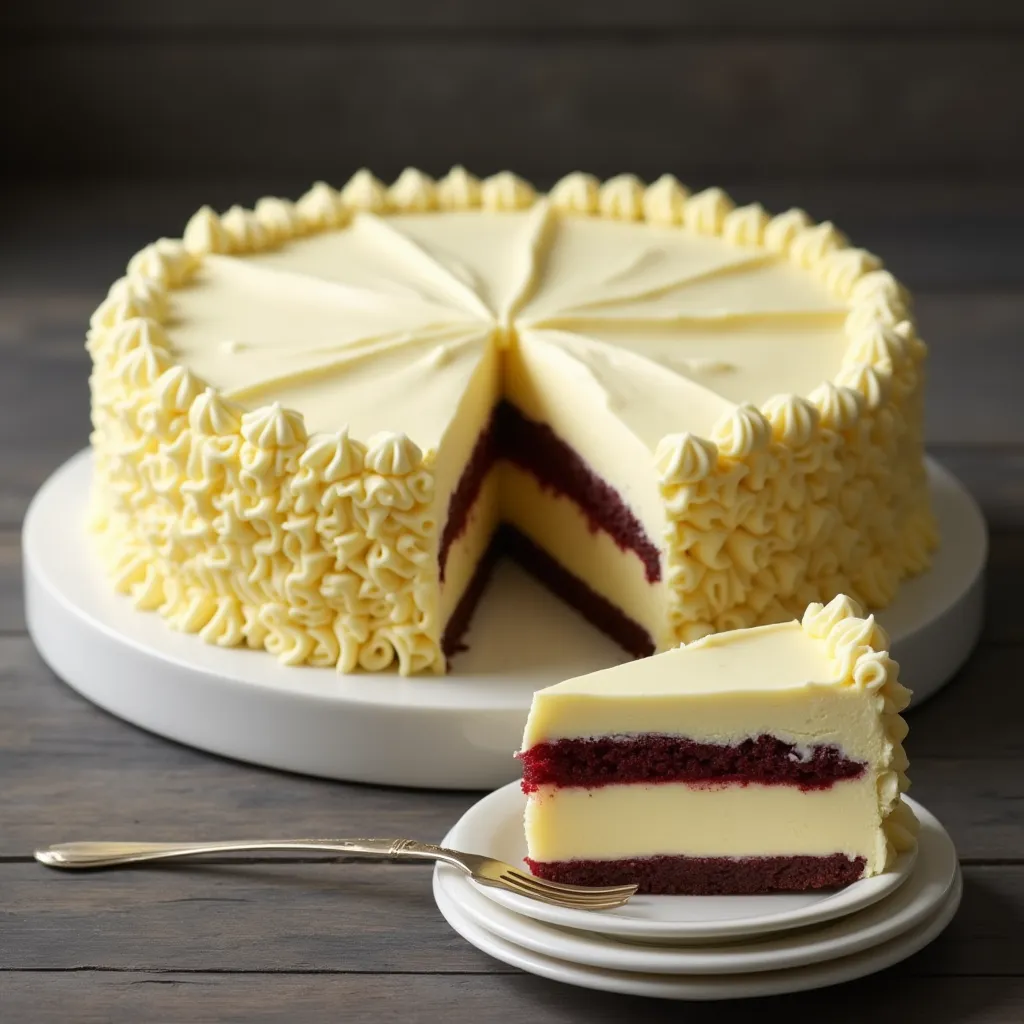
I first encountered this magnificent red velvet cheesecake at a friend's holiday party, and I was immediately captivated by its dramatic appearance and intriguing flavor combination. The contrast between the deep ruby-red cake layers and the pristine white cheesecake was visually stunning, while the flavor profile offered a perfect harmony of tangy cream cheese, subtle cocoa notes, and sweet vanilla. After begging for the recipe, I spent a weekend perfecting my own version, experimenting with the right balance of cocoa powder in the red velvet layers and determining the ideal baking temperature to achieve that perfect cheesecake texture. What makes this recipe special is how it transforms two classic desserts into something even greater than the sum of its parts. The red velvet cake stays moist and tender, while the cheesecake layer adds a luxurious creaminess that elevates the entire dessert.
Why I love this recipe
I absolutely adore this red velvet cheesecake recipe because it perfectly bridges the gap between homey comfort food and sophisticated dessert. There's something magical about cutting into those striking layers, revealing the beautiful contrast between the vibrant red cake and the creamy white cheesecake. I love how versatile it is for different occasions - it's elegant enough for holiday gatherings and special celebrations, yet approachable enough to make for a family Sunday dinner when you want something special. The flavor combination is truly remarkable, with the subtle cocoa notes of the red velvet complementing rather than competing with the tangy sweetness of the cheesecake. I particularly appreciate how the white chocolate in both the cheesecake layer and the frosting adds a luxurious depth without overwhelming the other flavors. Most of all, I love the reaction this cake gets when I bring it to the table - there's always a moment of hushed appreciation before everyone starts asking for the recipe!
What You Need From Your Kitchen
- Red Velvet Cake: Creates the vibrant red layers with a hint of cocoa flavor
- Cream Cheese: Forms the base of the cheesecake layers for a tangy, creamy texture
- White Chocolate: Adds richness to the cheesecake and creates the smooth frosting
- Buttermilk: Gives the red velvet cake its characteristic tender crumb
- Red Food Coloring: Creates the distinctive vibrant color of the red velvet layers
- Unsalted Butter: Forms the base of the white chocolate frosting
Let's Make These Together
- Prepare the pans
- Start by preheating your oven and preparing your pans. For the red velvet layers, grease and line two 9-inch round cake pans with parchment paper. For the cheesecake, line a 9-inch springform pan with parchment. Having everything ready before you begin mixing makes the process much smoother.
- Mix the batters
- For the red velvet cake, combine your dry ingredients first, then mix your wet ingredients separately before combining them. The batter should be smooth but not overmixed. For the cheesecake layer, ensure your cream cheese is properly softened to avoid lumps, and beat thoroughly with the sugar before adding eggs one at a time.
- Bake in stages
- Bake your red velvet layers first, then reduce the oven temperature for the more delicate cheesecake. The cheesecake is done when the edges are set but the center still has a slight jiggle - it will continue to set as it cools.
- Cool properly
- Allow the red velvet layers to cool in their pans for 10 minutes before transferring to wire racks. For the cheesecake, the gradual cooling process is crucial - leave it in the turned-off oven with the door cracked for an hour, then refrigerate for at least 4 hours or overnight.
- Layer strategically
- When assembling, start with a red velvet layer on the bottom for stability. Spread a thin layer of frosting between each layer to help them stick together, and take care when handling the delicate cheesecake layers.
 pin it
Switch Things Up
The first time I made this red velvet cheesecake, I was honestly intimidated by the multiple components. But I broke it down into steps, making the cheesecake layer one day and the red velvet layers the next. I've experimented with different decorations too - sometimes I'll add fresh berries around the edge for a pop of color, or dust the top with cocoa powder for a more dramatic look. Once I even added a thin layer of raspberry jam between the cake and cheesecake for a fruity twist. The beauty of this recipe is how versatile it is while still maintaining that wow-factor every single time.
Perfect Pairings
This luxurious Red Velvet Cheesecake pairs beautifully with a variety of accompaniments. Serve with a dollop of lightly sweetened whipped cream or a scoop of vanilla bean ice cream for added indulgence. For beverages, try an aromatic coffee like a smooth latte or cappuccino to balance the richness. A dessert wine such as a late harvest Riesling or a ruby port complements the cake's sweetness perfectly. For a non-alcoholic option, a cup of Earl Grey tea or hot chocolate makes a cozy companion. Fresh berries on the side add a bright, tart contrast that cuts through the cake's richness.
 pin it
Frequently Asked Questions
- → Can I make this cake in advance?
Yes, this cake is actually perfect for making ahead! The cheesecake layers benefit from overnight refrigeration to fully set. You can make the entire cake 1-2 days in advance and keep it refrigerated. Just bring it to room temperature for about 30 minutes before serving for the best flavor and texture.
- → Can I use a different food coloring for the red velvet layers?
Absolutely! While traditional red velvet cake uses red food coloring, you can use natural alternatives like beet powder or gel food coloring which often provides vibrant color with less product. If you prefer to avoid food coloring altogether, you can omit it - the cake will be a light brown color but will still have the classic red velvet flavor.
- → Why did my cheesecake crack?
Cheesecakes typically crack when they're overbaked, cooled too quickly, or exposed to drafts. To prevent cracks, ensure you don't overmix after adding the eggs, bake at the correct temperature, and follow the gradual cooling process. The good news is that even if your cheesecake cracks, it will be hidden between the cake layers and frosting!
- → Can I freeze leftover cake?
Yes, this cake freezes well! Cut leftover cake into individual slices, wrap each slice tightly in plastic wrap, then in aluminum foil, and freeze for up to 3 months. Thaw overnight in the refrigerator before serving.
- → Can I substitute the white chocolate in the recipe?
While white chocolate adds a specific flavor and texture to both the cheesecake and frosting, you could substitute it with regular cream cheese frosting if needed. For the cheesecake layer, you can omit the white chocolate, but you might want to increase the sugar slightly to maintain sweetness.
- → Is it necessary to slice the cakes horizontally?
Slicing the cakes creates the beautiful alternating layers seen in the photo. If you're not comfortable with horizontal slicing, you could alternatively make four thinner red velvet layers (dividing the batter between four pans instead of two) and a single cheesecake layer. The cake won't have as many distinct layers but will still be delicious.
Conclusion
This Red Velvet Cheesecake masterfully combines two beloved classics into one spectacular dessert. The vibrant red cake layers provide a beautiful contrast to the creamy cheesecake, while the white chocolate frosting adds a sweet, velvety finish. Perfect for special occasions, holidays, or anytime you want to impress your guests with a show-stopping finale to your meal. Each bite delivers the perfect balance of tangy, sweet, and rich flavors that will have everyone asking for your secret recipe.