
 pin it
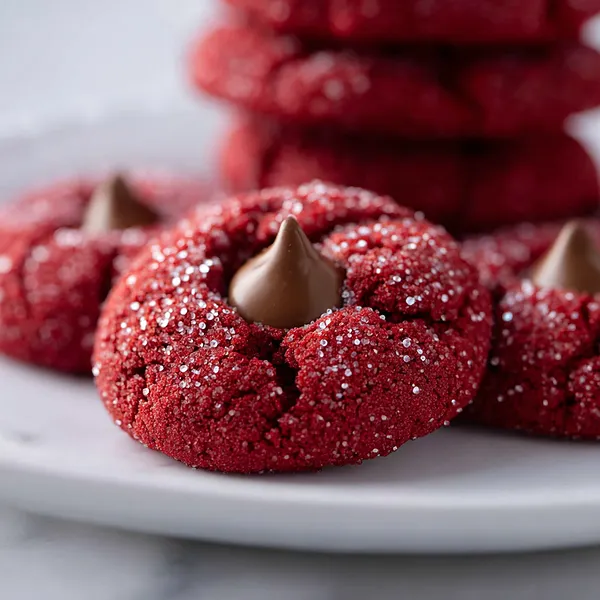
I discovered this recipe during my college years when I was desperately trying to impress my boyfriend's family during Christmas dinner. I wanted something that looked professional but wasn't too complicated for my novice baking skills. The moment I pulled these gorgeous red beauties from the oven, with their perfect crackled tops and that stunning contrast of red and white, I knew I had found something special. The texture is what really sets them apart - they're not your typical crunchy cookie, but rather soft and almost cake-like, with just the right amount of cocoa flavor enhanced by that classic red velvet tang from the buttermilk. The chocolate kiss on top isn't just decoration; it melts slightly while baking, creating this perfect little pocket of chocolate in each bite. Over the years, this recipe has become my signature cookie, the one everyone expects me to bring to every gathering.
Why I love this recipe
What I absolutely adore about this recipe is how it manages to be both elegant and comforting at the same time. There's something magical about the way the red velvet flavor - that perfect balance of chocolate and vanilla with a subtle tang - pairs with the simple sweetness of the chocolate kiss. The visual appeal is undeniable; these cookies look like they came from a fancy bakery, but they're surprisingly forgiving to make. I love how the powdered sugar coating creates those beautiful cracks as they bake, revealing the gorgeous red interior. But beyond the aesthetics, it's the memories these cookies create that make them so special to me. Every time I make them, I think about all the smiles they've brought to faces, the compliments they've earned, and the way they make any ordinary day feel a little more festive and special.
What You Need From Your Kitchen
- All-purpose flour: Provides structure and texture to the cookies
- Cocoa powder: Gives the cookies their chocolate flavor and red velvet taste
- Buttermilk: Adds tang and creates the classic red velvet flavor profile
- Red food coloring: Creates the signature vibrant red color
- Chocolate kiss candies: The perfect sweet topping that melts slightly during baking
- Powdered sugar: For rolling and creating the beautiful crackled effect
Let's Make These Together
- Prepare your workspace
- Start by preheating your oven and gathering all ingredients. Having everything measured and ready makes the process smooth and enjoyable.
- Create the base
- Cream the butter and sugar until it's light and fluffy - this is crucial for achieving that perfect soft texture we're after.
- Add the magic
- Mix in the eggs, vanilla, and that gorgeous red food coloring. Watch as your dough transforms into that beautiful red velvet color.
- Bring it together
- Gently fold in the dry ingredients alternating with buttermilk. The key here is not to overmix - we want tender cookies, not tough ones.
- Shape and coat
- Roll the dough into balls and coat them generously in powdered sugar. This creates those stunning cracks as they bake.
 pin it
Switch Things Up
I first made these cookies for a Christmas cookie exchange, and let me tell you, they were the first to disappear from the table! My neighbor Sarah actually knocked on my door the next day asking for the recipe because her kids wouldn't stop talking about them. Now I make a double batch every holiday season - one for giving away and one for hiding in my freezer for those moments when I need something sweet and comforting. The best part is watching people's faces light up when they bite into that perfect combination of red velvet and chocolate. I've even started making them for summer barbecues because the red color is so striking, and they're always a conversation starter.
Perfect Pairings
These red velvet crinkle cookies pair beautifully with a tall glass of cold milk or a steaming cup of coffee. For a more indulgent treat, serve them alongside vanilla ice cream or a rich hot chocolate topped with whipped cream. They also complement fresh berries wonderfully - the tartness of raspberries or strawberries provides a lovely contrast to the sweet, rich cookies. During the holidays, they're perfect with eggnog or a warm cup of spiced cider.
 pin it
Frequently Asked Questions
- → Can I make these cookies ahead of time?
Yes! You can prepare the dough up to 2 days ahead and refrigerate it. You can also freeze the shaped, uncoated dough balls for up to 3 months.
- → Why are my cookies not cracking properly?
Make sure you're rolling the dough balls in enough powdered sugar and that your oven temperature is accurate. The contrast in temperature helps create those beautiful cracks.
- → Can I use gel food coloring instead of liquid?
Absolutely! Gel food coloring actually works better as it won't thin out your dough. Start with a small amount as gel coloring is more concentrated.
- → What if I don't have buttermilk?
You can make a substitute by adding 1 tablespoon of lemon juice or white vinegar to 1 cup of regular milk. Let it sit for 5 minutes before using.
- → How do I store these cookies?
Store in an airtight container at room temperature for up to one week. Layer them between parchment paper to prevent the chocolate kisses from sticking together.
Conclusion
These red velvet crinkle cookies are the perfect combination of visual appeal and incredible taste. The soft, cake-like texture paired with the rich chocolate kiss makes every bite a delightful experience. They're ideal for holiday gatherings, special occasions, or whenever you want to treat yourself to something truly special. The beautiful crackled appearance dusted with powdered sugar makes them as gorgeous as they are delicious. Store them in an airtight container for up to a week, though they rarely last that long in my house!