
 pin it
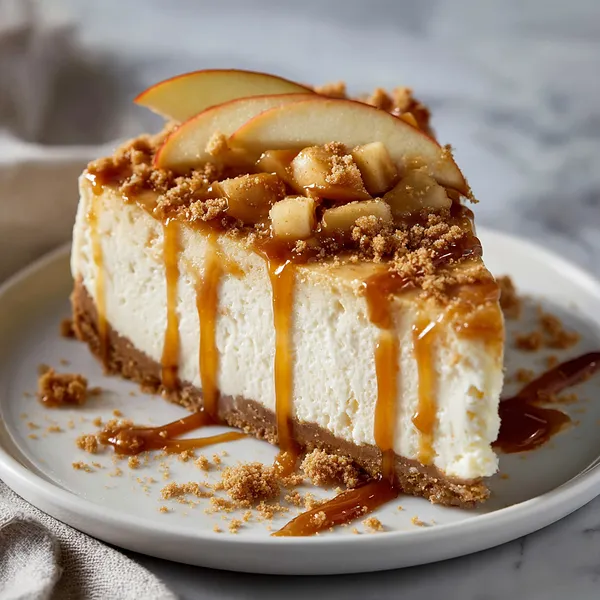
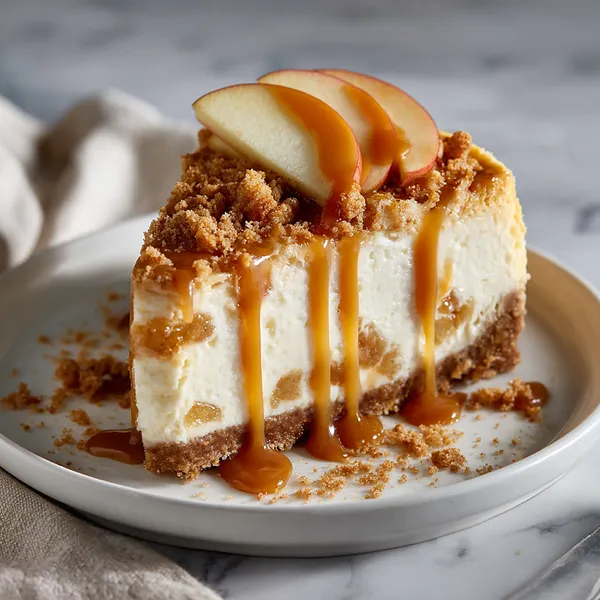
I first discovered the magic of combining apple pie and cheesecake at a small bakery in Vermont during a fall road trip. The baker there had created this hybrid dessert that completely changed my perspective on what cheesecake could be. When I returned home, I became obsessed with recreating that experience, experimenting with different ratios and techniques until I landed on this version. What makes this recipe special is the no-bake method – it keeps the cheesecake incredibly creamy and eliminates the risk of cracks. The graham cracker crust provides a buttery foundation that complements both the apple pie and cheesecake elements perfectly. I cook the apples separately with cinnamon and brown sugar, which concentrates their flavor and prevents them from releasing too much moisture into the filling. The salted caramel is the crown jewel here – I make mine from scratch because the depth of flavor is incomparable, though quality store-bought works in a pinch. When you fold those caramelized apple chunks into the whipped cream cheese mixture, you get pockets of spiced fruit throughout every slice. The final drizzle of caramel and sprinkle of flaky sea salt isn't just for looks – it creates this incredible sweet-salty contrast that keeps your taste buds engaged. After letting it set in the refrigerator for at least four hours (though overnight is better), you're rewarded with a dessert that slices cleanly and tastes like autumn itself.
Why I love this recipe
There's something almost magical about a dessert that requires no oven yet looks like it took hours of complex baking. This cheesecake has saved me countless times when I needed an impressive dessert but was short on time or oven space during the holidays. I love that it combines two classic desserts – apple pie and cheesecake – in a way that honors both while creating something entirely new. The texture is what really gets me: that smooth, mousse-like cream cheese layer studded with tender apple pieces, all sitting on a crunchy graham cracker base. It's a textural symphony. The salted caramel element elevates everything, adding sophistication and that addictive sweet-salty dynamic that keeps people reaching for just one more bite. I also appreciate how forgiving this recipe is – if your caramel isn't quite perfect or your apples are slightly overcooked, it still turns out delicious. It's taught me that some of the most impressive-looking desserts don't have to be complicated. Every time I serve this, I get requests for the recipe, and I love watching people's faces when they take that first bite and realize it's even better than it looks. It's become my signature autumn dessert, and honestly, I can't imagine my fall baking without it.
What You Need From Your Kitchen
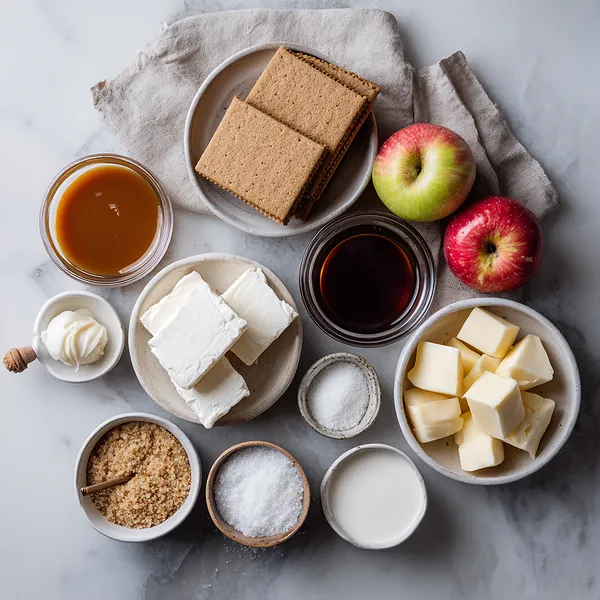
- Graham Cracker Crumbs: Process whole graham crackers in a food processor until finely ground, or purchase pre-made crumbs for convenience.
- Cream Cheese: Use full-fat brick-style cream cheese, not whipped or spreadable versions, for the best texture and stability.
- Heavy Whipping Cream: Whip until stiff peaks form to create a light, airy filling that sets perfectly without baking.
- Granny Smith Apples: Peel, core, and dice into small, uniform pieces so they cook evenly and distribute well throughout the filling.
- Salted Caramel Sauce: Use homemade or high-quality store-bought sauce, warming it slightly before drizzling for easier application.
- Brown Sugar: Adds moisture and deep caramel notes to the cooked apples, enhancing their natural sweetness.
Let's Make These Together
- Create the Buttery Base
- Start by combining your graham cracker crumbs with melted butter, mixing until every crumb is coated and the mixture holds together when pressed. This buttery foundation needs to be packed firmly into your springform pan to prevent crumbling when you slice the finished cheesecake. Use the bottom of a glass or measuring cup to really compress it into an even layer, then pop it in the fridge to firm up while you prepare the other components.
- Caramelize the Apples
- Heat your skillet and add the diced Granny Smith apples along with brown sugar and cinnamon. The tartness of Granny Smith apples is essential here – they won't turn mushy and their flavor won't get lost in the creamy filling. Stir occasionally as they cook, watching as the sugar melts and coats each piece of apple in a glossy, cinnamon-spiced glaze. Cook them until they're tender with just a slight bite, then remove from heat and let them cool completely. This cooling step is crucial because warm apples will deflate your whipped cream.
- Whip the Creamy Filling
- Beat your room-temperature cream cheese with sugar until it's completely smooth and fluffy – no lumps allowed! This might take a few minutes, but it's worth it. Add your vanilla, then in a separate bowl, whip the heavy cream until stiff peaks form. Here's the key: fold that whipped cream into the cream cheese mixture gently but thoroughly. This folding technique keeps all those air bubbles intact, giving you a light, mousse-like filling instead of a dense one. The filling should be billowy and cloud-like.
- Assemble with Care
- Now comes the fun part – gently fold your cooled, caramelized apples into that fluffy cream cheese mixture. You want them evenly distributed so every bite has apples. Pour this gorgeous filling over your chilled crust, smoothing the top with a spatula. If you're feeling fancy, drizzle some of your caramel sauce on top and swirl it with a knife for a marbled effect. Cover it carefully and let it chill for at least four hours, though overnight is even better for the perfect texture.
- Garnish Like a Pro
- Once your cheesecake is fully set, run a knife around the edge before releasing the springform. This is your moment to make it truly stunning – sprinkle that graham cracker crumble on top for texture, drizzle with more caramel (warm it slightly so it flows beautifully), and finish with those flakes of sea salt. That salt is not optional; it transforms this from sweet to sophisticated, cutting through the richness and making every flavor pop.
 pin it
Switch Things Up
I remember the first time I made this cheesecake for a family gathering – I was honestly nervous about the no-bake method holding up. But when I unmolded it and saw that perfect, smooth surface ready for the caramel drizzle, I knew I had something special. My aunt, who's notoriously picky about desserts, went back for thirds and demanded the recipe. Now I make this every autumn, and I've learned a few tricks along the way. Sometimes I add a handful of chopped pecans to the crust for extra crunch, or I'll caramelize the apples a bit longer for deeper flavor. Once, I was short on time and used store-bought caramel sauce instead of making my own, and honestly? Still absolutely delicious. The beauty of this recipe is its flexibility – you can make it as simple or as fancy as you want. I've even prepared the components a day ahead and assembled it the morning of an event, which saved my sanity during the holiday rush.
Perfect Pairings
This cheesecake pairs beautifully with a cup of strong coffee or espresso, which cuts through the richness perfectly. For an adult twist, serve it alongside a glass of dessert wine like Moscato d'Asti or a caramel-forward bourbon. If you're serving this as part of a larger dessert spread, consider lighter accompaniments like fresh berries or a citrus sorbet to cleanse the palate between bites. It also makes an incredible companion to vanilla bean ice cream – the temperature contrast between cold ice cream and room-temperature cheesecake is absolutely divine. For a cozy autumn evening, pair it with hot apple cider or a cinnamon-spiced latte.
 pin it
Frequently Asked Questions
- → Can I use a different type of apple?
While you can use other apples, Granny Smith are recommended because their tartness and firm texture hold up well during cooking. Honeycrisp or Pink Lady apples would be good alternatives, but avoid softer varieties like Red Delicious or Gala as they can become mushy.
- → Do I need to use a springform pan?
A springform pan is highly recommended for this no-bake cheesecake because it allows you to easily remove the sides without disturbing the delicate filling. If you don't have one, you could use a regular pie dish, but you won't be able to remove the cheesecake from the pan for serving.
- → Can I make this cheesecake ahead of time?
Absolutely! This cheesecake actually benefits from being made ahead. You can prepare it up to 2 days in advance and keep it covered in the refrigerator. Just wait to add the final caramel drizzle and toppings until right before serving to maintain the best appearance and texture.
- → How do I know when the cheesecake is fully set?
The cheesecake is ready when the filling is firm to the touch and doesn't jiggle when you gently shake the pan. It should hold its shape when you run a knife around the edge. If it still seems soft or jiggly in the center, give it a few more hours in the refrigerator.
- → Can I freeze this cheesecake?
Yes, you can freeze this cheesecake for up to 2 months. Wrap it tightly in plastic wrap and then aluminum foil before freezing. Thaw it overnight in the refrigerator before serving. However, the texture may be slightly different after freezing, and it's best to add fresh caramel and toppings after thawing.
- → What if I don't have salted caramel sauce?
You can make your own by heating sugar until it melts and caramelizes, then carefully adding butter and cream, finishing with a pinch of sea salt. Alternatively, you can use regular caramel sauce and just add more flaky sea salt on top. The salt is important for balancing the sweetness, so don't skip it entirely.
- → Why is my cheesecake filling runny?
This usually happens if the cream cheese wasn't at room temperature, if the whipped cream wasn't whipped to stiff peaks, or if warm apples were folded in. Make sure to follow the temperatures and consistency guidelines carefully. If your filling seems too soft, try adding a small amount of dissolved gelatin (1 teaspoon gelatin in 2 tablespoons warm water) to help it set.
Conclusion
This Salted Caramel Apple Pie Cheesecake is the ultimate celebration of fall flavors in one stunning dessert. The no-bake preparation makes it accessible for bakers of all levels, while the presentation rivals anything you'd find in a high-end bakery. The combination of creamy cheesecake, tender cinnamon apples, and rich salted caramel creates layers of flavor that keep people coming back for seconds. Whether you're preparing it for Thanksgiving, a dinner party, or simply treating yourself on a cozy weekend, this recipe delivers restaurant-quality results every single time. Store any leftovers covered in the refrigerator for up to five days, though I doubt it will last that long!