
 pin it
I remember the first time I tasted a salted caramel chocolate bar at a fancy chocolate shop in the city. It cost way too much for a small square, but that combination of flavors haunted me for weeks. I knew I had to recreate it at home, but I wanted something that didn't require tempering chocolate or using a candy thermometer. After several attempts, I created this recipe that captures all that luxury without the complexity. The base is a simple graham cracker crust that stays crispy even under all those gooey layers. Then comes the magic – a thick layer of caramel that I make rich and buttery by mixing in sweetened condensed milk. The chocolate topping is smooth and glossy, and that final sprinkle of flaky sea salt is what makes these bars truly special. Each bite gives you that satisfying crunch from the crust, the smooth sweetness of caramel, the rich chocolate, and then that little burst of salt that makes your taste buds sing. It's the kind of dessert that feels fancy but comes together with ingredients you probably already have in your pantry.
Why I love this recipe
What I love most about this recipe is how it transforms simple ingredients into something that tastes like it came from an expensive bakery. There's something deeply satisfying about slicing into these bars and seeing those distinct layers – it feels like you've accomplished something special. I also appreciate that this recipe is incredibly reliable. Unlike temperamental desserts that need perfect conditions, these bars come together every single time. The no-bake aspect means I can make them even in summer when I don't want to turn on the oven. I love that they're make-ahead friendly, actually improving after a night in the fridge as the flavors meld together. They're equally at home at an elegant dinner party or a casual family gathering. Most importantly, I love how these bars make people happy. There's something about that first bite – the way the salt enhances the chocolate and caramel – that brings genuine joy to people's faces. It's my go-to recipe when I want to impress someone or cheer them up, and it never fails to deliver.
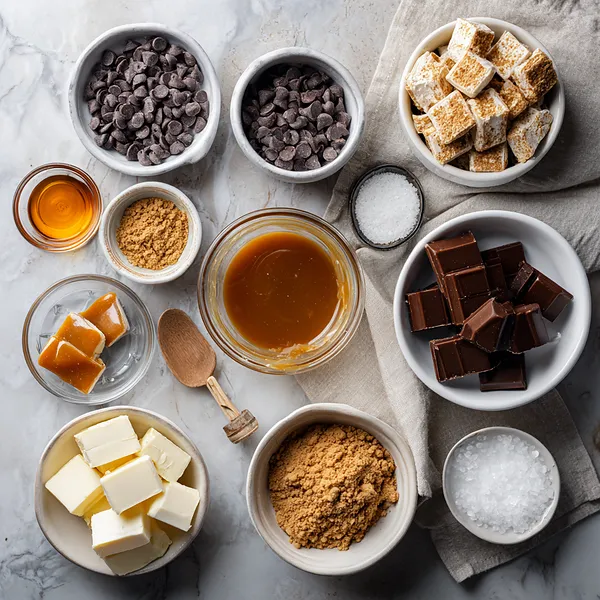
What You Need From Your Kitchen
- Graham cracker crumbs: Pulse whole graham crackers in a food processor until fine, or buy pre-made crumbs
- Dark chocolate chips: Choose quality chocolate chips with at least 60% cocoa for rich flavor
- Sweetened condensed milk: This thickens the caramel and adds richness to bind the layers
- Caramel sauce: Use store-bought or homemade caramel sauce for the gooey middle layer
- Flaky sea salt: Maldon or similar flaky salt works best for texture and presentation
- Butter: Use unsalted butter so you can control the salt level in the recipe
Let's Make These Together
- Create the Perfect Crust
- Start by preparing your pan with parchment paper for easy removal later. Mix your graham cracker crumbs thoroughly with melted butter until every crumb is coated and the mixture holds together when pressed. This buttery base provides the perfect crunchy foundation for your bars. Press it down firmly and evenly – use the bottom of a glass or measuring cup to really compact it. Pop it in the fridge while you prepare the next layer so it sets up nice and firm.
- Build the Caramel Layer
- The caramel layer is where the magic happens. Gently heat your caramel sauce with sweetened condensed milk, stirring constantly to prevent scorching. This combination creates an ultra-creamy, thick caramel that won't run when you cut the bars. Take your time with this step – rushing can lead to grainy caramel. Once it's smooth and glossy, let it cool slightly before pouring to prevent it from being too thin. Spread it evenly over your chilled crust, making sure to reach every corner.
- Top with Chocolate
- Melting chocolate properly is key to that beautiful glossy finish. Whether using a double boiler or microwave, take your time and stir frequently. The chocolate should be smooth and pourable but not too hot, or it might melt your caramel layer. Pour it over the center of your caramel and gently spread outward with an offset spatula. Work quickly but carefully to ensure an even layer across the entire surface.
- Finish and Set
- While your chocolate is still wet, sprinkle the flaky sea salt across the top. Don't be shy with it – that salt is what makes these bars extraordinary. The contrast between sweet and salty is what people will rave about. Now comes the hardest part: patience. Let these bars chill in the refrigerator for at least two hours. This allows all the layers to set properly so you get clean, beautiful cuts. When ready to serve, use a sharp knife and clean it between cuts for the most professional-looking bars.
 pin it
Switch Things Up
I first made these bars for a holiday cookie exchange, and they completely stole the show. Everyone kept asking for the recipe, and I loved watching people take that first bite – you could see the exact moment the sweet chocolate hit the salty caramel and their eyes went wide. Now I make them for every potluck, birthday party, and random Tuesday when I need a chocolate fix. My nephew calls them "the fancy candy bars" and asks for them instead of birthday cake. I've experimented with different chocolates – milk chocolate makes them sweeter, while extra dark gives them a sophisticated edge. Sometimes I add a layer of crushed pretzels to the crust for extra crunch. The recipe is incredibly forgiving, so don't stress about making it perfect. My first batch had uneven caramel, but they still disappeared in minutes. These bars have become my signature dessert, and honestly, they're the reason I get invited to so many gatherings now!
Perfect Pairings
These Salted Caramel Chocolate Bars pair beautifully with a strong cup of coffee or espresso – the bitterness cuts through the sweetness perfectly. For an extra indulgent dessert experience, serve them alongside vanilla bean ice cream, letting it melt slightly over the chocolate. They're also incredible with a glass of cold milk, which is classic for a reason. If you're feeling fancy, pair them with a dessert wine like tawny port or a sweet Riesling. For a fun party idea, create a dessert board with these bars, fresh berries, whipped cream, and toasted nuts. The salty-sweet flavor profile also works surprisingly well with aged cheddar cheese if you're into that sweet and savory combination.
 pin it
Frequently Asked Questions
- → Can I use milk chocolate instead of dark chocolate?
Absolutely! Milk chocolate will make these bars sweeter and less intense. You could also try a combination of half dark and half milk chocolate for a balanced flavor. Just keep in mind that milk chocolate has a lower melting point, so be extra careful not to overheat it.
- → How do I store these bars and how long do they last?
Store these bars in an airtight container in the refrigerator for up to one week. Layer them with parchment paper if stacking to prevent sticking. You can also freeze them for up to 3 months – just wrap individual bars in plastic wrap and place in a freezer bag. Thaw in the refrigerator before serving.
- → Can I make my own caramel sauce from scratch?
Yes! You can make homemade caramel by melting sugar until golden, then carefully adding cream and butter. However, using store-bought caramel sauce simplifies this recipe significantly and produces consistent results. If you do make your own, make sure it's completely cooled before adding the sweetened condensed milk.
- → Why is my chocolate layer cracking when I cut the bars?
Chocolate naturally hardens in the fridge and can crack when cold. To prevent this, let your bars sit at room temperature for 5-10 minutes before cutting. Also, use a sharp knife warmed under hot water (then dried) and clean it between each cut. The warmth helps the knife glide through the chocolate smoothly.
- → Can I add other toppings or mix-ins to this recipe?
Definitely! Try sprinkling crushed pretzels, chopped nuts, or toffee bits on top of the chocolate layer along with the salt. You could also add a layer of peanut butter between the caramel and chocolate, or swirl some raspberry jam into the caramel for a fruity twist. Get creative and make this recipe your own!
Conclusion
These Salted Caramel Chocolate Bars are the perfect make-ahead dessert for any occasion. They're decadent enough for special celebrations but simple enough to whip up on a weeknight when you're craving something sweet. The combination of buttery crust, gooey caramel, rich chocolate, and that finishing touch of sea salt creates a flavor experience that's truly unforgettable. Store them in the fridge for up to a week, though I doubt they'll last that long! They also make wonderful gifts – just pack them in a pretty box and watch your friends' faces light up.