
 pin it
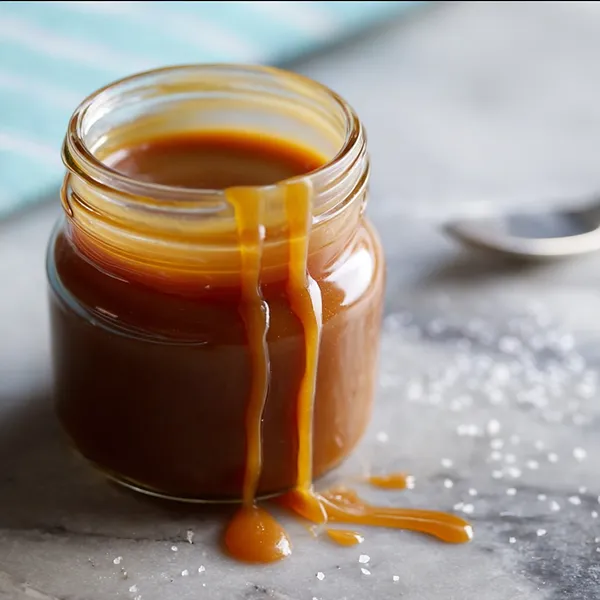
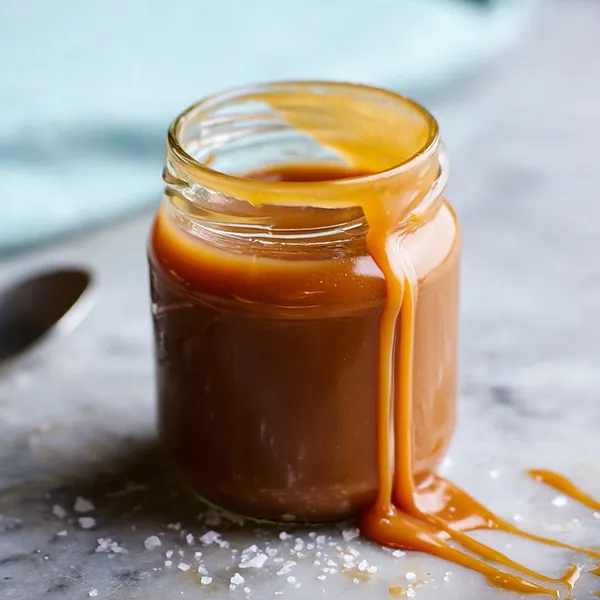
I discovered the beauty of homemade salted caramel quite by accident during a desperate moment when I needed a dessert sauce and had nothing in the pantry. With just sugar, butter, cream, and salt – ingredients I always have on hand – I decided to give it a shot. That first batch was a revelation. The process itself is almost meditative: watching the sugar slowly melt and transform, the way it bubbles and turns that perfect amber color, and then the dramatic moment when you add the cream and it hisses and bubbles up furiously before settling into the most gorgeous, glossy sauce. What amazed me most was how something so simple could taste so complex and luxurious. The flaky sea salt on top isn't just for show – it creates these little bursts of flavor that make each taste interesting and dynamic. This isn't just any caramel; it's the kind that makes people stop mid-bite and ask, "What IS this?" The texture is perfectly smooth and pourable when warm, yet it thickens beautifully when chilled. I love how it clings to whatever you drizzle it over without being too heavy or cloying. It has become my signature touch for everything from weekend pancakes to fancy dinner party desserts.
Why I love this recipe
This salted caramel sauce holds a special place in my kitchen repertoire because it never fails to impress, yet it's surprisingly simple to make once you understand the technique. I love that it uses basic pantry staples but creates something that tastes like it came from a fancy confectionery. There's something deeply satisfying about the transformation process – watching plain white sugar turn into liquid gold feels almost magical every single time. The balance of flavors is what really makes me keep coming back to this recipe. It's sweet but not cloying, rich but not heavy, and that salt brings everything into perfect harmony. I appreciate that it's versatile enough to use in countless ways, from drizzling over ice cream to incorporating into other recipes. It also makes fantastic gifts – pour it into cute jars with a ribbon, and suddenly you have a gourmet present that people actually get excited about. Most importantly, making this sauce taught me not to fear caramel making. Once you nail it, you realize it's all about patience and timing, not complicated techniques. Every time I make it, I feel like a real pastry chef, even though it takes less than 20 minutes from start to finish.
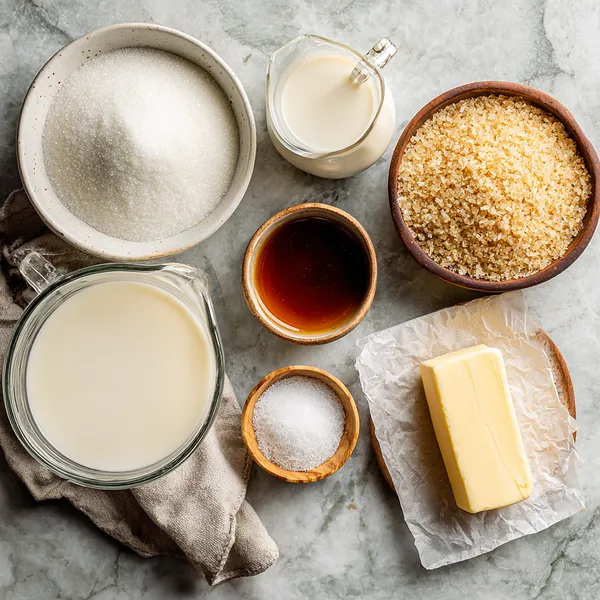
What You Need From Your Kitchen
- Granulated Sugar: Forms the base of the caramel; must be heated until it melts and caramelizes to achieve that signature deep amber color and complex flavor
- Unsalted Butter: Adds richness and creates a smooth, velvety texture; cut into pieces for even melting and easier incorporation into the hot caramel
- Heavy Cream: Brings everything together into a pourable sauce; must be at room temperature to prevent the caramel from seizing when added
- Flaky Sea Salt: The essential finishing touch that balances the sweetness and adds sophisticated depth; provides delightful bursts of flavor throughout
- Vanilla Extract: Enhances the overall flavor profile and adds warmth; use pure vanilla extract for the best results
Let's Make These Together
- Caramelize the Sugar
- Begin by placing your granulated sugar in a heavy-bottomed saucepan over medium heat. Don't add any water – we're doing a dry caramel method here. As the sugar starts to melt around the edges, gently push it toward the center with your spatula. Be patient and resist the urge to stir constantly. Let the sugar melt gradually, and watch as it transforms from white crystals to clear liquid to that gorgeous amber color. This process takes about 8-10 minutes, and the key is constant vigilance without constant stirring. You want a deep amber shade – think the color of an old penny – but not so dark that it approaches brown, which would taste bitter.
- Incorporate the Butter
- The moment your sugar reaches that perfect amber hue, act quickly and add all the butter pieces at once. Step back slightly because the mixture will bubble up dramatically and hiss. Don't panic – this is completely normal! Whisk vigorously but carefully to incorporate the butter into the caramelized sugar. The butter will melt quickly, and you'll see the mixture transform into a deeper, richer color. Keep whisking until everything is smooth and combined, which should take about 1-2 minutes. The butter not only adds incredible flavor but also helps stabilize the caramel.
- Add Cream Carefully
- Here comes the most dramatic part! Remove your pan from the heat – this is important for safety. Now, very slowly and carefully, drizzle in your room temperature heavy cream while whisking constantly. The mixture will bubble up violently and may even spit a bit, so pour in a thin, steady stream from a slight distance. Once all the cream is incorporated, the bubbling will calm down. Return the pan to medium heat and continue whisking for another minute. You'll see the sauce come together into a beautiful, glossy, unified mixture. If there are any stubborn bits of hardened caramel, keep whisking over the heat and they'll dissolve.
- Season and Finish
- Remove your gorgeous caramel from the heat one final time. Stir in the flaky sea salt and vanilla extract, whisking until the salt dissolves completely. This is your chance to taste and adjust – if you want more saltiness, add a pinch more. The salt should enhance the caramel's sweetness without overwhelming it. You're looking for that perfect sweet-salty balance that makes salted caramel so addictive. Pour your finished sauce into a heat-safe jar or container and let it cool. As it cools, it will thicken to that perfect drizzling consistency.
- Cool and Store Properly
- Let your caramel sauce cool to room temperature before covering and refrigerating. As it sits in the fridge, it will continue to thicken into a spoonable consistency. When you're ready to use it, simply warm it gently – either in the microwave in 15-second bursts, stirring between each one, or in a small saucepan over low heat. Don't overheat it; you just want it warm enough to drizzle easily. Before serving, consider sprinkling a few extra flakes of sea salt on top for that professional touch and extra flavor pop.
 pin it
Switch Things Up
I'll never forget the first time I attempted homemade caramel – I was terrified of burning it and hovered over the pot like a nervous hawk. The sugar started melting around the edges, and I panicked, stirring frantically. Big mistake! The sugar seized up into a crystallized mess. Round two, I learned patience. I let the sugar do its thing without interference, swirling the pan gently only when needed. When that amber color finally appeared and the kitchen filled with that incredible toasty-sweet aroma, I knew I had it. The moment I whisked in the cream and watched it bubble up dramatically, then settle into silky perfection – that's when I fell in love with caramel making. Now, I make this sauce at least twice a month. I've learned that room temperature cream is non-negotiable (cold cream can cause the caramel to seize), and cutting the butter into pieces helps it melt evenly. The flaky sea salt isn't just a trendy addition; it genuinely transforms the flavor, cutting through the sweetness and adding incredible depth. Sometimes I'll make a double batch because it disappears so quickly in our house.
Perfect Pairings
This salted caramel sauce is incredibly versatile and pairs beautifully with so many desserts. Drizzle it warm over vanilla ice cream or gelato for an instant sundae upgrade. It's phenomenal over apple pie, brownies, or chocolate lava cake. Try it with fresh fruit like sliced pears or bananas, or use it as a dip for pretzels for that perfect sweet-salty combination. It's also amazing in coffee drinks – stir a spoonful into your latte or cappuccino for a homemade caramel macchiato. For an elegant presentation, layer it with whipped cream and crushed cookies in parfait glasses, or use it as a filling for macarons and layer cakes.
 pin it
Frequently Asked Questions
- → Why did my caramel seize and become grainy?
This usually happens when cold cream is added to hot caramel, causing a temperature shock. Always use room temperature cream. It can also occur from stirring the sugar too much while it's melting. If your caramel does seize, try whisking it vigorously over low heat to smooth it out, or add a tablespoon of warm cream and whisk until it comes back together.
- → How can I tell when the sugar has caramelized enough?
The sugar should be a deep amber color, similar to an old copper penny. It will have a rich, nutty aroma that's distinctly different from plain melted sugar. If you're nervous about color, use a candy thermometer – aim for 350°F (175°C). Going too dark will result in bitter caramel, while too light won't have that complex caramel flavor you're looking for.
- → Can I make this recipe dairy-free?
Yes! You can substitute the butter with vegan butter or coconut oil, and use full-fat coconut cream instead of heavy cream. Make sure the coconut cream is well-stirred and at room temperature. The flavor will be slightly different – you'll taste hints of coconut – but it will still be delicious. The texture might be slightly thinner than traditional caramel.
- → How long does homemade salted caramel sauce last?
When stored properly in an airtight container in the refrigerator, this sauce will keep for up to two weeks. Make sure to let it cool completely before covering to prevent condensation. If you notice any mold or off smells, discard it. You can also freeze it for up to three months – just thaw overnight in the fridge before using.
- → Why is my caramel too thick or too thin?
Thickness is controlled by cooking time and cream ratio. If it's too thin after cooling, you can reheat it gently and simmer for a few extra minutes to evaporate more moisture. If it's too thick, simply whisk in a tablespoon or two of warm cream until you reach your desired consistency. Remember, caramel will always be thinner when warm and thicker when cold.
- → What's the best way to reheat caramel sauce?
The gentlest method is to microwave it in a microwave-safe container in 15-second intervals, stirring between each burst, until it reaches your desired warmth and consistency. Alternatively, place the jar in a bowl of hot water for a few minutes, or warm it in a small saucepan over very low heat, stirring constantly. Never use high heat as it can cause the sauce to separate or burn.
Conclusion
This salted caramel sauce is pure magic in a jar. The combination of buttery sweetness and that perfect hint of salt creates a flavor that's absolutely irresistible. Store it in the fridge for up to two weeks, and gently reheat before using. Whether you're elevating a simple dessert or creating something spectacular, this sauce is your secret weapon. The best part? Once you master this recipe, you'll never buy store-bought caramel again.