
 pin it
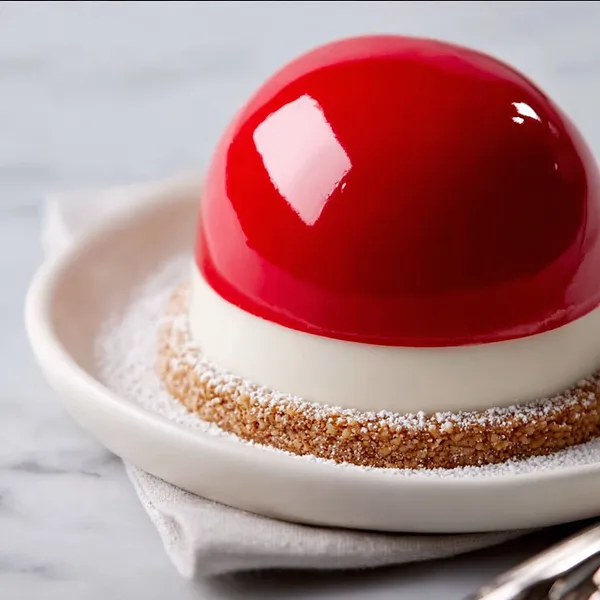
I first discovered dome cakes during a trip to a fancy Parisian patisserie years ago, where I watched in awe as pastry chefs created these architectural marvels behind glass windows. When I bit into one, I was amazed by how the mirror glaze had this incredible snap when you cut through it, giving way to the softest, most velvety mousse I'd ever tasted. I knew I had to learn how to make them at home. This Santa Dome version is my holiday tribute to those beautiful French creations. The recipe starts with a simple graham cracker crust that provides a sturdy, slightly sweet foundation. Then comes the star of the show: a luscious white chocolate mousse folded with fresh raspberry puree that creates natural swirls of pink throughout. The mousse is piped into hemisphere molds and frozen solid, which is crucial for the next step. The mirror glaze, made with white chocolate, gelatin, and red food coloring, needs to be poured over frozen domes so it sets quickly and creates that stunning glossy finish. The white chocolate ball on top isn't just decoration – it's a clever way to hide where you poured the glaze. Every element works together to create something that looks professionally made but is totally achievable at home with patience and the right technique.
Why I love this recipe
What I absolutely love about this recipe is how it transforms simple, accessible ingredients into something that looks like it came from a high-end pastry boutique. There's something so satisfying about working with mirror glaze – it's almost meditative watching it flow over the frozen domes and settle into that perfect smooth finish. But beyond the visual wow factor, these cakes taste incredible. The white chocolate mousse is rich without being too heavy, and the raspberries add this bright, tart note that cuts through the sweetness perfectly. I also love that these are individual servings, so everyone gets their own perfect little Santa dome – no messy slicing or uneven portions at the table. The make-ahead factor is huge for me too. You can prepare everything up to two days in advance, which means on the actual holiday, you're just pulling them from the fridge and basking in compliments. And honestly? There's something magical about serving a dessert that makes people pause, pull out their phones, and take pictures before they even think about eating it. These cakes create moments, start conversations, and make memories. Plus, once you master the technique, you can play with different colors and flavors – think green for Christmas trees, pink for Valentine's hearts, or orange for fall pumpkins. It's a recipe that keeps giving year after year.
What You Need From Your Kitchen
- Graham crackers: Crush finely and mix with melted butter to form the base crust layer
- Cream cheese: Soften to room temperature and beat with powdered sugar for the mousse base
- White chocolate chips: Melt with heavy cream and fold into the cream cheese mixture for richness
- Fresh raspberries: Mash and fold into the mousse to create beautiful pink swirls and tart flavor
- Heavy whipping cream: Whip to stiff peaks and fold into mousse for light, airy texture
- Red mirror glaze: Heat to correct temperature and pour over frozen domes for glossy finish
- White chocolate balls: Place on top of each dome as decorative Santa hat pom-pom
Let's Make These Together
- Create the Graham Cracker Base
- Begin by crushing your graham crackers into fine crumbs using a food processor or by placing them in a sealed bag and crushing with a rolling pin. Mix the crumbs thoroughly with melted butter until the mixture holds together when pressed. Press this mixture firmly and evenly into the bottom of your tart rings or small pans, making sure there are no gaps or thin spots that could cause the base to crumble later.
- Prepare the White Chocolate Mousse
- Beat your softened cream cheese with powdered sugar and vanilla until it's completely smooth with no lumps remaining. In a separate bowl, gently melt your white chocolate with a portion of the heavy cream, stirring constantly to prevent burning. Once melted and smooth, allow it to cool for a few minutes so it won't deflate your whipped cream later. Fold this white chocolate mixture into your cream cheese base using a gentle folding motion to maintain airiness.
- Incorporate Raspberries and Whipped Cream
- Mash your fresh raspberries with a fork until they're mostly broken down but still have some texture. You can strain out the seeds if you prefer a smoother texture. Whip your remaining heavy cream until it forms stiff peaks that hold their shape. Now comes the fun part – gently fold the whipped cream into your white chocolate mixture in two additions, then swirl in the mashed raspberries to create those beautiful pink marbled patterns throughout the mousse.
- Form and Freeze the Domes
- Carefully fill your hemisphere silicone molds with the mousse mixture, either by piping it in with a large piping bag or by spooning it in gently. Make sure to fill each cavity completely and smooth the tops flat since this will become the bottom of your dome. Tap the molds firmly on your counter several times to release any trapped air bubbles that could create holes in your finished domes. Place the molds on a flat surface in your freezer and freeze for at least 4 hours or preferably overnight.
- Apply the Mirror Glaze
- Prepare your red mirror glaze and heat it to precisely 90°F – this temperature is crucial for achieving that perfect glossy finish. Set up your workspace with a wire rack over a large baking sheet to catch drips. Unmold your frozen domes and place them on the wire rack. Working quickly but carefully, pour the glaze over the center of each dome and let it flow naturally down the sides. The glaze should coat the dome in one smooth motion. If you notice any bare spots, you can gently touch them up with a small spoon of glaze.
- Assemble and Chill the Final Cakes
- Using a large offset spatula, carefully lift each glazed dome and place it onto your prepared graham cracker base. Work quickly since the frozen mousse will start to thaw as you handle it. Press a white chocolate ball gently on top of each dome to complete the Santa hat look. Transfer all the assembled cakes to your refrigerator and let them chill for at least 2 hours before serving. This allows the glaze to set completely and the mousse to reach the perfect creamy consistency.
 pin it
Switch Things Up
I'll never forget the first time I made these Santa Dome Cakes for our family Christmas Eve dinner. I was honestly nervous because I'd never worked with mirror glaze before, and I kept thinking, what if this turns into a sticky disaster? But when I poured that glossy red glaze over the frozen mousse domes and watched it cascade down the sides in perfect sheets, I literally gasped. My sister walked into the kitchen at that exact moment and her eyes went so wide. We both just stood there staring at these gleaming red domes like they were precious jewels. The hardest part was actually waiting for them to set in the fridge before serving. When we finally cut into them at dinner, revealing those pristine white layers against the red, my nephew said they looked like real Santa hats made of candy. Now these have become our signature Christmas dessert, and every year someone asks if I'm making "those fancy red cakes" again.
Perfect Pairings
These Santa Dome Cakes pair beautifully with a glass of champagne or sparkling wine for an elegant holiday celebration. For a non-alcoholic option, try serving them with a rich espresso or a cup of peppermint hot chocolate. If you're serving these as part of a dessert spread, they work wonderfully alongside classic sugar cookies, chocolate truffles, or a simple fruit platter with fresh berries and grapes. For a complete holiday menu, serve these after a meal of roasted turkey or prime rib with all the traditional sides. The light, creamy texture of the mousse makes it a perfect ending to a heavy meal without being too overwhelming.
 pin it
Frequently Asked Questions
- → Can I make these cakes without silicone molds?
Yes, you can use small bowls lined with plastic wrap as an alternative to silicone hemisphere molds. Just make sure to line them smoothly to avoid wrinkles that might show through the glaze. You can also use muffin tins lined with plastic wrap, though the shape won't be as perfectly rounded. The silicone molds are recommended for the best results and easiest unmolding.
- → How far in advance can I prepare these Santa Dome Cakes?
You can make these cakes up to 2 days in advance. Prepare them completely through the glazing step, then store them covered in the refrigerator. The mirror glaze will maintain its shine and the mousse will stay fresh. Just make sure to cover them loosely with plastic wrap or place them in a cake container so nothing touches the glazed surface.
- → What if my mirror glaze isn't smooth or has bubbles?
Mirror glaze issues usually come from incorrect temperature or air bubbles in the glaze itself. Make sure your glaze is at exactly 90°F before pouring. If you see bubbles forming, gently strain the glaze through a fine-mesh sieve before using. Also ensure your frozen domes are completely smooth on the surface before glazing. Any imperfections in the mousse will show through the mirror glaze.
- → Can I use frozen raspberries instead of fresh?
Yes, frozen raspberries work perfectly well in this recipe. Just make sure to thaw them completely and drain any excess liquid before mashing them. You might want to reduce the amount slightly since frozen berries can release more moisture than fresh ones. Pat them dry with paper towels after thawing to prevent the mousse from becoming too watery.
- → Why did my mirror glaze slide off the dome?
The most common reason for glaze sliding off is that the domes weren't frozen solid enough before glazing. Make sure your mousse domes are frozen completely hard – at least 4 hours or overnight. Another reason could be that the glaze was too warm, causing the frozen mousse to start melting on contact. Check that your glaze temperature is right around 90°F, not hotter.
- → Can I make these in different colors for other holidays?
Absolutely! The beauty of this recipe is its versatility. You can use green mirror glaze for Christmas tree domes, pink for Valentine's Day hearts, orange for Halloween pumpkins, or any color you like. You can also change the mousse flavors – try chocolate, strawberry, lemon, or coffee. Just maintain the same proportions and techniques for best results.
Conclusion
These Santa Dome Cakes are the ultimate show-stopping holiday dessert that combines elegance with festive fun. The creamy white chocolate mousse paired with tart raspberries creates a perfect flavor balance, while the glossy mirror glaze adds that professional pastry shop finish. Whether you're hosting a Christmas dinner or looking for a memorable dessert to bring to a holiday gathering, these individual cakes are guaranteed to impress. They can be made a day ahead, making them perfect for stress-free entertaining. Each bite delivers a delightful mix of textures and flavors that will have everyone asking for seconds.