
 pin it
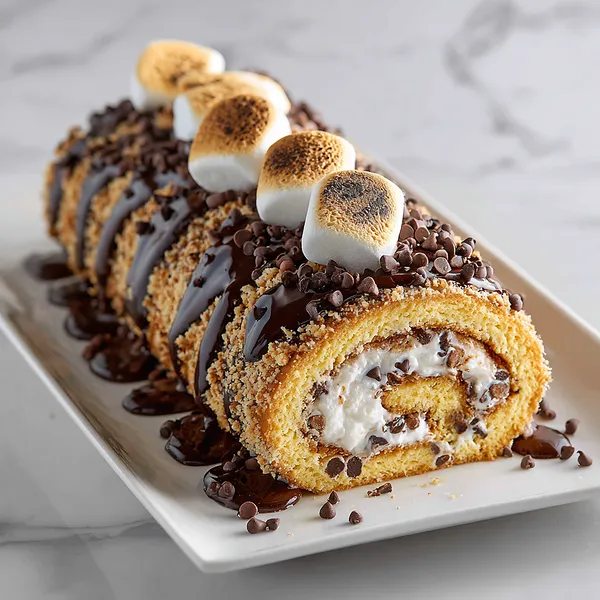
I first encountered the magic of Swiss rolls when I visited a small bakery in Europe, where the pastry chef was meticulously rolling a delicate sponge cake with such precision and care. I was mesmerized by the technique and knew I had to master it myself. When I returned home, I started experimenting with different flavor combinations, but nothing quite captured my imagination until I thought about s'mores – that quintessential treat that brings back memories of childhood camping trips and summer nights. I decided to transform those nostalgic flavors into an elegant Swiss roll, and after several attempts at perfecting the sponge texture and the marshmallow filling consistency, I finally created this Epic S'mores Swiss Roll. The key breakthrough came when I realized that adding mini chocolate chips directly into the marshmallow cream filling created pockets of melted chocolate throughout the roll, mimicking those gooey chocolate bits you get in a traditional s'more. Coating the outside with crushed graham crackers instead of just sprinkling them on top gave every single bite that essential s'mores crunch. The toasted marshmallows on top aren't just for show – they add that caramelized, slightly burnt flavor that's absolutely essential to authentic s'mores. What I love most is how this recipe takes something so simple and rustic and elevates it into a dessert that looks like it belongs in a five-star restaurant, yet still tastes exactly like those cherished campfire memories.
Why I love this recipe
I love this recipe for so many reasons, but what really gets me is how it bridges the gap between casual comfort food and impressive showpiece dessert. There's something incredibly satisfying about taking a beloved childhood treat like s'mores and reimagining it in such an unexpected way. Every time I make this Swiss roll, I'm reminded that baking isn't just about following recipes – it's about creativity, nostalgia, and bringing joy to people through food. The technique of rolling the cake taught me patience and precision, skills that have made me a better baker overall. I also appreciate how forgiving this recipe actually is despite looking so intricate – if your roll cracks a little, the graham cracker coating hides it beautifully, and if the ganache drips aren't perfect, they just add to the rustic charm. What really makes my heart sing is watching people's faces when they take their first bite. There's always this moment of surprise and delight as they experience all the layers of flavor and texture working together harmoniously. The recipe has also become a wonderful way to involve my kids in the kitchen – they love crushing the graham crackers, sprinkling the chocolate chips, and especially toasting the marshmallows with a kitchen torch. It's created countless memories and has become our family's special celebration dessert, proving that the best recipes aren't just about taste, but about the moments and connections they create.
What You Need From Your Kitchen
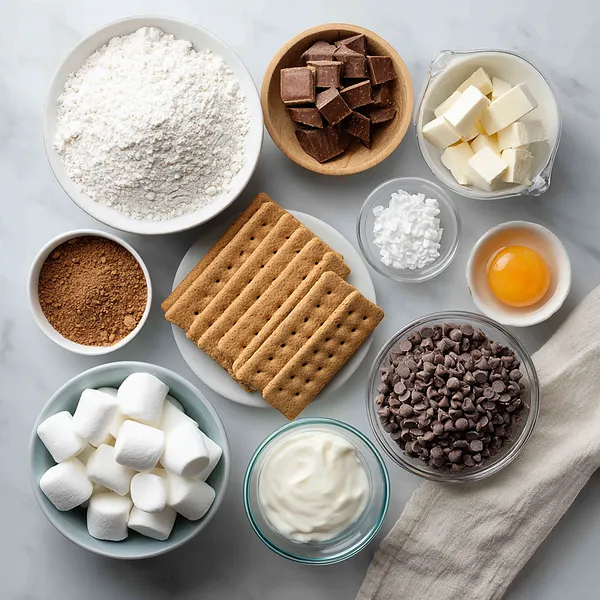
- Eggs: Bring to room temperature and beat with sugar until thick and pale for maximum volume
- All-Purpose Flour: Sift before using to ensure a light, airy sponge cake without lumps
- Marshmallow Fluff: Fold gently with whipped cream to create a fluffy, stable filling
- Heavy Cream: Whip to stiff peaks before combining with marshmallow fluff and use for making ganache
- Mini Chocolate Chips: Fold into the marshmallow filling for pockets of chocolate throughout
- Chocolate: Use good quality chocolate (semi-sweet or dark) and chop finely for smooth ganache
- Graham Crackers: Crush into fine crumbs using a food processor or place in a sealed bag and crush with a rolling pin
- Marshmallows: Use large marshmallows for topping and toast with a kitchen torch or under the broiler until golden
Let's Make These Together
- Whip the Perfect Sponge
- The foundation of a great Swiss roll is a light, airy sponge cake that's flexible enough to roll without cracking. Start by beating your room temperature eggs and sugar for a full 5-7 minutes – this isn't the time to rush! You're incorporating air that will give the cake its structure and tenderness. When the mixture has tripled in volume and forms thick ribbons that hold their shape for a few seconds when you lift the beaters, you're ready to gently fold in the flour. Use a light hand here, cutting through the center and folding over to maintain all that precious air you just whipped in.
- Master the Rolling Technique
- This is where magic happens, and it's easier than you think! The secret to a crack-free roll is working with the cake while it's still warm and pliable. As soon as it comes out of the oven, flip it onto your sugar-dusted towel, peel off the parchment, and roll it up with the towel inside. This "teaches" the cake its shape so it won't fight you later. Let it cool completely in this position – patience here prevents heartbreak later. When you're ready to fill it, unroll gently, spread that glorious marshmallow cream, and roll it back up confidently but carefully. Think of it like rolling a yoga mat – steady, even pressure.
- Create the Ganache Coating
- The chocolate ganache is what transforms this from a simple cake roll into an epic showstopper. Heat your cream just until it starts to simmer, then pour it over your chopped chocolate and let it sit for a couple minutes. This allows the chocolate to soften evenly. When you whisk it together, you'll see it transform into liquid silk. The key is letting it cool to just the right consistency – you want it thick enough to coat the roll beautifully but still fluid enough to create those gorgeous drips. Test it by letting a spoonful drip back into the bowl – if it falls in a slow, steady stream, you're golden.
- Apply the Graham Cracker Coating
- After pouring that luscious ganache over your chilled roll, you'll want to work relatively quickly to press the graham cracker crumbs into the surface while the chocolate is still tacky. Pour the crumbs into a shallow dish or onto a piece of parchment, then gently roll and press the coated Swiss roll through the crumbs, making sure to cover all sides. Don't be shy – really press those crumbs in! Any bare spots can be patched by pressing crumbs directly with your hands. The result is a beautifully textured exterior that adds that essential s'mores crunch to every bite.
- Toast the Marshmallow Topping
- The final flourish is those perfectly toasted marshmallows on top, and they're not just for show – they add that authentic campfire flavor. Arrange your large marshmallows along the top of the roll, then use a kitchen torch to carefully toast them until they're golden brown with slightly charred edges. If you don't have a torch, place the whole roll under a preheated broiler for just 30-60 seconds, but watch it like a hawk because marshmallows go from perfect to burnt in seconds. That caramelized, slightly smoky flavor is what takes this dessert from great to absolutely epic.
 pin it
Switch Things Up
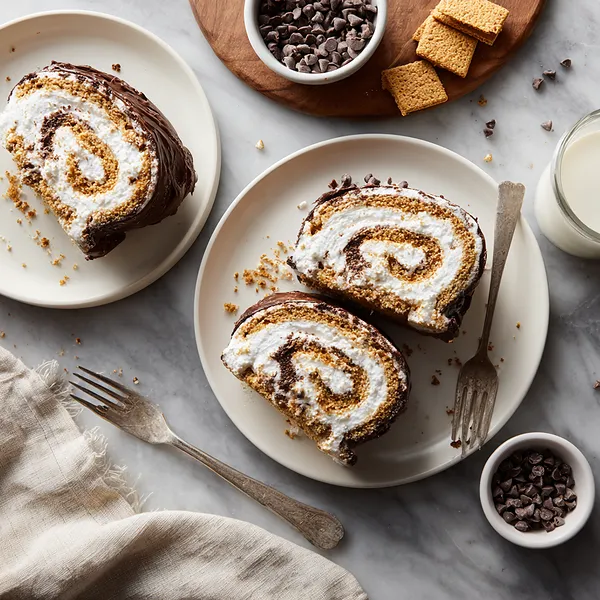
I'll never forget the first time I made this Swiss roll for a backyard gathering. I was nervous about the rolling technique, worried the cake would crack, but I followed the parchment paper method and it worked like a dream. As I was assembling it, my kitchen started smelling like a campfire cookout mixed with a chocolate factory, and my kids kept sneaking into the kitchen asking when they could try it. When I finally sliced into it and revealed that perfect spiral, everyone gasped – it looked even better than I'd imagined. The crunch of the graham crackers against the soft cake, the gooey marshmallow filling oozing out slightly, and that rich chocolate ganache coating everything was pure magic. My neighbor, who's usually a chocolate cake purist, came back three times for more slices. Now it's become my signature dessert, and I make it for every summer party, birthday celebration, and honestly, sometimes just because Tuesday needs a little excitement. The trick I've learned is to not overthink the rolling process – work quickly while the cake is still warm, and trust that the marshmallow filling is forgiving enough to hold everything together beautifully.
Perfect Pairings
This Epic S'mores Swiss Roll pairs beautifully with a variety of beverages and accompaniments. Serve it with a tall glass of cold whole milk for that classic campfire combination, or elevate it with a rich hot chocolate topped with whipped cream for the ultimate chocolate lover's experience. For adults, a smooth coffee or espresso balances the sweetness perfectly, while a glass of dessert wine like port or a chocolate stout beer creates an elegant pairing. If you want to go all out, serve each slice with a scoop of vanilla bean ice cream that melts into the warm ganache, or add a dollop of freshly whipped cream on the side. For a fun twist, offer toasted marshmallow skewers alongside the cake, or serve it with fresh strawberries and raspberries to cut through the richness with a burst of fruity tartness.
 pin it
Frequently Asked Questions
- → Can I make this Swiss roll ahead of time?
Absolutely! This Swiss roll actually benefits from being made in advance. You can prepare the entire roll, wrap it tightly in plastic wrap, and refrigerate it for up to 2 days before adding the final ganache coating and marshmallow topping. In fact, the chilling time helps the filling set and makes the roll easier to slice cleanly. If you want to make it even further ahead, you can freeze the filled and rolled cake (without ganache) for up to 1 month. Thaw it in the refrigerator overnight before coating with ganache. Just add the toasted marshmallow topping right before serving for the best presentation and that fresh campfire flavor.
- → Why did my cake crack when I rolled it?
Cake cracking is usually due to one of three things: the cake was overbaked and became too dry, it cooled too much before the initial roll, or you rolled it too tightly. The most common culprit is not rolling the cake while it's still warm. The warmth keeps the cake flexible and pliable. Also, make sure you're not overbaking – the cake should spring back when touched but shouldn't be golden brown all over. If you do get small cracks, don't worry! The graham cracker coating is very forgiving and will hide minor imperfections beautifully. For future attempts, try the towel-rolling technique immediately after baking while the cake is still hot.
- → Can I substitute the marshmallow fluff with something else?
While marshmallow fluff creates that authentic s'mores flavor and fluffy texture, you can make substitutions if needed. You could use marshmallow cream (which is essentially the same thing) or make a homemade marshmallow filling by beating egg whites with sugar and gelatin. Another option is to use a cream cheese frosting mixed with melted mini marshmallows for a tangier twist. Some people like to use a Swiss meringue buttercream for a more stable filling. However, keep in mind that changing the filling will alter the authentic s'mores flavor profile. If you can't find marshmallow fluff, most grocery stores sell it near the peanut butter or in the baking aisle.
- → How do I prevent the ganache from being too runny or too thick?
The perfect ganache consistency is all about temperature and timing. After mixing your chocolate and hot cream, let it sit at room temperature and check it every 5 minutes. You want it to thicken to the consistency of thick honey or chocolate syrup – it should flow slowly off a spoon but not be so thin that it runs right off the cake. If your ganache is too thin, refrigerate it for 5-10 minutes, stirring occasionally. If it becomes too thick and loses its pourable quality, microwave it for 10-15 seconds or set the bowl over warm water and stir until it loosens up. The ratio of chocolate to cream also matters – using equal parts by weight gives you a perfect coating ganache. If you want thicker ganache, increase the chocolate ratio slightly.
- → Do I need a kitchen torch for the marshmallows?
A kitchen torch definitely makes toasting the marshmallows easier and gives you more control, but it's not absolutely necessary. If you don't have a torch, you can achieve similar results by placing the finished Swiss roll under your oven's broiler for 30-60 seconds. Just make sure to watch it very carefully because marshmallows can go from perfectly golden to burnt in seconds under that intense heat. Place the rack in the upper third of the oven and rotate the baking sheet as needed to ensure even toasting. Another option is to toast the marshmallows on skewers over a gas stovetop flame before placing them on top of the roll. Honestly, even untoasted marshmallows look beautiful and taste delicious, so don't let the lack of a torch stop you from making this impressive dessert!
- → How should I store leftovers?
Store any leftover Swiss roll in an airtight container in the refrigerator for up to 3-4 days. The cake actually stays moist and delicious because the marshmallow filling helps keep it from drying out. Cover it well with plastic wrap or place it in a cake keeper to prevent it from absorbing other refrigerator odors. When you're ready to serve leftover slices, you can let them come to room temperature for about 15-20 minutes for the best flavor and texture, or enjoy them cold straight from the fridge – both ways are delicious! The graham cracker coating might soften slightly after a day or two due to moisture from the cake and ganache, but this doesn't affect the taste at all. Just avoid leaving it at room temperature for extended periods, especially in warm weather, as the cream-based filling and ganache need refrigeration.
Conclusion
This Epic S'mores Swiss Roll is more than just a dessert – it's an experience that brings the magic of campfire nights into your kitchen. The combination of soft sponge cake, fluffy marshmallow cream, rich chocolate ganache, and crunchy graham crackers creates a symphony of textures and flavors that'll transport you straight to summer evenings under the stars. Whether you're celebrating a special occasion or just want to treat yourself and your loved ones to something extraordinary, this show-stopping dessert delivers every single time. The best part? While it looks incredibly impressive and bakery-worthy, it's surprisingly achievable with a little patience and the right technique. So gather your ingredients, preheat that oven, and get ready to create a dessert that'll have everyone coming back for seconds!