
 pin it
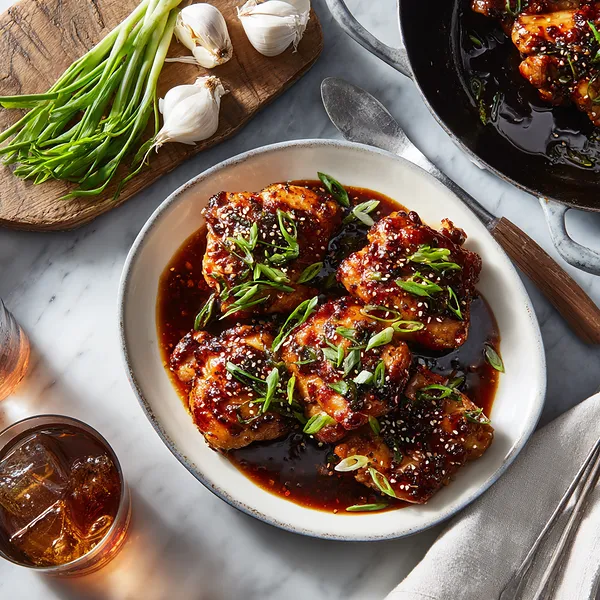
I discovered my love for soy-garlic chicken during a trip to a Korean restaurant in Los Angeles. The chicken was glazed to perfection, with this incredible balance of sweet and savory that I couldn't stop thinking about. When I got home, I was determined to recreate that magic in my own kitchen. After several attempts, I finally nailed the perfect ratio of soy sauce to honey, and the addition of fresh ginger and sesame oil took it to the next level. This recipe represents everything I love about cooking – taking inspiration from restaurant experiences and making them accessible for home cooks. The key is getting the chicken skin really crispy before adding the sauce, which creates this amazing textural contrast. I use bone-in, skin-on thighs because they stay incredibly juicy and flavorful during cooking. The sauce thickens beautifully with just a little cornstarch slurry, creating that signature sticky glaze. Every time I make this, I'm transported back to that first restaurant experience, but now I can enjoy it whenever I want. It's become a staple in my recipe rotation, and I've shared it with countless friends who all say the same thing – it's restaurant-quality delicious.
Why I love this recipe
This recipe holds a special place in my heart for so many reasons. First, it's incredibly forgiving – even if you're not an experienced cook, you'll get amazing results. The ingredient list is simple, but the flavors are anything but basic. I love how the honey caramelizes with the soy sauce, creating these beautiful glossy patches on the chicken that are almost like candy. The garlic mellows as it cooks, becoming sweet and aromatic rather than harsh. What really sets this recipe apart is the texture – that crispy skin combined with tender, juicy meat and a sticky glaze is just perfection. It's also incredibly versatile; I've made it for casual family dinners, meal prep for the week, and even served it at dinner parties where it always steals the show. The aromatics that fill the kitchen while it's cooking are enough to make anyone hungry. I appreciate that it's a one-pan dish, which means less cleanup – a huge win in my book. The sesame seeds and green onions aren't just garnish; they add important textural and flavor elements that complete the dish. Every time I make this, I'm reminded why simple, well-executed recipes are often the best.
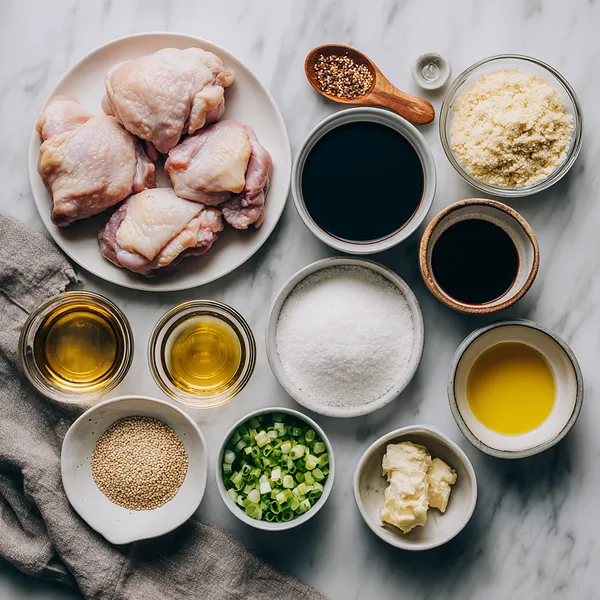
What You Need From Your Kitchen
- Chicken thighs: Pat dry thoroughly and season with pepper before cooking for crispy skin
- Soy sauce: Use low-sodium variety to control saltiness; substitute with tamari for gluten-free
- Garlic: Mince finely and sauté until fragrant but not burned
- Honey: Provides sweetness and helps create the sticky glaze; can substitute with maple syrup
- Sesame oil: Adds nutty depth; use toasted sesame oil for best flavor
- Rice vinegar: Balances sweetness with acidity; don't substitute with regular vinegar
- Fresh ginger: Grate finely for maximum flavor distribution throughout the sauce
- Green onions: Slice thinly on the diagonal for garnish, adding fresh flavor and color
Let's Make These Together
- Prep Your Chicken Right
- Start by patting your chicken thighs completely dry with paper towels. This crucial step removes excess moisture, allowing the skin to crisp up beautifully when it hits the hot pan. Season both sides generously with freshly ground black pepper. Don't skip the drying step – wet chicken will steam rather than sear, and you'll miss out on that golden, crispy skin that makes this dish so irresistible.
- Get That Perfect Sear
- Heat your cast-iron skillet over medium-high heat until it's nice and hot. Place the chicken thighs skin-side down in the pan, making sure not to overcrowd them. Resist the urge to move them around! Let them cook undisturbed for 8-10 minutes. You'll hear them sizzle – that's good! The skin will release naturally from the pan when it's ready. Flip them over and cook the other side for 6-7 minutes until nicely browned.
- Build Your Flavor Base
- After removing the chicken, drain most of the rendered fat from the pan, leaving just a tablespoon behind. Reduce the heat to medium and add your minced garlic and grated ginger. Sauté these aromatics for about a minute, stirring constantly. Your kitchen will smell absolutely amazing! The garlic should turn golden and fragrant, but watch carefully – burned garlic tastes bitter and will ruin your sauce.
- Create the Magical Sauce
- Pour in the soy sauce, honey, sesame oil, and rice vinegar, stirring to combine. Mix your cornstarch and water in a small bowl to make a slurry, then add it to the pan while stirring. Bring everything to a gentle simmer and watch as the sauce transforms into a glossy, thickened glaze. This should take 2-3 minutes. The sauce should coat a spoon nicely when it's ready.
- Bring It All Together
- Return your beautifully browned chicken to the pan, nestling each piece into that gorgeous sauce. Reduce the heat to medium-low and start spooning the sauce over the chicken repeatedly. This basting process is where the magic happens – each layer of sauce creates more flavor and that signature sticky coating. Let it all simmer together for 5-7 minutes, continuing to baste occasionally.
 pin it
Switch Things Up
I first made this recipe on a rainy Tuesday evening when I was craving something warm and satisfying. I had chicken thighs in the fridge and decided to experiment with a soy-garlic glaze I'd been thinking about. As the chicken sizzled in the pan and the sauce began to caramelize, the aroma filled my entire apartment. My neighbor actually knocked on my door to ask what I was cooking! The first bite was a revelation – the chicken was incredibly tender, and the sauce had this perfect sticky consistency that clung to every piece. I've tweaked the recipe over the years, adjusting the sweetness and adding more ginger for depth. Now it's my signature dish, the one everyone requests when I'm cooking. I've made it for casual weeknight dinners and special occasions alike. The best part? It tastes like you spent hours in the kitchen when it really only takes about 50 minutes from start to finish.
Perfect Pairings
These Soy Garlic Chicken Thighs pair beautifully with fluffy jasmine rice or sticky short-grain rice to soak up all that incredible sauce. For vegetables, I love serving it alongside steamed broccoli, bok choy, or snap peas with a light sesame dressing. A crisp cucumber salad with rice vinegar provides a refreshing contrast to the rich, savory chicken. If you want to make it a complete Asian-inspired feast, add some vegetable spring rolls or edamame as appetizers. For drinks, a cold Japanese lager or a glass of off-dry Riesling complements the sweet and savory flavors perfectly. You could also serve it with cauliflower fried rice for a lower-carb option.
 pin it
Frequently Asked Questions
- → Can I use boneless, skinless chicken thighs?
Yes, you can use boneless, skinless thighs, though you'll miss out on the crispy skin texture. Reduce the initial cooking time to about 5-6 minutes per side since boneless thighs cook faster. The sauce will still be delicious and sticky!
- → How do I prevent the sauce from burning?
Keep the heat at medium or medium-low once you add the sauce ingredients, and stir frequently. The honey and soy sauce can caramelize quickly, which adds flavor, but too much heat will cause burning. If you notice the sauce getting too dark too fast, reduce the heat immediately and add a splash of water.
- → Can I make this recipe ahead of time?
While this dish is best served fresh, you can prepare the sauce ahead and store it in the refrigerator for up to 3 days. Cook the chicken fresh when you're ready to serve for the best texture. If you do need to make it completely ahead, reheat gently in a pan with a splash of water to revive the sauce.
- → What's the best way to reheat leftovers?
Reheat leftovers in a covered pan over medium-low heat with a tablespoon of water to prevent drying out. You can also microwave them, but add a damp paper towel over the top to maintain moisture. The skin won't be as crispy when reheated, but the flavor will still be excellent.
- → Can I double this recipe?
Absolutely! Just make sure you have a large enough pan to fit all the chicken thighs in a single layer for the initial searing. You may need to work in batches if your pan isn't big enough. The sauce recipe doubles perfectly, and you might need to increase the final simmering time by a few minutes to ensure all pieces are thoroughly coated and heated through.
- → What can I substitute for rice vinegar?
In a pinch, you can use apple cider vinegar or white wine vinegar, though the flavor will be slightly different. Use about 3/4 the amount as rice vinegar is milder. Avoid using regular white vinegar or balsamic vinegar as they'll overpower the delicate balance of flavors.
- → How can I make this dish less sweet?
Simply reduce the honey to 1/4 cup instead of 1/3 cup, or add an extra tablespoon of rice vinegar to balance the sweetness. You can also add a pinch of red pepper flakes for some heat, which will help counterbalance the sweet notes.
Conclusion
This Soy Garlic Chicken Thighs recipe is everything you want in a weeknight dinner – easy, flavorful, and absolutely delicious. The combination of soy sauce, garlic, honey, and sesame creates a sauce that's both complex and comforting. What I love most is how the chicken skin gets perfectly crispy before being coated in that luscious glaze. It's a one-pan wonder that delivers restaurant-quality results without the fuss. Whether you're cooking for your family or entertaining guests, this dish never fails to impress. Serve it over steamed rice or with your favorite vegetables, and you've got a complete meal that everyone will love.