
 pin it
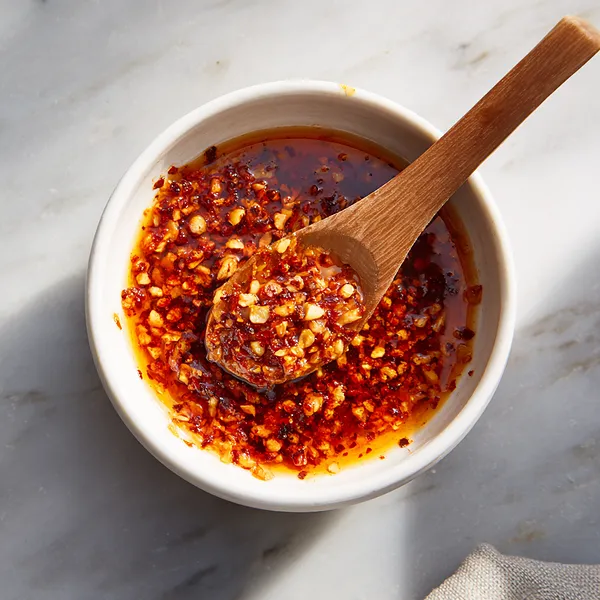
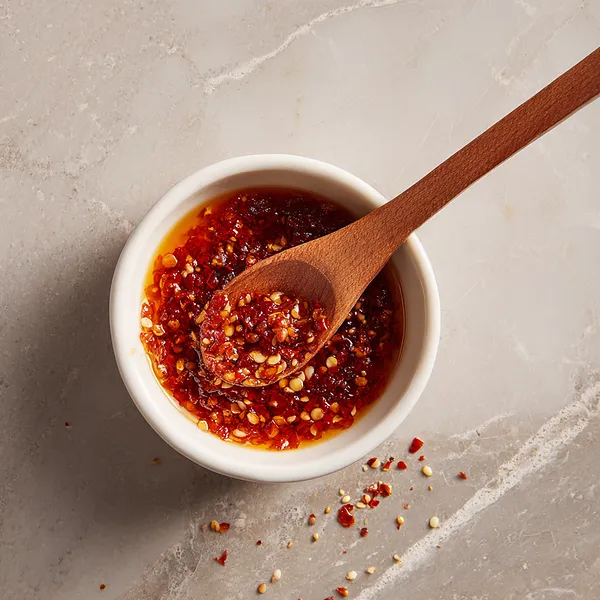
I have to tell you about my obsession with chili crisp – it started when I visited a little Sichuan restaurant in my city and tasted their house-made version. The owner graciously shared some tips, and I went home determined to recreate it. This recipe is the result of countless batches and tweaks until I got it just right. What makes this chili crisp special is the layering of aromatics – we're not just heating oil and adding chili flakes. First, the oil gently infuses with whole spices like star anise, bay leaves, and Sichuan peppercorns, building that complex base flavor. Then comes the garlic, which we crisp to golden perfection, adding a sweet nuttiness. The chili flakes bloom in the hot oil, releasing their color and heat without burning. Sesame seeds add a toasty dimension, while a touch of soy sauce and sugar create that addictive savory-sweet balance. The key is controlling the temperature – too hot and everything burns, too cool and you don't extract those essential flavors. When it's done right, you get this incredible condiment with crispy bits suspended in flavorful oil, ready to transform anything you put it on.
Why I love this recipe
What I love most about this recipe is how it makes me feel like a culinary alchemist, transforming simple ingredients into liquid gold. There's something deeply satisfying about the process – the way the kitchen smells as the spices bloom, the visual transformation as the oil turns that gorgeous red color, and the anticipation of that first taste. This chili crisp represents everything I value in cooking: it's made from whole, recognizable ingredients, it keeps for a long time, and it has the power to elevate the simplest meals into something exciting. I love that I can control exactly what goes into it, adjusting the heat level to my preference and knowing there are no weird additives or preservatives. It's become my secret weapon in the kitchen – when I'm tired and dinner feels like a chore, a spoonful of this over plain noodles or rice suddenly makes everything delicious and interesting again. Plus, there's genuine joy in sharing jars with friends and watching their faces light up when they taste it. This recipe has taught me that the best condiments are the ones you make yourself, with love and attention to detail.
What You Need From Your Kitchen
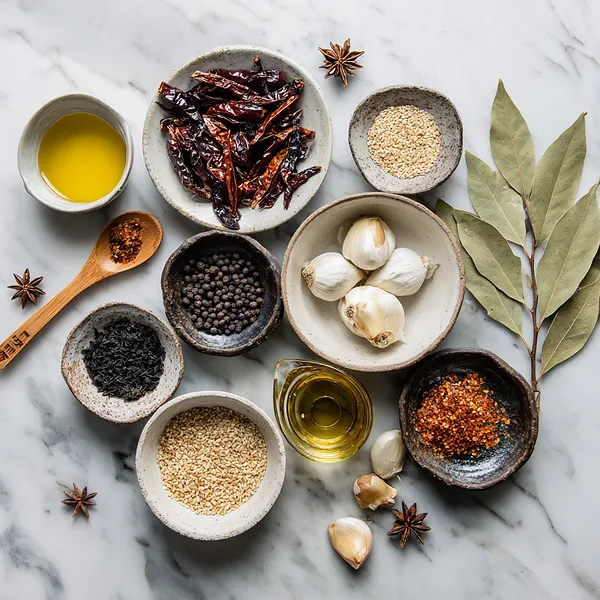
- Neutral oil: Acts as the base and carrier for all the flavors, infusing with spices and aromatics
- Dried chili flakes: Provide the signature heat and vibrant red color when bloomed in hot oil
- Garlic: Minced and crisped until golden, adding sweet, savory depth and textural crunch
- Sesame seeds: Toasted to release their nutty aroma and add another layer of texture
- Sichuan peppercorns: Infuse the oil with their distinctive numbing, citrusy quality
- Soy sauce: Brings umami depth and savory complexity to balance the heat
Let's Make These Together
- Infuse the aromatic base
- Start by gently heating your neutral oil with whole spices like Sichuan peppercorns, star anise, and bay leaves. This low and slow infusion is crucial for building layers of flavor. Keep the heat moderate and watch for the spices to release their aromatic oils into the base. After about 10 minutes of gentle simmering, strain out the whole spices so they don't overpower the final product or create bitterness.
- Create crispy garlic magic
- Return your infused oil to the heat and add your minced garlic. This is where patience pays off – cook the garlic slowly over medium-low heat, stirring frequently to ensure even browning. You want those garlic bits to turn golden and crispy without burning. The whole kitchen will smell incredible as the garlic transforms from raw and pungent to sweet and nutty. This takes about 5-7 minutes, and it's worth every second of attention.
- Toast the sesame seeds
- Once your garlic reaches that perfect golden state, stir in the sesame seeds. They only need a minute or two to toast and release their nutty fragrance. Keep stirring to prevent any burning, and you'll notice them becoming slightly more golden and fragrant. This step adds another dimension of flavor and texture to your chili crisp.
- Bloom the chili flakes
- Place your dried chili flakes in a large heatproof bowl and get ready for the most satisfying part. When your oil reaches the right temperature (around 350°F), carefully pour it over the chili flakes. You'll hear that wonderful sizzle and see the oil bubble as it blooms the chilies, extracting their color, flavor, and heat. Stir everything together immediately to ensure even coverage and prevent any spots from burning.
- Season and finish
- While the mixture is still hot, stir in your soy sauce, sugar, and optional MSG or mushroom powder. The residual heat will help the sugar dissolve completely and allow all the flavors to marry beautifully. Let your chili crisp cool completely before transferring it to a jar. As it cools, the flavors will continue to develop and intensify, creating that perfect balance of heat, crunch, and umami that makes this condiment so addictive.
 pin it
Switch Things Up
I first made this chili crisp on a rainy Sunday afternoon when I was craving the numbing spice of Sichuan cuisine but didn't want to order takeout. As the garlic sizzled and turned golden in the oil, filling my kitchen with that incredible aroma, I knew I was onto something special. I experimented with different ratios, toasting the spices just right until the oil turned that beautiful deep red. The first taste was a revelation – crispy, spicy, savory, with that characteristic tongue-tingling sensation from the Sichuan peppercorns. Now I make a double batch every month because I go through it so quickly. I've gifted jars to friends, and they always come back asking for more. There's something deeply satisfying about creating this perfect balance of textures and flavors, watching those garlic bits crisp up, and knowing you've made something that'll elevate every meal for weeks to come.
Perfect Pairings
This chili crisp is incredibly versatile and pairs beautifully with so many dishes. Drizzle it over steamed dumplings or wontons for an instant flavor boost, stir it into noodle soups for added depth and heat, or spoon it over fried rice to take it to the next level. It's magical on scrambled eggs or avocado toast for breakfast, transforms simple roasted vegetables into something spectacular, and makes an incredible dipping sauce when mixed with a bit of vinegar. Try it on pizza, mix it into mayonnaise for spicy sandwich spreads, or use it to top grilled fish or chicken. It even works stirred into plain yogurt as a savory dip.
 pin it
Frequently Asked Questions
- → How long does homemade chili crisp last?
When stored properly in a clean, dry jar in the refrigerator, homemade chili crisp can last for up to 3 months. The high oil content acts as a preservative, and the lack of water-based ingredients prevents bacterial growth. Always use a clean, dry spoon when serving to avoid introducing contaminants. If you notice any off smells, mold, or changes in appearance, discard it immediately.
- → Can I make this less spicy?
Absolutely! You can reduce the amount of chili flakes or use a milder variety like Korean gochugaru, which has a sweeter, less intense heat. You can also increase the ratio of oil to chili flakes, which dilutes the heat while maintaining flavor. Some people like to add more sesame seeds or even include fried shallots to add bulk and reduce the overall spice intensity.
- → What type of chili flakes work best?
Korean gochugaru is excellent for a milder, slightly sweet chili crisp with beautiful color. Chinese Sichuan chili flakes (often a mix of different chilies) provide more heat and complexity. You can also use a combination of different chili types to create your own custom heat level and flavor profile. Avoid using pre-ground cayenne pepper as it's too fine and can make the oil muddy.
- → Do I need to use Sichuan peppercorns?
While Sichuan peppercorns add that distinctive numbing, tingling sensation that's characteristic of authentic Sichuan chili crisp, they're not absolutely necessary. If you can't find them or don't enjoy that particular sensation, you can omit them or substitute with a small amount of black peppercorns for a different kind of spice. The chili crisp will still be delicious, just with a slightly different flavor profile.
- → Can I add other ingredients to customize it?
Definitely! Chili crisp is very versatile. Popular additions include fried shallots or onions for sweetness and crunch, dried shrimp for umami depth, crushed peanuts for texture, or even a touch of five-spice powder for complexity. Some people like to add a splash of rice vinegar or black vinegar at the end for acidity. Experiment with small batches to find your perfect combination.
- → Why did my garlic burn or my chili crisp taste bitter?
Burning occurs when the temperature is too high. Garlic and chili flakes both burn easily and develop bitter, acrid flavors when overcooked. The key is controlling your heat and watching carefully. Cook garlic over medium-low heat and remove it from heat before pouring over chili flakes if needed to let the temperature drop slightly. If you're unsure about temperature, err on the side of caution – you can always heat it more, but you can't unburn ingredients.
Conclusion
This homemade spicy garlic chili crisp is more than just a condiment – it's a flavor revolution in a jar. With its perfect balance of heat, crunch, and aromatic depth, you'll find yourself reaching for it at every meal. The beauty of making it yourself means you control the spice level and can adjust ingredients to your taste. Store it in a clean jar in the refrigerator, and it'll keep for months, though I doubt it'll last that long once you discover how versatile it is.