
 pin it
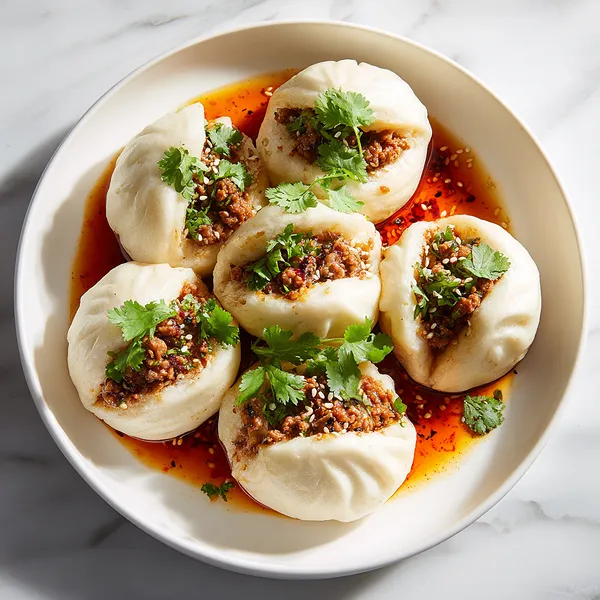
I first encountered steamed pork buns at a tiny dim sum spot tucked into a busy weekend market, and I remember being completely caught off guard by how something so simple-looking could deliver such a complex, satisfying experience. The bun itself was so soft it almost melted before you even bit in, and then came this burst of savory, fragrant pork that had been seasoned with just the right balance of soy, sesame, and ginger. From that moment I was obsessed. I came home and spent weeks trying to recreate that texture — that perfectly steamed, slightly chewy yet cloud-like dough — and I finally cracked it. The secret is in letting the dough proof properly and not rushing the steam. Now every time I make these, I feel that same excitement as I lift the steamer lid and see those gorgeous white domes ready to be devoured.
Why I love this recipe
I love this recipe because it feels like a little act of craft every single time. There is something deeply satisfying about making dough from scratch, watching it rise, then folding each bun by hand knowing exactly what is tucked inside. The filling is perfectly balanced — savory, slightly sweet from the oyster sauce, with that background warmth from ginger and garlic. And when you drizzle the chili oil over the top and add that bright pop of cilantro, the whole dish transforms into something that looks and tastes truly restaurant-worthy. It is one of those recipes that impresses every single guest without requiring any fancy equipment or hard-to-find ingredients. That combination of accessible and extraordinary is exactly why this recipe has earned a permanent spot in my kitchen.
What You Need From Your Kitchen
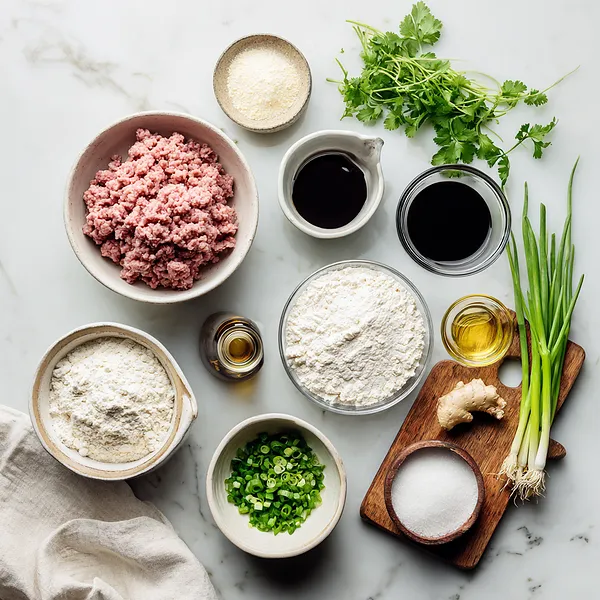
- Ground Pork: Mixed with seasonings to create a juicy, savory filling packed with umami flavor.
- All-Purpose Flour: The base for the soft, pillowy dough that wraps around the filling.
- Instant Yeast: Leavens the dough so it rises beautifully and steams into a fluffy, cloud-like bun.
- Soy Sauce: Seasons the pork filling with a deep, savory, salty depth of flavor.
- Oyster Sauce: Adds a subtle sweetness and richness that balances the soy in the filling.
- Fresh Ginger: Grated and mixed into the filling for a warm, aromatic kick that elevates the pork.
- Chili Oil: Drizzled over the finished buns for a glossy, spicy, fragrant finishing touch.
Let's Make These Together
- Mix and Knead the Dough
- Combine flour, yeast, sugar, and salt in a large bowl. Add warm water gradually and knead for 8-10 minutes until the dough is smooth, soft, and elastic. It should spring back when poked. Cover with a damp cloth and leave in a warm place for 1 hour to double in size.
- Season and Chill the Filling
- Mix the ground pork with soy sauce, oyster sauce, sesame oil, grated ginger, minced garlic, and green onions in a bowl. Stir thoroughly until everything is evenly combined. Pop it in the fridge while the dough proofs so the flavors can meld together beautifully.
- Roll Out and Shape Each Bun
- Once risen, punch the dough down and divide into 10 equal pieces. Roll each into a ball, then flatten with a rolling pin into a 4-inch round disc. Keep the center slightly thicker than the edges so the filling stays secure.
- Fill, Pleat, and Seal
- Spoon a tablespoon of filling into the center of each disc. Bring the edges up around the filling and pleat them together, pinching and twisting at the top to seal tightly. Place each bun on a small square of parchment paper to prevent sticking.
- Second Proof Then Steam
- Let the filled buns rest uncovered for 15 minutes for a second proof. Then arrange in a steamer basket over boiling water and steam for 18-20 minutes on medium-high heat without opening the lid. Rest briefly before serving with chili oil and cilantro.
 pin it
Switch Things Up
I started making these on a lazy Sunday when I had ground pork in the fridge and no plans. I was convinced the dough would never come together, but once it proofed and puffed up beautifully, I knew I was onto something. I added a little extra ginger to the filling just because I love that warmth, and when I opened the steamer and saw those perfect white domes, I genuinely felt like a professional dim sum chef. My family devoured all ten in under fifteen minutes. Now it is a regular request in our house.
Perfect Pairings
These steamed pork buns pair beautifully with a light cucumber and sesame salad to balance the richness of the pork filling. A bowl of hot and sour soup or simple miso soup alongside makes for a complete and comforting Asian-inspired meal. For dipping, a mix of soy sauce, rice vinegar, and sliced chilies is absolutely perfect. A cold jasmine iced tea or a light lager also complements the flavors wonderfully.
 pin it
Frequently Asked Questions
- → Can I freeze steamed pork buns?
Yes! Let the buns cool completely, then freeze them in a single layer before transferring to a zip-lock bag. Reheat from frozen by steaming for 8-10 minutes.
- → Can I use a different protein instead of pork?
Absolutely. Ground chicken, turkey, or even a mushroom and tofu mixture all work wonderfully as filling substitutes in this recipe.
- → Why did my buns deflate after steaming?
This usually happens when the lid is removed too quickly. Always let the buns sit with the lid slightly ajar for 2 minutes before fully opening to prevent the sudden temperature shock.
- → Do I need a bamboo steamer specifically?
No, a metal steamer basket set inside a large lidded pot works just as well. The key is keeping steam consistent and making sure the buns don't touch the water directly.
- → How do I know when the dough has proofed enough?
The dough should double in size and feel airy and light. If you poke it gently, the indent should slowly spring back halfway — that's the sweet spot.
- → Can I make the dough ahead of time?
Yes. After the first knead, place the dough in an oiled bowl, cover tightly, and refrigerate overnight. Let it come to room temperature for 30 minutes before shaping.
Conclusion
These steamed pork buns are everything a homemade dim sum experience should be — soft, pillowy dough wrapped around a deeply savory, juicy filling. Whether you serve them as a weekend project, a crowd-pleasing appetizer, or a comforting dinner, they never fail to impress. The beauty of this recipe is in its simplicity once you get the dough right, and the reward is absolutely worth every fold.