
 pin it
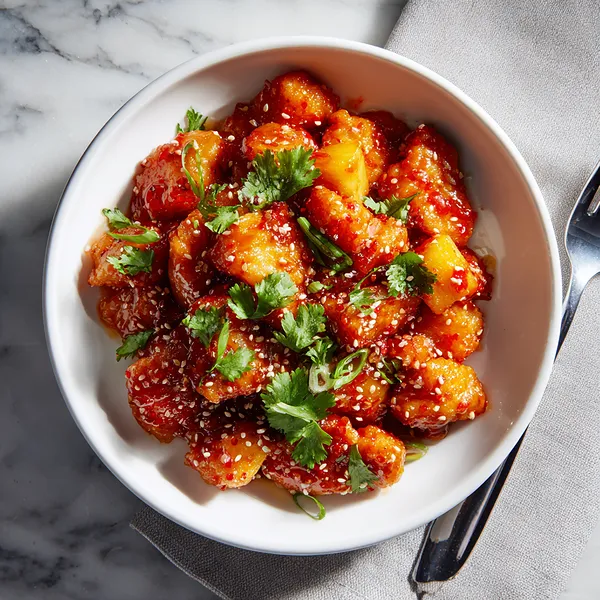
I remember the first time I encountered really good sweet and sour chicken – it was at a small family-run Chinese restaurant where everything was made fresh to order. That experience changed my entire perspective on what this dish could be. Instead of the heavy, overly sweet version I'd grown up with from takeout chains, this was balanced, flavorful, and not swimming in thick gloppy sauce. When I started developing my own version at home, I knew I wanted to capture that same balance. The key, I discovered, was baking instead of deep frying, which keeps the chicken tender without adding unnecessary oil. The sauce is where the magic happens – that perfect balance of sweet and tangy that coats everything but doesn't drown it. Adding fresh pineapple chunks instead of just using canned adds so much more flavor and texture. The bell peppers bring color and a subtle sweetness that complements the sauce beautifully. And those fresh herbs on top? That was my own addition, inspired by Vietnamese cuisine, and it completely elevates the dish with a fresh, bright note that cuts through the richness.
Why I love this recipe
What I love most about this recipe is how it proves that homemade can be better than takeout, without requiring any special skills or hard-to-find ingredients. The baking method means I can prep everything, pop it in the oven, and have time to make rice and set the table instead of standing over a hot stove. The flavors are customizable too – if you like it sweeter, add more sugar; tangier, increase the vinegar. The texture of the baked chicken is something special – it stays incredibly tender and juicy, never dry like deep-fried versions can sometimes be. I also appreciate how it looks just as impressive as it tastes. Those vibrant colors – the golden pineapple, bright red peppers, glossy sauce, and fresh green herbs – make it a showstopper on the dinner table. It's become my go-to recipe when I want to impress guests without spending hours in the kitchen. And the leftovers? They're even better the next day when all those flavors have had time to meld together. This recipe has saved me countless times when I'm craving something special but don't want the hassle or expense of ordering out.
What You Need From Your Kitchen
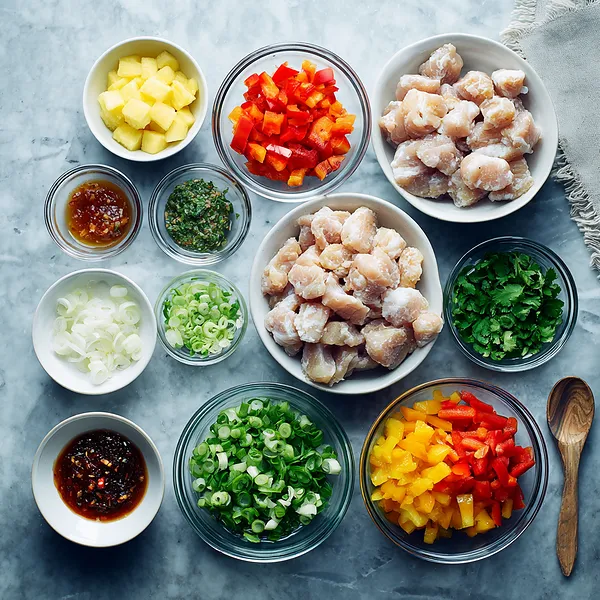
- Chicken breasts: Cut into uniform 1-inch chunks and pat dry before mixing with sauce
- Fresh pineapple: Cut into bite-sized chunks about the same size as the chicken pieces
- Red bell peppers: Remove seeds and cut into 1-inch pieces for even cooking
- Sweet and sour sauce: Use store-bought or homemade as the base of your glaze
- Cornstarch: Mix with water to create a slurry that thickens the sauce as it bakes
- Fresh cilantro: Roughly chop and use as a fresh garnish before serving
- Green onions: Slice thinly on the diagonal for garnish
Let's Make These Together
- Prep Your Ingredients
- Start by preheating your oven and gathering all your ingredients. Cut the chicken into uniform chunks and prep your vegetables. Having everything ready before you start mixing makes the process smooth and stress-free. The key to success is making sure all your chicken pieces are about the same size so they cook evenly.
- Create the Perfect Sauce
- Whisk together all your sauce ingredients in a large bowl. The cornstarch slurry is crucial here – it transforms a thin sauce into that gorgeous glossy coating you see in restaurants. Make sure there are no lumps in your cornstarch mixture before adding it to the sauce. The combination of sweet and sour sauce, ketchup, vinegar, and honey creates the perfect balance of flavors.
- Coat Everything Generously
- Add your chicken, pineapple, and bell peppers to the sauce and toss until every piece is completely coated. Don't be shy with the mixing – you want that sauce on everything. The pineapple will release some juice as it bakes, which adds even more flavor to the sauce.
- Bake to Perfection
- Spread everything on your prepared baking sheet in a single layer. Remember to stir halfway through baking – this ensures even cooking and prevents any pieces from sticking. As it bakes, the sauce will thicken and caramelize, creating that irresistible sticky coating. Watch for the chicken to reach 165°F internally.
- Finish with Fresh Garnishes
- The fresh cilantro, green onions, and sesame seeds aren't just for looks – they add a fresh, bright contrast to the rich, sweet sauce. Sprinkle them on right before serving for the best flavor and visual appeal. Serve immediately while everything is hot and the sauce is at its glossiest.
 pin it
Switch Things Up
I first made this recipe on a rainy Tuesday when I was craving Chinese takeout but didn't want to leave the house. I had some chicken breasts in the fridge and remembered seeing a can of pineapple in the pantry. Instead of frying, I decided to bake everything to keep things lighter and easier. The result? Better than any takeout I'd ever ordered. The chicken stayed so tender, and the pineapple got these amazing caramelized bits that added incredible depth. Now, whenever someone in my family requests Chinese food, I head straight to the kitchen instead of reaching for my phone. The aroma while it bakes fills the entire house with this sweet, tangy scent that has everyone gathering in the kitchen asking "is it ready yet?" I love how the sauce thickens and gets glossy, coating every piece perfectly.
Perfect Pairings
This sweet and sour chicken is incredibly versatile when it comes to pairings. Serve it over steamed jasmine rice or brown rice to soak up all that delicious sauce, or try it with fried rice for a complete Chinese-inspired meal. Crispy vegetable egg rolls or spring rolls make excellent appetizers, and a side of stir-fried broccoli or bok choy adds extra vegetables to the plate. For a complete feast, pair it with some pot stickers and hot and sour soup as starters. If you want to lighten things up, serve it over cauliflower rice or zucchini noodles. A cold glass of iced green tea or a light lager beer complements the sweet and tangy flavors beautifully.
 pin it
Frequently Asked Questions
- → Can I use chicken thighs instead of breasts?
Absolutely! Chicken thighs work wonderfully in this recipe and stay even more tender and juicy. Just make sure to cut them into similar-sized chunks and check that they reach an internal temperature of 165°F.
- → Can I make this recipe in advance?
Yes, you can prep the entire dish up to 4 hours ahead. Combine all ingredients except garnishes, cover tightly, and refrigerate. When ready to cook, let it sit at room temperature for 15 minutes, then bake as directed, adding a few extra minutes if needed.
- → What can I substitute for fresh pineapple?
Canned pineapple chunks work perfectly! Just make sure to drain them very well and pat them dry with paper towels to remove excess moisture. You can also use frozen pineapple chunks, thawed and drained.
- → How do I store and reheat leftovers?
Store leftovers in an airtight container in the refrigerator for up to 3 days. Reheat in the microwave for 1-2 minutes or in a 350°F oven for 10-15 minutes until warmed through. The sauce may thin slightly when reheated, which is normal.
- → Can I add other vegetables to this dish?
Definitely! Snap peas, broccoli florets, carrots, or onions all work well. Just cut them into similar-sized pieces and add them with the other vegetables. Keep in mind that harder vegetables like carrots might need slightly longer cooking time.
- → Is this recipe spicy?
No, this recipe is sweet and tangy but not spicy at all. If you'd like to add some heat, stir in 1/4 to 1/2 teaspoon of red pepper flakes to the sauce, or drizzle with sriracha before serving.
Conclusion
This Baked Sweet and Sour Chicken brings all the flavors you love from your favorite takeout, but made healthier in your own oven. The combination of tender chicken, juicy pineapple, and crisp bell peppers coated in that irresistible sticky-sweet sauce is absolutely addictive. It's the kind of recipe that looks impressive but is surprisingly simple to pull off, making it perfect for both weeknight dinners and when you're entertaining guests. Serve it over fluffy rice or noodles, and watch it disappear!