
 pin it
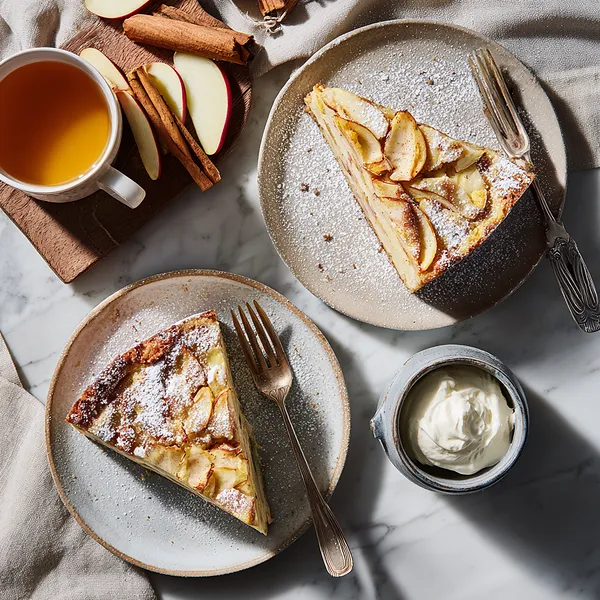
I first encountered a version of this Apple Pie Cake at a friend's cottage in the English countryside, where desserts are serious business. My friend's grandmother had been making something similar for decades, inspired by Jamie Oliver's approach to rustic, unfussy baking that somehow always looks spectacular. What struck me immediately was how this dessert managed to be both homey and elegant at the same time. The genius of this recipe lies in its simplicity – you're essentially creating a very apple-heavy cake where the fruit becomes the star. Unlike traditional apple pie where the apples are encased in pastry, here they're suspended in a tender, buttery cake batter that bakes up golden and beautiful. The layers of thinly sliced apples create this stunning visual effect when you cut into it, revealing rings and ribbons of caramelized fruit. The cinnamon adds warmth without overwhelming the delicate apple flavor, and the touch of brown sugar creates lovely caramelized edges. What I love most is the texture contrast – you get the soft, moist cake surrounding tender apple slices that have concentrated in flavor during baking. It's comfort food elevated, the kind of dessert that makes you want seconds even when you're completely full. Every bite is a perfect balance of fruit, cake, and spice.
Why I love this recipe
I love this recipe because it's forgiving, impressive, and absolutely delicious – the holy trinity of baking in my book. Unlike fussy layer cakes or temperamental pastries, this Apple Pie Cake is incredibly forgiving. If your apple slices aren't perfectly uniform, it still looks beautiful. If you accidentally add a bit more cinnamon, it just tastes more cozy. The batter is straightforward and nearly impossible to mess up. But here's the real magic: despite being so easy, everyone who sees it thinks you're a professional baker. The towering height, the layers of apples visible through each slice, the golden-brown top dusted with powdered sugar – it looks like something from a fancy bakery window. I also love how versatile it is. Make it for a formal dinner party, and it holds its own as an elegant dessert. Make it for a casual coffee with friends, and it feels perfectly at home. The flavors are nostalgic and comforting without being boring – it's familiar enough that everyone loves it, but special enough that it feels like a treat. Plus, it keeps incredibly well, so you can enjoy it for several days (if it lasts that long!). The aroma alone is worth making it – your house will smell absolutely amazing. It's become my go-to recipe when I want to show someone I care without spending all day in the kitchen.
What You Need From Your Kitchen
- Granny Smith Apples: Peel, core, and slice thinly, then toss with brown sugar and cinnamon
- All-Purpose Flour: Sift together with baking powder and cinnamon for even distribution
- Eggs: Beat with granulated sugar until light and fluffy for maximum volume
- Unsalted Butter: Melt and cool slightly before adding to the egg mixture
- Granulated Sugar: Whisk with eggs to create a light, airy base for the cake
- Brown Sugar: Toss with apple slices to encourage caramelization during baking
Let's Make These Together
- Prepare Your Workspace
- Start by preheating your oven to 350°F and preparing your springform pan with butter and parchment paper. Having everything ready before you start mixing makes the process smooth and stress-free. Get your apples peeled, cored, and sliced, then toss them with brown sugar and cinnamon in a large bowl.
- Create the Batter
- In a large bowl, beat your eggs and sugar together until the mixture becomes pale and fluffy – this incorporates air and creates a lighter cake. Add your melted butter and vanilla, mixing well. In a separate bowl, combine your dry ingredients, then gently fold them into the wet mixture. The key here is not to overmix; you want to combine everything just until the flour disappears.
- Build the Layers
- This is where the magic happens! Pour a third of your batter into the prepared pan and spread it evenly. Now arrange a generous layer of those cinnamon-sugar apples on top. Add another third of batter, more apples, and finish with the final third of batter and a beautiful top layer of apples arranged in overlapping circles. The more apples you add, the more impressive your cake will look when sliced.
- Bake to Perfection
- Slide your cake into the preheated oven and let it bake for about 70-75 minutes. Your kitchen will start smelling absolutely amazing after about 30 minutes. Keep an eye on the top – if it's browning too quickly, cover it loosely with foil. The cake is ready when a toothpick comes out clean and the top is gloriously golden with caramelized apple edges.
- Cool and Finish
- This is the hardest part – waiting! Let the cake cool in the pan for 15-20 minutes so it sets properly. Then carefully release the springform ring, transfer to your prettiest serving plate, and dust generously with powdered sugar. Serve it warm with a dollop of whipped cream and watch everyone's faces light up when they take that first bite.
 pin it
Switch Things Up
I remember the first time I made this Apple Pie Cake – it was for my sister's birthday brunch, and I was nervous about whether the apples would stay in place or if the whole thing would collapse. But when I pulled it out of the oven, I literally gasped. The apples had caramelized beautifully, creating these gorgeous golden layers throughout the cake. The smell was intoxicating – cinnamon, butter, and baked apples filled the entire house. When I cut the first slice and saw all those apple layers holding perfectly, I felt like a baking champion. My sister couldn't stop talking about it, and three people asked for the recipe before we even finished eating. Now I make it every fall, and it's become my signature dessert. Sometimes I add a handful of raisins or swap half the apples for pears, and it's just as delicious. The best part? It actually tastes even better the next day when all the flavors have melded together. Every time I make it, I'm reminded that sometimes the most impressive dishes are the ones that feel like home.
Perfect Pairings
This Apple Pie Cake pairs beautifully with a variety of accompaniments that complement its warm, spiced flavors. For a classic approach, serve it with vanilla ice cream or freshly whipped cream – the cold, creamy contrast against the warm cake is absolutely divine. A drizzle of salted caramel sauce takes it to the next level, adding a sophisticated sweetness that enhances the caramelized apples. For beverages, pair it with a hot cup of spiced chai tea, rich coffee, or even a glass of dessert wine like late harvest Riesling. If you're serving it for brunch, it's wonderful alongside Greek yogurt and a drizzle of honey. For a fall-themed spread, consider serving it with sharp cheddar cheese (trust me on this one – the sweet and savory combination is magical), toasted pecans, or a warm apple cider. It also makes an excellent addition to a Thanksgiving dessert table alongside pumpkin pie and pecan tarts.
 pin it
Frequently Asked Questions
- → Can I use a regular cake pan instead of a springform?
While a springform pan makes removing the cake much easier, you can use a regular 9-inch round cake pan. Just make sure to grease it very well and line the bottom with parchment paper. You'll need to invert it onto a plate to remove it, which can be tricky with all those apples. A springform is really worth the investment for this recipe!
- → Why did my cake sink in the middle?
A sunken center usually means the cake wasn't fully baked. Because this cake is so dense with apples, it needs the full baking time. Make sure you're checking with a toothpick in multiple spots – it should come out clean or with just a few moist crumbs. Also, avoid opening the oven door too frequently during baking, as temperature fluctuations can cause sinking.
- → Can I make this cake ahead of time?
Absolutely! This is actually one of those magical desserts that tastes even better the next day. The flavors meld together beautifully and the texture becomes more uniform. You can make it up to 2 days ahead and store it covered at room temperature, or refrigerate it for up to 5 days. Just bring it to room temperature before serving, or warm individual slices in the microwave for 15-20 seconds.
- → What other apples can I use besides Granny Smith?
Granny Smiths are ideal because they're tart and hold their shape well during baking. However, you can experiment with other firm apple varieties like Honeycrisp, Braeburn, or Pink Lady. I'd avoid very soft apples like Red Delicious or McIntosh as they'll turn mushy. A combination of Granny Smith and Honeycrisp gives you a nice balance of tart and sweet.
- → My apples turned brown while I was preparing the batter – is that okay?
Some browning is totally fine and won't affect the final cake at all since everything gets baked. If you want to prevent it, you can toss your apple slices with a little lemon juice along with the cinnamon and brown sugar. But honestly, once it's all baked together, you won't notice any difference!
- → Can I freeze this cake?
Yes! This cake freezes beautifully. Let it cool completely, wrap it tightly in plastic wrap and then aluminum foil, and freeze for up to 3 months. Thaw it overnight in the refrigerator, then bring to room temperature before serving. I don't recommend freezing individual slices as they don't thaw as evenly, but the whole cake works great.
Conclusion
This Apple Pie Cake is everything you love about fall baking wrapped into one spectacular dessert. It's the perfect balance between the comforting familiarity of apple pie and the celebratory nature of a towering cake. Whether you're hosting a dinner party, celebrating a special occasion, or just treating yourself on a lazy Sunday afternoon, this cake delivers every time. The beauty of this recipe is that it looks incredibly impressive but comes together with simple ingredients and straightforward steps. Serve it warm with a scoop of vanilla ice cream or a dollop of fresh whipped cream, and watch it disappear!