
 pin it
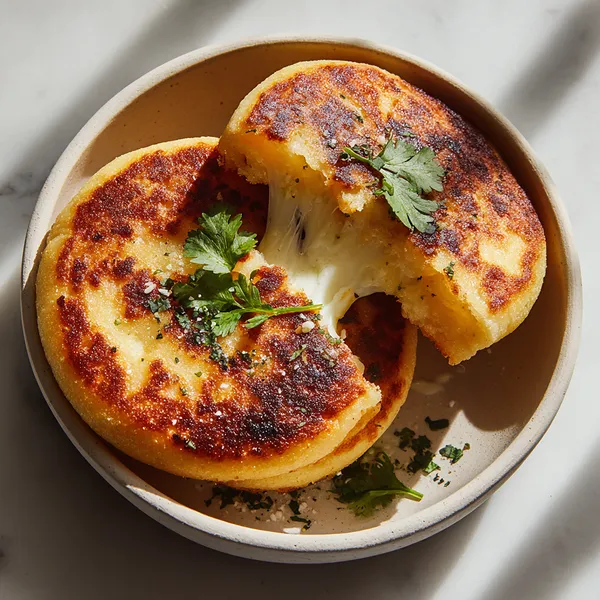
I first encountered arepas at a tiny Venezuelan family restaurant where a woman was pressing and cooking them entirely by hand on a flat griddle the size of a table. I remember watching the process — the way she shaped the dough with practiced, confident hands, pressed it flat with her palm, then laid it on the griddle without a second glance. A few minutes later she split one open and stuffed it with cheese that immediately began melting from the residual heat. I had never eaten one before and I didn't know what to expect. The outside was firm and slightly crispy, almost like a corn cake, and the inside was soft and doughy and warm, with pockets of melted cheese threaded through every bite. It tasted like something I had always known but never had. I asked her what was in it and she laughed and said just corn, water, salt, and cheese. Four ingredients. I went home and made them that same weekend. They have been a permanent part of my kitchen ever since, always there when I want something fast, filling, and deeply satisfying.
Why I love this recipe
I love this recipe because it is completely unpretentious and yet it delivers one of the most satisfying eating experiences I know. There is something almost meditative about making the dough — mixing the warm water into the cornmeal, feeling it come together under your hands, shaping each round. It requires no mixer, no oven, no special tools. Just your hands and a pan. And then that moment when you split an arepa open and the cheese pulls — that never gets old, no matter how many times you've made them. I also love how forgiving these are. Too thick? They just need a few extra minutes. Not enough cheese? Add more. The dough tells you when it's right by feel, and once you've made them a couple of times, your hands just know. That kind of intuitive, hands-on cooking is my favourite kind.
What You Need From Your Kitchen
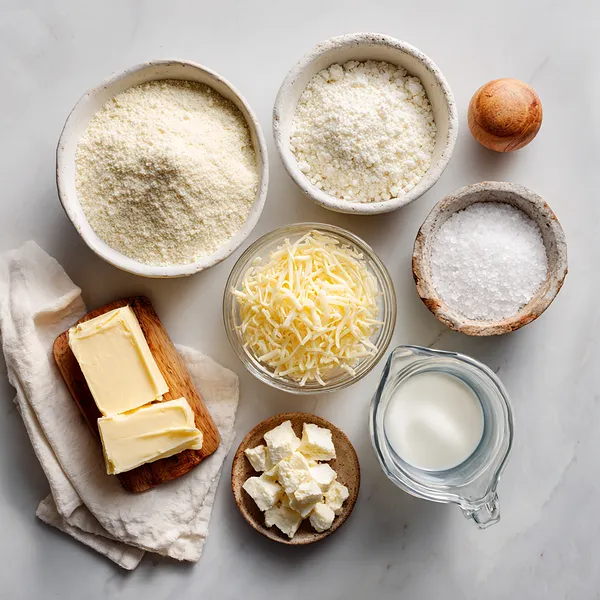
- Masarepa (Pre-cooked White Cornmeal): Mixed with warm water and butter to form a smooth, pliable dough that is the base and shell of every arepa
- Low-Moisture Mozzarella: Shredded and stuffed inside the arepa dough, melting into long dramatic cheese pulls as the arepa cooks through
- Queso Blanco: Cubed and layered with the mozzarella inside for a saltier, creamier interior with authentic Venezuelan flavor
- Unsalted Butter: Worked into the dough for richness and also used in the pan to create that golden, amber-toasted crust
- Warm Water: The hydrating element that activates the cornmeal and brings the dough together — temperature matters, use warm not cold
Let's Make These Together
- Mix and rest the cornmeal dough
- Pour the masarepa and salt into a large bowl, then gradually add warm water while mixing with your hands until a smooth, soft dough forms. Work in the softened butter and knead briefly until the texture is uniform and crack-free. Cover with a towel and let it rest for 5 minutes — this short rest makes shaping dramatically easier.
- Portion and flatten each dough disk
- Divide the rested dough into 6 equal balls. Flatten each one between your palms to about half an inch thick and 3 to 4 inches wide. Check the edges — if they crack, wet your fingertips and smooth them out before proceeding. Smooth edges mean a tight seal around the cheese.
- Stuff generously with cheese
- Thin one disk slightly in your palm and place a big tablespoon of mozzarella and a couple of queso blanco cubes right in the center. Pull the edges up over the cheese and pinch firmly all the way around until completely sealed. Reshape into a smooth disk. No cheese should be visible on the surface — any gap will leak during cooking.
- Toast low and slow in a hot pan
- Heat your skillet over medium heat with a little butter or oil until the surface shimmers. Lay the arepas in without overcrowding and leave them completely alone for 5 to 6 minutes. Resist any urge to move them. You want a deep golden crust to build on the bottom before you flip. When the edges look set and dry, it is time.
- Flip, finish, rest and pull
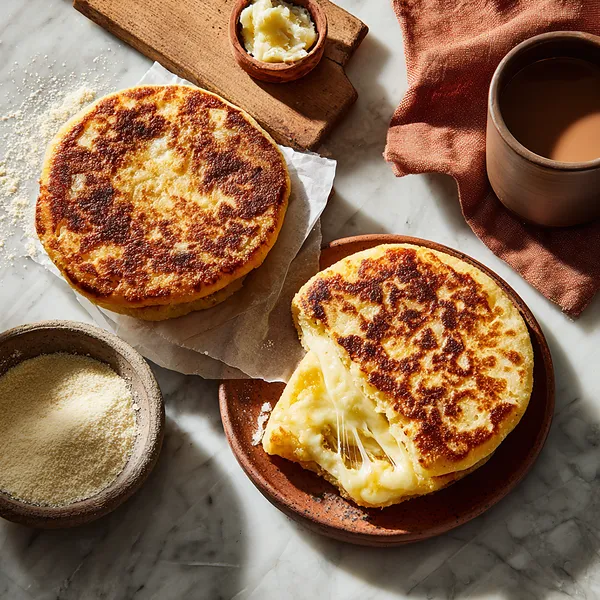
- Flip carefully with a wide spatula and cook the second side for another 5 to 6 minutes until evenly golden. Tap one gently — it should sound slightly hollow. Remove from the pan, rest for 2 minutes, then split open and watch that cheese pull happen in real time. Add a pat of butter and serve immediately.
 pin it
Switch Things Up
I made these for the first time after watching a street food video and becoming completely obsessed with the cheese pull. I didn't have masarepa so I ordered it online and waited three days. When the package finally arrived I made them at 10pm on a weeknight, standing at the stove in my pajamas. The first one came out slightly too thick. The second one was perfect — that golden crust, the cheese melting at the edges. I ate four of them straight off the pan before I even thought about plating them. They have been in my regular rotation ever since.
Perfect Pairings
Arepas con Queso pair effortlessly with a steaming mug of Colombian hot chocolate — the slight bitterness of the chocolate is a classic contrast to the salty, buttery corn cakes. For a full breakfast spread, serve alongside scrambled eggs, ripe avocado slices, and a drizzle of honey on the side. A simple tomato and onion curtido salsa adds freshness and acidity that cuts through the richness of the cheese beautifully. For a heartier meal, serve with slow-cooked black beans and a squeeze of lime.
 pin it
Frequently Asked Questions
- → What is masarepa and where can I find it?
Masarepa is pre-cooked white cornmeal, the essential ingredient for arepas. It is not the same as masa harina, polenta, or regular cornmeal — those will not work. The most common brand is P.A.N., a yellow and red bag widely available in Latin grocery stores, international supermarkets, and online. Some large mainstream supermarkets now stock it in the international foods aisle.
- → Can I use a different cheese besides mozzarella?
Yes — any good melting cheese works beautifully. Traditional options include queso de mano, queso telita, or queso llanero. Outside of Latin markets, low-moisture mozzarella is the best substitute for the stretch factor. Monterey Jack, Oaxacan cheese, or a mild provolone also melt well. Avoid aged hard cheeses like Parmesan as they won't produce the iconic pull.
- → Why are my arepas cracking when I shape them?
Cracking means the dough is too dry. Add warm water one tablespoon at a time, kneading after each addition until the dough is smooth and pliable. You can also wet your hands slightly before shaping to help smooth out any surface cracks. The dough should feel like soft playdough — firm enough to hold its shape but soft enough to flatten without breaking.
- → Can I bake arepas instead of pan-frying them?
Absolutely. After shaping and stuffing, bake on a parchment-lined tray at 375°F (190°C) for 20–25 minutes, flipping once halfway through. The crust won't be quite as golden and crispy as the pan version, but the cheese inside will melt just as well. For the best of both worlds, pan-sear for 3 minutes per side first, then finish in the oven for 10 minutes.
- → Can I make the dough ahead of time?
Yes, the dough keeps well. Wrap it tightly in plastic wrap or store in an airtight container in the refrigerator for up to 24 hours. When ready to use, let it come back to room temperature for 15 minutes and knead briefly to restore its pliability. You can also shape and stuff the arepas in advance and refrigerate them uncooked for up to 8 hours before pan-frying.
- → How do I reheat leftover arepas?
The best way to reheat arepas is in a dry skillet over medium heat for 2 to 3 minutes per side — this restores the crispy crust beautifully. Avoid the microwave as it makes the outside soft and the texture suffers significantly. An air fryer at 350°F for 5 minutes also works very well and gives close to fresh results.
Conclusion
Arepas con Queso are one of those recipes that prove the most satisfying food is often the simplest. With barely five ingredients and one pan, you get something that looks and tastes extraordinary — especially that moment when the cheese pulls apart. Once you master the basic dough, you can fill these with anything, but honestly, the plain cheese version never gets old.