
 pin it
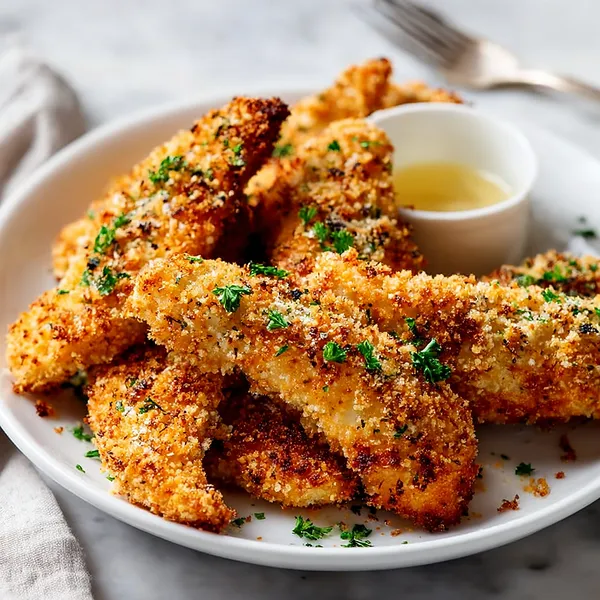
I discovered the magic of baked chicken tenders during a time when I was trying to eat healthier but couldn't give up my love for crispy, crunchy chicken. I'd always associated that perfect golden crust with deep frying, so I was skeptical when I first saw a baked version. But the moment I took my first bite, I was completely converted. The panko breadcrumbs create this incredibly light, crispy coating that somehow rivals anything you'd get from a fryer. What I love most is the process – there's something so satisfying about setting up your breading station with flour, egg, and seasoned panko, then watching each tender get its golden armor. The chicken stays so moist inside because you're not overcooking it to achieve that crunch. When they come out of the oven with that gorgeous golden-brown color, and you hear that satisfying crunch with the first bite, you know you've nailed it. I've made these so many times now that I can prep them almost on autopilot, which makes them perfect for those nights when you want something delicious but don't have the energy for anything complicated. They're honestly one of those recipes that makes you feel like a culinary genius even though they're surprisingly simple.
Why I love this recipe
What I truly love about this recipe is how it delivers all the satisfaction of fried chicken without any of the hassle or guilt. There's no messy oil splatters to clean up, no worrying about the perfect frying temperature, and no heavy, greasy feeling afterward. The panko breadcrumbs are the real hero here – they create such an incredible texture that's actually lighter and crispier than traditional breading. I also appreciate how adaptable this recipe is; you can season the coating any way you like, making it as simple or as adventurous as your mood dictates. It's become my ultimate crowd-pleaser because literally everyone loves these tenders – picky kids, health-conscious friends, and comfort-food enthusiasts alike. The fact that they bake in just 20 minutes means I can have dinner on the table faster than I could get takeout delivered. Plus, they're perfect for meal prep; I often make a double batch and keep them in the fridge for quick lunches throughout the week. Whether you're serving them as a main course, appetizer, or protein-packed snack, these tenders never disappoint. They've honestly transformed the way I think about healthy cooking – proving that you don't have to sacrifice flavor or texture to make better choices.
What You Need From Your Kitchen
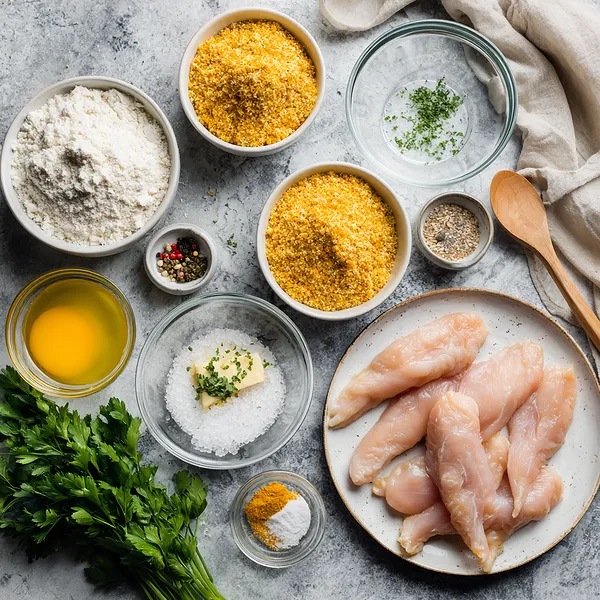
- Chicken tenderloins: Pat dry before breading to help the coating stick better and achieve maximum crispiness
- Panko breadcrumbs: Mix with olive oil before coating for an extra crispy, golden texture that mimics fried chicken
- Eggs: Beat well to create an even coating that helps the panko adhere perfectly to the chicken
- All-purpose flour: Use as the first dredging step to create a dry surface for the egg wash to cling to
- Garlic powder and paprika: Blend into the panko mixture for savory depth and a beautiful golden color
- Fresh parsley: Chop finely and sprinkle over the finished tenders for a pop of color and fresh flavor
Let's Make These Together
- Prepare Your Workspace
- Start by preheating your oven to 425°F and lining your baking sheet with parchment paper. Setting up your breading station with three bowls in a row makes the process smooth and efficient. Pat your chicken tenderloins dry with paper towels – this crucial step ensures the breading sticks properly and gets crispy. Having everything organized before you start breading will make the whole process feel effortless.
- Create the Perfect Coating
- In your three bowls, set up your breading station: flour in the first, beaten eggs in the second, and your seasoned panko mixture in the third. The secret to restaurant-quality crispiness is mixing olive oil into your panko breadcrumbs. This helps them brown beautifully and creates that irresistible crunch. Don't skip the seasonings in the panko – garlic powder and paprika add so much flavor and give the tenders that gorgeous golden color.
- Bread Each Tender Carefully
- Working with one tender at a time, gently coat it in flour, shaking off any excess. Dip it into the egg wash, letting the extra drip back into the bowl. Finally, press it firmly into the panko mixture, making sure every surface is well coated. Place each breaded tender on your prepared baking sheet with a little space between them. Taking your time with this step ensures even, crispy results.
- Bake to Golden Perfection
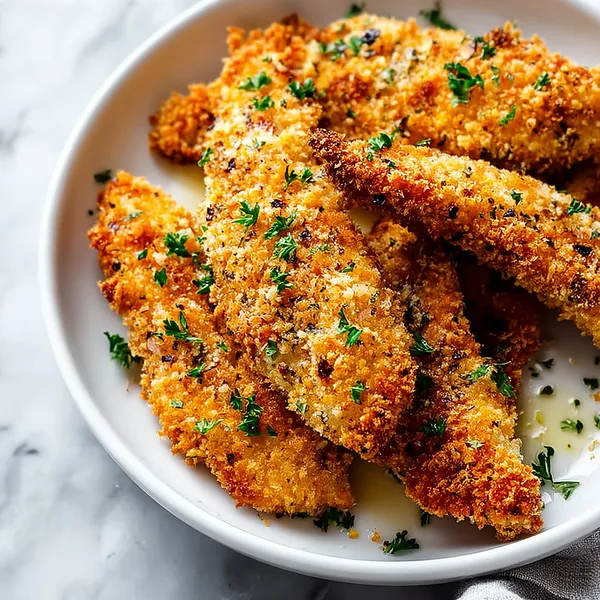
- Slide your tray into the preheated oven and bake for about 20 minutes, flipping the tenders halfway through. You'll know they're done when they're gorgeously golden brown and the internal temperature reads 165°F. The aroma of those crispy, seasoned breadcrumbs will fill your kitchen and make everyone eager for dinner. Let them rest for just a couple of minutes before serving to let the coating set perfectly.
 pin it
Switch Things Up
I still remember the first time I made these for my nephew's birthday party. I was nervous because kids can be brutally honest food critics, but I didn't want to spend hours in front of a deep fryer. I decided to give baked tenders a shot, and I'm so glad I did. The kids devoured them, and the adults kept sneaking extras when they thought no one was looking. One parent even asked if I'd ordered them from a restaurant! Since then, I've made these tenders countless times – for busy weeknights, meal prep Sundays, and even as a quick protein option when friends drop by unexpectedly. I've experimented with different seasonings, from Italian herbs to Cajun spices, and they always turn out amazing. The key is really in that panko coating and making sure your oven is properly preheated. Now it's become my go-to recipe whenever someone asks for a foolproof chicken dish.
Perfect Pairings
These crispy chicken tenders pair beautifully with classic sides like crispy oven-baked fries or sweet potato wedges for that full comfort food experience. For a lighter option, serve them alongside a fresh garden salad with ranch dressing or coleslaw for a satisfying crunch contrast. Mac and cheese makes an indulgent pairing that kids and adults alike will love. Don't forget the dipping sauces – honey mustard, barbecue sauce, ranch, or marinara all complement the golden crust perfectly. For a complete meal, add some steamed broccoli or roasted vegetables to round out your plate with color and nutrition.
 pin it
Frequently Asked Questions
- → Can I use chicken breasts instead of tenderloins?
Absolutely! You can slice chicken breasts into strips about 1 inch wide. Just keep in mind that thicker pieces may need a few extra minutes of cooking time. Always check that the internal temperature reaches 165°F to ensure they're fully cooked.
- → How do I keep the tenders crispy if I'm not serving them immediately?
Place the baked tenders on a wire rack set over a baking sheet and keep them in a warm oven (around 200°F) until you're ready to serve. This prevents the bottoms from getting soggy while keeping them warm. Avoid covering them with foil as this traps steam and makes them lose their crispiness.
- → Can I make these gluten-free?
Yes! Simply substitute the all-purpose flour with a gluten-free flour blend and use gluten-free panko breadcrumbs (or crushed gluten-free cornflakes for a different texture). The rest of the recipe remains exactly the same.
- → Can these be frozen for later?
Definitely! You can freeze them either before or after baking. To freeze unbaked tenders, arrange breaded tenders on a baking sheet and freeze until solid, then transfer to a freezer bag. Bake from frozen, adding 5-7 minutes to the cooking time. For cooked tenders, let them cool completely, freeze on a baking sheet, then store in freezer bags for up to 3 months.
- → What's the best way to reheat leftovers?
To maintain that crispy texture, reheat leftovers in the oven or toaster oven at 375°F for 8-10 minutes rather than using the microwave. You can also use an air fryer at 375°F for 5-6 minutes for perfectly crispy results.
- → Why did my coating fall off during baking?
This usually happens if the chicken wasn't dry enough before breading or if the coating wasn't pressed firmly into the chicken. Make sure to pat the chicken very dry with paper towels and really press that panko mixture onto each tender. Also, avoid moving them around too much once they're on the baking sheet.
Conclusion
These crispy baked chicken tenders prove that healthy doesn't have to mean boring. With their golden, crunchy exterior and juicy interior, they're everything you love about fried chicken without the guilt or mess. They're incredibly versatile – serve them as a main dish with your favorite sides, slice them over salads, tuck them into wraps, or set them out as the ultimate party appetizer. The simple seasoning lets the chicken shine while the panko creates that addictive crunch everyone craves. Best of all, they're ready in about 30 minutes and use ingredients you probably already have in your pantry.